


GS39 Whirlpool Range - Overview
Models starting with GS39
Click on the best match to narrow your results.
- GS395LEGB0 Whirlpool Range (Freestanding, Gas)
- GS395LEGB1 Whirlpool Range (Freestanding, Gas)
- GS395LEGB3 Whirlpool Range (Freestanding, Gas)
- GS395LEGB4 Whirlpool Range (Freestanding, Gas)
- GS395LEGB5 Whirlpool Range (Freestanding, Gas)
- GS395LEGB6 Whirlpool Range (Freestanding, Gas)
- GS395LEGB7 Whirlpool Range (Freestanding, Gas)
- GS395LEGQ0 Whirlpool Range (Freestanding, Gas)
- GS395LEGQ1 Whirlpool Range (Freestanding, Gas)
- GS395LEGQ3 Whirlpool Range (Freestanding, Gas)
- GS395LEGQ5 Whirlpool Range (Freestanding, Gas)
- GS395LEGQ6 Whirlpool Range (Freestanding, Gas)
- GS395LEGQ7 Whirlpool Range (Freestanding, Gas)
- GS395LEGT3 Whirlpool Range (Freestanding, Gas)
- GS395LEGT4 Whirlpool Range (Freestanding, Gas)
- GS395LEGT5 Whirlpool Range (Freestanding, Gas)
- GS395LEGT6 Whirlpool Range (Freestanding, Gas)
- GS395LEGT7 Whirlpool Range (Freestanding, Gas)
- GS395LEGZ0 Whirlpool Range (Freestanding, Gas)
- GS395LEGZ1 Whirlpool Range (Freestanding, Gas)
- GS395LEGZ3 Whirlpool Range (Freestanding, Gas)
- GS395LEGZ4 Whirlpool Range (Freestanding, Gas)
- GS395LEHS0 Whirlpool Range (Freestanding, Gas)
- GS395LEHS4 Whirlpool Range (Freestanding, Gas)
- GS395LEHS5 Whirlpool Range (Freestanding, Gas)
- GS395LEHS6 Whirlpool Range (Freestanding, Gas)
- GS395LEHS7 Whirlpool Range (Freestanding, Gas)
Keep searches simple, eg. "belt" or "pump".
 – Part Number: 8009")
Refrigerator Light Bulb (40w)
PartSelect #: PS884734
Manufacturer #: 8009
This an authentic OEM 40-Watt replacement light bulb, used in a number of household appliances. It is specially designed to withstand extreme temperatures, which is why these replacement bulbs are mos...
$17.80
In Stock

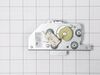
Range Control Knob
PartSelect #: PS11745570
Manufacturer #: WP8273103
This is a control knob, sometimes known as a valve knob, for a range, oven, or stove. It allows you to control the temperature of the surface burner on your appliance. It is made of plastic and is bla...
$19.95
In Stock

Range Torx Screw
PartSelect #: PS11741257
Manufacturer #: WP3368921
7-18 x 3/4-Inch - sold individually.
$6.95
In Stock

Refrigerator Screw
PartSelect #: PS12349731
Manufacturer #: W11233072
This is a multi-use and multi-appliance screw. It can be used on a microwave, refrigerator, range/oven, air conditioner, dehumidifier, washer, or dryer. The measurements of this screw are 8 x 1/2 inch...
$20.95
In Stock

Range Control Knob
PartSelect #: PS11745571
Manufacturer #: WP8273104
This knob accepts a D-shaped shaft. Sold individually.
$19.95
In Stock

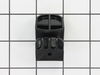
Range Rear Drawer Glide
PartSelect #: PS890554
Manufacturer #: WP8053334
This OEM replacement rear drawer glide supports the storage drawer on your range, and allows the drawer to open and close with ease. If your storage drawer will not open or close, or catches and stick...
$10.45
In Stock

Range Rack
PartSelect #: PS11751295
Manufacturer #: WPW10256908
This oven rack is a piece for your range. The oven rack is sold individually and is silver in color. The function of this part is to provide a balanced and flat surface for your cookware to sit inside...
$78.38
In Stock

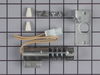
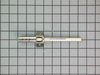
Range Surface Burner Spark Igniter
PartSelect #: PS11746068
Manufacturer #: WP8523793
This Whirlpool Surface Burner Spark Igniter is a genuine, OEM part that readily ignites the surface burner on your range. Specially designed for perfect compatibility with certain Whirlpool, KitchenAi...
$33.95
In Stock

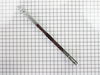
Range Spark Igniter
PartSelect #: PS11770331
Manufacturer #: W11032529
This is the replacement spark igniter or surface burner igniter for your range. This igniter has a blue tube, but the tube can come in a variety of colors, and still do the same job. The spark igniter...
$43.00
In Stock

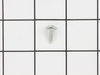
Range Screw
PartSelect #: PS11738704
Manufacturer #: WP179051
Sold individually. Lock washers are used with screws when vibration from an appliance may cause the screw to loosen. Lock washers are also used in the electrical components of an appliance to ensure ...
$8.37
In Stock

Range Igniter Screw
PartSelect #: PS11745563
Manufacturer #: WP8273062
This screw is sold individually.
$7.95
In Stock

Range Front Drawer Glide
PartSelect #: PS11740957
Manufacturer #: WP3195546
Sold individually.
$9.95
In Stock
Common Symptoms of models starting with GS39
[Viewing 9 of 9]Will Not Start
Fixed by
these parts
these parts


Show All
Gas igniter glows, but will not light
Fixed by
these parts
these parts

Show All
Little to no heat when baking
Fixed by
these parts
these parts

Show All
Door won’t close
Fixed by
these parts
these parts

Show All
Element will not heat
Fixed by
these parts
these parts
Show All
Little to no heat when broiling
Fixed by
these parts
these parts
Show All
Oven not heating evenly
Fixed by
these parts
these parts

Show All
Door won’t open after self cleaning cycle
Fixed by
these parts
these parts

Show All
Oven is too hot
Fixed by
these parts
these parts
Show All
")


Keep searches simple. Use keywords, e.g. "leaking", "pump", "broken" or "fit".
oven wouldn't heat
My oven was misdiagnosed from an appliance repair company. They said my ignitors and spark module needed to be replaced. I did this myself and still nothing. The problem happened to be a defective gas valve.
First I unplugged the stove and shut off the gas supply. After I disconnected the flex hose and the 2 gas connections ... Read more behind the stove, I removed the 4 screws that held the valve to the back of the stove.
I went to the front of the appliance and pulled out the bottom drawer. This exposed the valve from the other side. I disconnected the electrical connections (3 colored wires) to the valve and removed it. I re-attached the new valve, putting everything back in reverse order. I made sure the 3 wires were reconnected correctly by labeling each one before disconnecting them. I made certain that my gas connections were sealed by using teflon tape and/or pipe sealant from the hardware store. I turned the shutoff valve back to the on position and checked for leaks. If I smelled gas I snugged it down a bit more until no gas smell was detected.
There was nothing wrong with the ignitors or the spark module. The stove failed to pre-heat and the "tick-tick" I used to hear when the stove was first turned on was nonexistent. What the so-called experts said would be hundreds of dollars to fix unded up being a $90 part.
Read less
Parts Used:

-
Ignatius from Hazelwood, MO
-
Difficulty Level:Easy
-
Total Repair Time:30 - 60 mins
-
Tools:Wrench (Adjustable)
99 of 111 people
found this instruction helpful.
Was this instruction helpful to you?
Thank you for voting!
mice had made nests in the insulation wrap in the range
I numbered every part. ex: 1 L., for first part removed left side. I used a magic marker to circle the holes and wrote the number of screws used on the part, set the srews in a separete place, so that I new where these screws went to. The cleanup was pretty time consuming, but I was able to keep my stove, when every repairman I called to
... Read more
fix my stove told me I was better off buying a new stove. ($600.00 stove 2 years old)Please Note: The insulation blanket needed for the entire stove is two pieces, the sides and top are one part # and the bottom and back, are another part #. I did not know this. I just purchased the top and sides. I got lucky, the back and bottom were still in good shape. So I guess I should have read the description of the part more carefully to see what it covers, before I ordered it. It took two people two hours to do the work, it was really nice to have an extra set of eyes, to remember what direction pieces of metal from the stove went. I would do it all over in a heart beat instead of buying a new stove.
Read less
Parts Used:

-
Wendy from Red Hook, NY
-
Difficulty Level:Easy
-
Total Repair Time:More than 2 hours
-
Tools:Screw drivers
114 of 174 people
found this instruction helpful.
Was this instruction helpful to you?
Thank you for voting!
The lower burner would not ignite.
First I removed the oven racks. Then I loosened the two screws in the back of the oven floor and figured out how to remove it. Then I loosened the two screws at the front of the diverter and, with some pushing and pulling and twisting, was able to get that to come out, too. Then I tried lighting the oven and noticed that the igniter wa
... Read more
s not glowing. When I saw that the upper (broiler) burner was working fine, I hoped that the problem was the lower igniter itself. I checked the wires and they seemed fine. I saw that two bolts held the igniter onto its bracket, so with a socket wrench (which size I got right on the first guess!) I removed those bolts and the igniter came loose. I found the connecter for the wires when I removed the drawer under the oven and was able to pull it apart easily. The igniter came out completely. There was nothing unusual about it, but I decided to take a chance and order a new one, hoping that replacing it would solve the problem. I put the rest of the oven together and waited. About three days later the part arrived (it was sent on a holiday; FedEx is soooo much better than USPS). I retraced the steps of taking the oven apart, put the two bolts into the new igniter to attach it to the bracket, and went back underneath behind the drawer to connect the wires. Then came the moment of truth: I tried turing on the oven. I held the button down to keep the light off, and after a few seconds I saw it: IT GLOWED!! It worked!! After yelling a satisfying "YEAH!!," I turned it off, put back the drawer, the diverter (more pulling and pushing and twisting), and the oven floor. Now it's all working perfectly and it took a very short time to fix. And a little luck that the problem was with such a simple part.
Read less
Parts Used:

-
Mark from Rego Park, NY
-
Difficulty Level:Easy
-
Total Repair Time:Less than 15 mins
-
Tools:Screw drivers, Socket set
80 of 87 people
found this instruction helpful.
Was this instruction helpful to you?
Thank you for voting!