Popular Sharp Parts

Your Price
$11.72
   In Stock
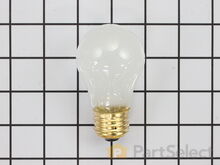
Sharp Light Bulb - 40W
★★★★★
★★★★★
66 Reviews
PartSelect Number PS884734
Manufacturer Part Number 8009
This an authentic OEM 40-Watt replacement light bulb, used in a number of household appliances. It is specially designed to withstand extreme temperatures, which is why these replacement bulbs are most often used to light the inside of refrigerators and ranges. It features a standard socket base, which means you simply unscrew the burnt-out bulb and screw in the replacement. Depending on the appliance you may require a screwdriver or nut driver to access the light bulb. We recommend you wear work gloves while handling this replacement part. It is constructed of glass and metal and is sold individually. Depending on the appliance and location of the bulb within it, you may want to consider disconnecting power and using a flashlight for easier access to unscrewing and re-screwing in your bulb during this repair.
Installation Instructions
judie from mays landing, NJ
interior drawers were off their rollers
pulled the washer out and replaces the top roller system on both sides and the replaced the weels and brackets on the bottom drwaer. however i had trouble putting the dish washer back correctly and had to call a repairman to adjust the dishwasher and alighn it to open and close properly. but i did do good inside. i feel it was easy and a success. thank you for having the supplies for us to attempt to repair it on our own. Read more...
Your Price
$38.37
   In Stock
Sharp Refrigerator Door Switch
★★★★★
★★★★★
85 Reviews
PartSelect Number PS12728638
Manufacturer Part Number W11384469
Door switch turns the light off when you close the door.
Fixes these symptoms
Installation Instructions
Clint from Rayville, MO
Lights inside refrigerator not working
I used a flat-head screwdriver to pop out the old light rocker switch. Then, I unplugged the wires, plugged them into the new light rocker switch, and then popped the new switch into the hole. That's it! Lights began working again. Read more...
Your Price
$27.62
   In Stock
Sharp Door Switch
★★★★★
★★★★★
35 Reviews
PartSelect Number PS12731166
Manufacturer Part Number W11396033
This light switch may also be known as a refrigerator door switch or a light switch kit, and is compatible with your refrigerator. The function of the refrigerator door switch is to turn on the light when your fridge door is open, and to make sure it is off when your refrigerator door is closed. The reason you would need to replace this part is if your light is not turning on when your door is open. For this repair, you will need a putty knife, and a small flat-blade screwdriver.
Fixes these symptoms
  • Ice maker not making ice
  • Ice maker won’t dispense ice
  • Light not working
  • See more...
Installation Instructions
Kevin from Beckley, WV
while closing the door, the light switch fouled, resulting in the switch breaking
I used a flat screwdriver and released the lock tab on the bottom of the light switch, and pried the switch out, being careful to not damage the plastic around the mounting place of the switch, unplugged wiring from old switch, plugged in the new one and pushed the new switch into place. Job finished light switch now working. Read more...
Your Price
$115.96
   In Stock
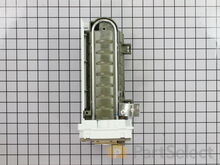
Sharp Replacement Ice Maker
★★★★★
★★★★★
153 Reviews
PartSelect Number PS2121513
Manufacturer Part Number D7824706Q
This ice maker (Ice Maker Assembly, Refrigerator Ice Maker) produces ice cubes that are ejected into the storage bucket. It is located in the freezer section of your appliance, mounted on the freezer wall. The ice maker can break from normal wear and accidental damage. If this happens, your refrigerator may no longer make ice cubes, or may not make enough cubes, and the part should be replaced. This model measures approximately 11 inches long and 5 inches wide. It’s constructed of plastic and metal, and comes in black/white/silver. This assembly includes the ice mold and the control device.
Fixes these symptoms
  • Clicking sound
  • Doesn’t stop running
  • Ice maker dispenses too little ice
  • See more...
Installation Instructions
Bernie from Diamond Bar, CA
Icemaker producing few or no cubes and often leaving "kling-ons" on ice tray
Interior surface of ice tray felt rough & flaky (coating deteriorated) so cubes would not release.
Unplug appliance.
Remove timer cover by hand pressure @ edge.
Remove single attachment screw & bracket at lower front of icemaker.
Disconnect wiring harness from socket @ rear of compartment.
Tricky part was determining what type of connection held the other two attachment points along the long edge of the icemaker. I did not have repair manual or useful drawing but looked @ PartsDirect pic of side brackets & used a small mirror to confirm that mine were also some sort of "snap in" attachment.
Remove icemaker unit by pushing upward and outward on the unit. I takes a good bit of pressure and will pop loose, but be careful not to break attachment bracket from freezer wall.
Scavenge shut off bar and wiring harness from old icemaker once you have it out & attach to new one before installing it back in freezer.
Again, you might find a mirror useful to align those pesky snap-in brackets with the new unit.
Since you probably kept your freezer running while waiting for the part, the plastic snap-ins will be cold and brittle. I warmed them up first by applying a dampened cloth heated in the microwave to make them a little more pliable.
A good push of the new unit towards the snap-ins along with some upward force will get it stable.
Reattach the metal screw in bracket & connect the wiring harness to rear plug... and don't forget to plug the whole thing back in.
It will take awhile for the first batch of cubes dump as the timer may need to cycle completely around to get to the fill cycle... be patient.
Dump the first couple of batches of cubes just to make sure you're free of any residue.
Read more...
Your Price
$63.12
   In Stock
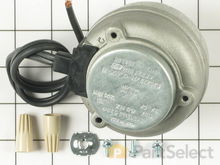
Sharp Condenser Fan Motor Kit
★★★★★
★★★★★
34 Reviews
PartSelect Number PS395284
Manufacturer Part Number 833697
This condenser fan motor kit is designed for use with refrigerators. This fan draws air through the condenser coils and over the compressor. It does this with the goal of cooling the warm refrigerant before it enters the evaporator. When your fan or fan motor is not working your refrigerator will not cool properly. This is a 2-Watt, 115 Volt motor that rotates the fan in a counter clockwise direction. This kit includes the hardware needed for installation, and a set of instructions. Before you begin any repair work make sure to unplug your appliance.
Fixes these symptoms
  • Freezer section too warm
  • Fridge and Freezer are too warm
  • Fridge runs too long
  • See more...
Installation Instructions
Tom from Franklin, WI
Sometimes the condenser fan would start causing the refrigerator to overheat.
Unplug the appliance.
Removed the screws holding the back panel.
Removed the fan blade.
removed 3 screws holding the condenser fan.
Remove the 3 metal brackets attached to the fan.
(First note which studs the brackets are attached to. Attach the 3 metal brackets to the new fan. (New screws were supplied)
Cut and strip the wire about two inches from the fan.
Cut and strip the new wire. I cut the new wire in half (about 6 inches.) Connect the two wires, twist and used 2 wire nuts. Tie wrap the wire to the wire harness. Mount the new fan (three screws)
Screw the back panel back on.
Mount the new
Read more...
Your Price
$29.50
   In Stock
Sharp DIODE
★★★★★
★★★★★
8 Reviews
PartSelect Number PS12584264
Manufacturer Part Number W11256462
This diode, or high voltage diode, is used in microwaves. It is an electrical current control device that ensures power flows in one direction and not the other way. If your microwave produces no heat, heats inconsistently, or gets noisy, replacing this part can be the solution. The tools needed for this replacement are a nutdriver, pliers, and screwdrivers. First remove the microwave cover, then remove the old part by disconnecting the small thermostat. Replace with the new diode. Remember to use the diagram provided by the manufacturer for more instructions.
Fixes these symptoms
Installation Instructions
kelvin from san diego, CA
no heat
this problem started two months ago when my micro quit heating up, after all the research most agreed it was the magnetron. taking the micowave apart is not to difficult just make sure you bag all the screws accordingly. the high voltage area is on the right hand side behind a panel. caution there is a capacitor that will bite if your not careful, need to short the circuit between the two connectors with an insulated screw driver it will make a small pop or let it sit for awhile and it will discharge by itself. The magnetron worked for two days then quit, after more research i took it apart again and tightened up all the connections. Worked great on the bench but when i got it back up on the cabinet two dayslater kaput again. so again i take it down and replaced the two cheapest parts in the high voltage system, magnetron thermst fix, and h.v diode. benched tested it this time for 3 days cooking anything that i could think of, worked great. its been one week now afer installtion and it is still working. Read more...
Your Price
$46.11
   In Stock
Sharp ARM-SHUT
★★★★★
★★★★★
6 Reviews
PartSelect Number PS12712096
Manufacturer Part Number W11342242
This ice level arm, also known as an ice shutoff arm, is designed to detect the level of ice within the ice bin of your ice maker or refrigerator and turn it off when enough ice has been made. When the ice maker is empty, the arm will be down. When the ice maker is full, the arm will be raised, and over time, wear and tear to the level arm can cause the ice maker to stop making ice completely. To replace this arm, unplug your appliance and remove the ice making assembly, then pull the levelling arm out of the assembly and place the new one. Consisting of a long, angled metal arm and a plastic flap, this level arm is a genuine OEM part that is compatible with a wide-range of refrigerators and icemakers and measures at approximately 9-inches by 4.5-inches.
Fixes these symptoms
  • Ice maker dispenses too much ice
  • Ice maker not making ice
  • See more...
Installation Instructions
Thomas from Va. Beach, VA
shut off arm broke
open ice maker door, use mirror to view slot in front of ice maker, slip piece in place and done Read more...
Your Price
$14.21
   In Stock
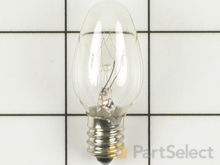
Sharp Light Bulb - 7W
★★★★★
★★★★★
5 Reviews
PartSelect Number PS11731356
Manufacturer Part Number W10857122
Sold individually. This bulb is a 7-watt appliance incandescent light bulb. This appliance light bulb is two inches long. It is used for many clothes dryers. You will need a Phillips screwdriver and needle-nose pliers. Unplug the power from your dryer. You will find the light bulb by opening your dryer door and locating the casing surrounding the bulb on the top of the inside of the door. You will need to remove the single screw holding it in place to access the bulb. Twist the old bulb out of place. Use your pliers if the base of the bulb is still inside the socket once the glass part of the bulb has been removed. Check to make sure that the socket itself is not damaged. If the socket is damaged it will need to be replaced as well. Screw your new bulb into place.
Installation Instructions
Gilbert from Clinton, MO
The compressor would not run.
I removed the screws in the lower back panel where the compressor is located. Then I unplugged the capacitor and plugged the new one in. I then checked to see if the compressor would start. It wouldn't so I replaced the overload relay with capacitor and that fixed the problem. The capacitor just plugs into the relay then plugs into the compressor. There are several screws but all in all it is easy. Read more...
Your Price
$66.66
   In Stock
Sharp Run Capacitor
★★★★★
★★★★★
5 Reviews
PartSelect Number PS11743364
Manufacturer Part Number WP65889-4
This part helps the compressor kick on and off while maintaining a constant temperature to keep things frozen in your freezer. If you are noticing temperature issues with your refrigerator or freezer, the run capacitor may need replacing. This repair is fairly easy to complete, and the only tools you will require are a 1/4 inch nut driver, and a 1/4 inch socket with a small ratchet. The run capacitor is located in the back of the fridge, so you will need to make sure you have room to work on this repair. Make sure to unplug the fridge prior to beginning the repair.
Fixes these symptoms
  • Clicking sound
  • Freezer section too warm
  • Fridge and Freezer are too warm
  • See more...
Installation Instructions
Mark from West Chester, PA
Timer won't advance for auto-sensing cycles. Low Heat.
First I unplugged the dryer from the wall outlet. Then, removed the access panel in the lower front (held on by 2 screws near the floor). Then, I removed the black plastic air duct (held by 3 screws) in front of the blower. Then, with a Sharpie marker, next to each wire terminal lug, I labeled on the chassis the COLOR of each wire where it plugs on to a terminal lug (for proper wiring re-assembly later). Then, thru the lower front, I reached into the lower left rear of the dryer to remove the heating element assembly from its metal duct (held by 3 or 4 screws) - it slides down a bit, then it is easily removable. I layed the element on the floor in front of the dryer - all wiring still intact. Then, using the NEW HEATING ELEMENT and SENSORS ordered, I assembled them to match the original, re-using screws off of the old unit - and moving the wiring one-by-one from the original to the new assembly. I then installed the new heating element assembly into the duct at the lower rear of the dryer. I then replaced the 2 sensors on the front metal panel of blower housing, with new parts from my order, re-using the original wiring and screws. Then I re-installed the black plastic duct onto the front of the blower. Then, on the top of the dryer, I dissassembled the control panel from the rear, by removing 5 screws. I then found the resistor mounted on the back of the timer, and replaced it with the new one. Since the new resistor did not come with terminal lugs crimped on its wires, I had to cut the terminal lugs off of the original resistor and solder them onto the new resistor. I then reassembled the control panel. I then plugged the dryer back into the wall outlet and did a test run with no clothes. IT WORKED !! Then I reinstalled the lower front access panel and ran the dryer with wet clothes. IT WORKED !! Read more...
Your Price
$158.58
   In Stock
Sharp Ice Dispenser Solenoid and Door Kit
★★★★★
★★★★★
13 Reviews
PartSelect Number PS2003478
Manufacturer Part Number 12001991
In addition to the solenoid (115V), this kit also comes with a door strike and an ice door assembly. Please be advised the spring and roll pin are not included with this kit.
Fixes these symptoms
  • Door Sweating
  • Door won’t open or close
  • Ice maker not making ice
  • See more...
Installation Instructions
Scott from Walker, LA
Ice Dispenser "round chute" broken side tab, ice/water fountain not working
I could see that a tab was broken from the round chute that opens for ice dispensing and closes to seal off freezer ice chute when not in use. With the tab broken, the round door would not shut to seal the freezer chute and dispensing water would spatter everywhere. I looked for just the round door part, but is only sold in the "Ice dispenser solenoid and door kit" I only had to use the round chute/flap from the kit. The instructions were easy to follow and I had the fridge back working in about 10 minutes. It took me longer to find the right star headed screwdriver that I needed to remove the Maytag star screws (5) total. Because I didn't have to replace the solenoid or the spring mechanism, this was especially easy, and now I have those parts on hand if one day I need them!! Read more...

Sharp Appliance Types

Popular Sharp Models

Below are the most popular Sharp models we have. Enter your model number in the search box to find your model.