Your coupon for will be reflected when you check out!
✖
Your coupon for
✖
Hello!
You're visiting the PartSelect site in U.S.
Would you like to shop on the Canadian site?
Stay on this site
Go to Canadian site
✖
Model Number Locations
1Select Category Type
Select Category Type
2Select Product Type
Select Product Type
3Select {MODEL} Type
Select {MODEL} Type
Sample Model Number Tags
Model numbers can be made up of numbers (1005400, for example) or a combination of letters and numbers (LAT1000AAE). The model number will most likely appear on either a paper sticker or a metal plate. Your appliance's model number tag may look similar to the sample model number tags shown here (model number highlighted in yellow):
Model has been saved to My Models. If you're not signed in, your lists are available on this device and will expire within 30 days.
Model has been saved to My Models.
This is an inner cap seal, but may also be known as an O-ring, and it is a part for your washing machine. Some symptoms replacing this part will fix include: leaking from your appliance, uncontrollabl...
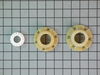
This kit includes one driver hub and two driven basket hubs. The basket hub is located under the agitator. If your washer is not agitating or spinning properly, the hubs will need to be replaced.
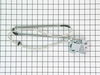
This hose clamp is used in a wide variety of household appliances. Most often it is found in washers, dishwashers, refrigerators, freezers, dehumidifiers, garbage disposals, or air conditioners. This ...
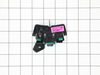
This part makes sure that the lid is shut before allowing the machine to start or agitate.
NOTE: This is a manufacturer substitution. Part may differ in appearance but is a functional equivalent to prior parts including
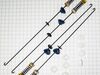
This touch-up paint can be used on a wide variety of household appliances. It is most often used on washers, dryer, refrigerators, dishwashers, ranges, freezers, trash compactors, or microwaves. It is...
The hose clamp is used to hold the water hose in place which will prevent the hose from leaking water. Sometimes the clamp may lose its ability to latch on, causing a leaking washer. For the installat...
Introduce your washing machine to the effective deep clean with the Affresh Washing Machine Cleaner by Whirlpool. Designed to remove and prevent unpleasant odors and stubborn residues, this product br...
Disconnect power, hot/cold supply and drain hose. Tip washer onto front side, expect some additional water to leak out. Remove the cracked drain pump, 3 screws, hose clamps, and electrical plug.
Tip washer back up, use the putty knife to pop the top cover up (clips are about 6.5in in from sides). Unclip the white plastic cover
... Read moreover the outer and inner tubs. Pop the center cap from inside the inner tub, exposing the bolt holding the inner tub down. Remove bolt, pull inner tub up and out.
At bottom of outer tub remove 2 screws from drain access cover, should find some change under there (or in the pump).
Re-assemble using new pump.
Note: Before new pump arrived I was able to use some silicone sealant, epoxy, and black tape to temporarily fix the cracked pump housing after pulling it out.
The actual install of the pump was extremely easy. I removed the back cover, (After unhooking water, drain and electricity. I laid the machine on its front ( USE CAUTION WHEN DOING THIS, THERE ARE SHARP EDGES on the FRAME) After bandaging my cut fingers, I used a nut-driver/screwdriver to remove the screws, pliers to remove the Spring cla
... Read moremps, unhooked the wiring( its a single plug in) and reverse the procedure for installing.
I saw where a person had put the screws in the filter below the tub. I had to find the clips on the front of the machine, (about 7 in in from the sides) I removed the nut cover on the agitator, used a socket to remove the agitator, tub, and a nut driver to remove the filter. I found 3 areas where coins could get through the drain filter, and I used self tapping screws to make an obstruction that water could get through but not the coins. I reinstalled tub. Before re installing the agitator, I got some fiber glass window screening and cut a piece to go over the drain slots in the bottom of the tub but under the agitator, then reinstalled the agitator.
I noticed that the new pump had more re enforcing at the areas where the 1st pump broke. I doubt that it will break, but I am not taking any chances. I put the screen in to prevent the coins from getting to the drain filer 1st and the back up was the screws in the drain filter.
Removed a cap in the center of the tub basket which has a bolt that needs removed I believe it's a 9/16 after I removed the bolt I then removed the center of the bottom of the basket assembly which then allowed me to get to the basket hub that needed replaced it was a little dirty and I couldn't get it out so I sprayed a little penitratin
... Read moreg oil on it let it sit a little then I was able to remove the hub and install the new one then I put it all back together and the washer is working great


 Diagram and Parts List for Whirlpool Washer")


 – Part Number: 72017")