Your coupon for will be reflected when you check out!
✖
Your coupon for
✖
Hello!
You're visiting the PartSelect site in U.S.
Would you like to shop on the Canadian site?
Stay on this site
Go to Canadian site
✖
Model Number Locations
1Select Category Type
Select Category Type
2Select Product Type
Select Product Type
3Select {MODEL} Type
Select {MODEL} Type
Sample Model Number Tags
Model numbers can be made up of numbers (1005400, for example) or a combination of letters and numbers (LAT1000AAE). The model number will most likely appear on either a paper sticker or a metal plate. Your appliance's model number tag may look similar to the sample model number tags shown here (model number highlighted in yellow):
Model has been saved to My Models. If you're not signed in, your lists are available on this device and will expire within 30 days.
Model has been saved to My Models.
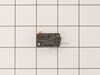
This door switch, also known as a safety switch, is a genuine OEM replacement part for microwaves. It is a safety mechanism that sends signals to the microwaves control system, telling it when the doo...
$27.87
In Stock
Order now and your part arrives in 2-3 business days!
This is a high limit thermostat designed for microwaves, ranges and ovens. Made of plastic and metal, this thermostat is designed to open the electrical circuit for your appliance when it reaches a sp...
$26.87
In Stock
Order now and your part arrives in 2-3 business days!
This rubber cushion is supplied by the original manufacturer and has a shaft approximately 1 inch long. The cushion acts as a layer of protection between the oven door and oven frame/cavity. It preven...
$6.93
In Stock
Order now and your part arrives in 2-3 business days!
This genuine OEM left-threaded convection fan motor is responsible for spinning the fan blade, ensuring even circulation of hot air within your oven for consistent cooking. It is typically located beh...
$136.57
In Stock
Order now and your part arrives in 2-3 business days!
The temperature sensor, also referred to as a thermostat, probe, or thermistor sensor, is responsible for measuring the temperature inside your oven. It is a platinum-resistance sensor with a resistan...
$137.56
In Stock
Order now and your part arrives in 2-3 business days!
This hexagon nut cap, also known as a nut cover cap, is a nylon-insulated cylindrical cap with left-hand threads and a 4mm thread size, for counterclockwise tightening. It is sourced from the original...
The Samsung Burner Cap - Small is a sturdy and durable component, perfect for frequent use in your kitchen range. Crafted from heat-resistant materials, it is designed to promote even cooking and prot...
$81.72
In Stock
Order now and your part arrives in 2-3 business days!
This terminal block assembly is designed for use within various models of ranges and is sold as an individual OEM part without any other hardware included. Terminal blocks are responsible for receivin...
$71.75
In Stock
Order now and your part arrives in 2-3 business days!
I initially thought I needed a new touch control panel but after a bit of research on the web and numerous videos and articles on replacing the control panel, I found an obscure video and forum where they mentioned that this thermostat fuse has been known to overheat and shut down the oven (touch controls) for safety reason. By the way,
... Read moremy unit is 3 years old and the warranty expired one month ago! I took the top off, found the fuse and tested it with a Multi-meter (again, thanks to some very helpful youtube videos out there). Dead. I figured it was worth a try and ordered the $20 part as opposed to the much more expensive control.
> remove all of the gas burners on the stove (a total of about a dozen screws) > then remove the top back vent and the screws that hold the top metal piece in place > you will see the thermostat fuse towards the back in the middle. > loosen one screw and replace > put back together in reverse order.
*** You do NOT have to remove the front piece as some videos and articles mention. The total time should be about 20 minutes. With a little patience and pre-homework, it's easy and you'll save a couple hundred in labor costs.
I took off the back cover after I looked at youtube similar problems. Then removed the little thermostat and un hooked the 2 wires. I looked up the part and after is was delivered couple days later I connected the 2 wies and after putting the back cover on the oven was back to normal. Was such an easy repair and the part was only $11.
Slide out the stove. Unplug the electricity. Remove the back panel with a screwdriver. Then go inside the oven and remove the two Philips head screws holding the fan cover. Then remove the nut holding the fan. Note, it is a left handed nut, so turn it right to loosen it. Pull off the fan. Return to the back and remove the nut and two scr
... Read moreews that hold the fan. The fan slides right out. The only problem I had was that the electrical contacts on the new motor were wider than the original. I had to break the plastic so I could separate the wire leads, so that they would fit the new motor. Works like a charm. John


(0001) Samsung Microwave Oven Combo")