Your coupon for will be reflected when you check out!
✖
Your coupon for
✖
Hello!
You're visiting the PartSelect site in U.S.
Would you like to shop on the Canadian site?
Stay on this site
Go to Canadian site
✖
Model Number Locations
1Select Category Type
Select Category Type
2Select Product Type
Select Product Type
3Select {MODEL} Type
Select {MODEL} Type
Sample Model Number Tags
Model numbers can be made up of numbers (1005400, for example) or a combination of letters and numbers (LAT1000AAE). The model number will most likely appear on either a paper sticker or a metal plate. Your appliance's model number tag may look similar to the sample model number tags shown here (model number highlighted in yellow):
Model has been saved to My Models. If you're not signed in, your lists are available on this device and will expire within 30 days.
Model has been saved to My Models.
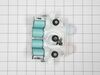
This is an inlet valve for your washing machine. The inlet valve is an electrically controlled valve with a solenoid that opens and closes as needed, during the water filling cycle of the washing mach...
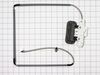
The hose clamp is used to hold the water hose in place which will prevent the hose from leaking water. Sometimes the clamp may lose its ability to latch on, causing a leaking washer. For the installat...
Introduce your washing machine to the effective deep clean with the Affresh Washing Machine Cleaner by Whirlpool. Designed to remove and prevent unpleasant odors and stubborn residues, this product br...
Introducing the Whirlpool Washer Washplate Screw - your reliable solution for fixing broken or loose washplates in your washing machine. This OEM genuine part, compatible with distinct models of Whirl...
This is an impact absorber, also known as a sound dampening pad, for washing machines. This sound dampening pad attaches to the top of your washing machine drum to reduce the severity and harshness of...
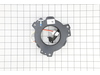
This drain pump is specially designed to fit in top load washing machines. It is responsible for removing water from the washer tub during the drain cycle and directing it to the household plumbing sy...
Appliance spray paint is a great way to cover up any chips and scratches that have appeared on your appliances. Instead of replacing the part entirely, this is an easy fix. This is also a great way to...
This lid hinge is a genuine OEM replacement part for your washing machine. This hinge is for the left side of your lid, although it is a good idea to replace btoh hinges at once. The hinge holds up th...
This clutch slider kit is genuine OEM replacement kit that fits in various models of washing machine. It is a part of the transmission system in your washer which is responsible for controlling the mo...
Introducing Whirlpool's Genuine OEM Wire Hinge, which is specifically designed for the right side of your washer. This essential component enables your washer lid to effortlessly pivot open and close,...
$20.95
In Stock
Questions And Answers for 7MMVWB855EC3
Be the first to ask our experts a question about this model!
✖
Ask a Question
Ask our experts a question on this model and we'll respond as soon as we can.
Washer would start cycle and return a CL error. No water would flow into the tub. Researched problem and probable cause. Ordered new water inlet valve. Once received, disconnected water hoses and electric plug and removed rear upper access panel (5 screws). Used thin putty knife under sides of front control panel to disengage spring clips
... Read more. Once access to the faulty valve was attained, removed electrical harness and valve mounting screws. Installation of new valve was reverse process. Figuring out how to raise the front panel for access to the valve was most difficult. Found a YouTube video showing how; it was easy from there. Entire replacement took about 30 mins max.
Did troubleshooting after code LF showed on indicator window. Did troubleshooting; checked hoses for obstructions and small filters on inlets. All good. Ordered new fill valve. Came in a few days, good service. Removed control panel top by removing screws on back of control panel, then by pushing putty knife under each side to rele
... Read morease spring clips. Carefully lifted cover and set onto lid. Photographed fill valve at left side as you are standing in front of machine. Removed screws with small ratchet. Carefully removed wires via clips. Lifted out valve. Attached wires to new, set back into its place, replaced screws, tightened but not too tight so as to break part. Replaced control panel, pushing downward to engage spring clips, then replace screws on back. Re attached hoses, ensuring they were on the correct sides, plugged machine into power, ran through cycle and VIOLA!! Worked perfectly!! After a couple weeks, still working perfectly! Was VERY happy it was only fill valve and not mother board as the cost was a fraction. I found trouble shooting videos to be very helpful. Your service quite good.
The valve is a 4 solenoid valve, which has Temp. sensor molded into the valve body mixer center outlet. No mention of it in the troubleshooting. it has a 2 pin plug. it was shorted zero ohms. New one measure open infinity. I also purchased the control module as the troubleshooting said to if solenoid checked good which all 4 rea
... Read mored 1310 ohms , i purchased and replaced control module, no help. the guide is outdated for these new high tech washers. If this happens again. I will just unplug the 2 pin plug on bottom of valve assembly. By the way the 2 clips that hold the washer top in place are very difficult to remove and re install.


 Diagram and Parts List for Maytag Washer")


 – Part Number: 350930")