Your coupon for will be reflected when you check out!
✖
Your coupon for
✖
Hello!
You're visiting the PartSelect site in U.S.
Would you like to shop on the Canadian site?
Stay on this site
Go to Canadian site
✖
Model Number Locations
1Select Category Type
Select Category Type
2Select Product Type
Select Product Type
3Select {MODEL} Type
Select {MODEL} Type
Sample Model Number Tags
Model numbers can be made up of numbers (1005400, for example) or a combination of letters and numbers (LAT1000AAE). The model number will most likely appear on either a paper sticker or a metal plate. Your appliance's model number tag may look similar to the sample model number tags shown here (model number highlighted in yellow):
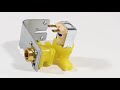
This water inlet valve should be located behind the lower kickplate panel in either the right or left corner. The attaching solenoid on the valve open and close according to the desired amount of water needed.
How Buying OEM Parts Can Save You Time and Money
Why buy the real thing?
OEM stands for Original Equipment Manufacturer. Simply put, this means that the company who made your appliance is also supplying the replacement part for it.
Replacing your General Electric Dishwasher Dishwasher Inlet Valve
Troubleshooting
This part fixes the following symptoms:
Leaking | Will not fill with water | Not cleaning dishes properly | Not draining
This part works with the following products:
Dishwasher.
Part# WD15X10014 replaces these:
AP5632416, 2309993, WD15X10014, WD15X10011
Customer Reviews
Average Rating:
★★★★★
★★★★★
56 Reviews
4.7
Filter By Rating:
5 Stars
48
4 Stars
5
3 Stars
0
2 Stars
2
1 Star
1
Sort by:
< Prev
1
2
3
Next >
Search filter:
Clear Filter
Your search term must have 3 or more characters.
Keep searches simple. Use keywords, e.g. "leaking", "pump", "broken" or "fit".
Sorry, we couldn't find any existing reviews that matched. Try using some different or simpler keywords.
★★★★★
★★★★★
ANA H - August 1, 2018
Verified Purchase
Perfect matching off brand part for my high end dishwasher.
This part fit my high-end dishwasher without the replacement cost of the original part. It came with step by step instructions to replace. Great service and prompt delivery. I will highly recommend this company.
★★★★★
★★★★★
Charles K - September 27, 2018
Verified Purchase
Arrived as agreed
Everything fit and works
★★★★★
★★★★★
Michael H - July 9, 2020
Verified Purchase
Water valve
Part was easy to find and quick to deliver. Replacement was straightforward and the part seems to be doing its job.
★★★★★
★★★★★
Damon L - June 25, 2021
Verified Purchase
GREAT!
Quick delivery , quality part!
★★★★★
★★★★★
Ralph K - October 29, 2020
Verified Purchase
Easy repair!!!
Fast shipping!!!
★★★★★
★★★★★
Janet F - June 28, 2019
Verified Purchase
Worked as expected
Found the part easily, received as promised and installation was easy. My son installed it for me and was done in about 20 minutes. Thanks!!
★★★★★
★★★★★
Derick B - September 4, 2023
Verified Purchase
Great part selection
The part selection was easy and I recieved the part quiclky. Appliance is repaired and working great.
★★★★★
★★★★★
Tanda R - July 7, 2021
Verified Purchase
Fixed my dishwasher leak right away.
Part was new & exactly what I needed. Received it with in a couple of days of ordering. Easy fast ordering & paying.
★★★★★
★★★★★
Pamela M - August 5, 2018
Verified Purchase
Fixed issue
We had water running randomly. So this was a one man job, 45 minute fix and didn’t even have to pull out dw??
★★★★★
★★★★★
John B - August 28, 2018
Verified Purchase
Parts
Exactly what I ordered was sent. Thank you
< Prev
1
2
3
Next >
Customer Repair Stories
Average Repair Rating: 3.8 / 5.0, 17 reviews.
What's this?
Sort by:
< Prev
1
2
Next >
Search filter:
Clear Filter
Your search term must have 3 or more characters.
Keep searches simple. Use keywords, e.g. "leaking", "pump", "broken" or "fit".
Sorry, we couldn't find any existing installation instruction that matched.
Leaking Solenoid valve
1.Shut off the electric! 2.Shut off the water Supply. 3.Removed the two lower front panels(Two bolts each) . 4.The Water supply Solenoid is located far left up front . 5. Unplug power connector clip to the solenoid. 6.remove the two mounting bolts . 7. Use pliers to compress the rubber hose clamp And slide down the hose . 8 some small amo
... Read moreunt of water maybe in the hose a pan maybe necessary under the solenoid. 9.Gently pull the rubber hose off the nozzle. Complete installation in reverse. May The Force Be With You!
Read less
William from ANNAPOLIS, MD
Difficulty Level:
Very Easy
Total Repair Time:
Less than 15 mins
Tools:
Nutdriver, Pliers
2 of 2 peoplefound this instruction helpful.
Was this instruction helpful to you?
Thank you for voting!
Blocked inlet valve
Removed kick panel and pulled out the unit from cabinet carefully. Turned off water and power. Removed the water feed and used an aluminum pie tin line a low-profile drip pan to catch the extra water and used a scrap towel to clean the dust and extra water spilling out. Used sockets and wrench to remove the old inlet and screwed out the h
... Read moreousing to examine the old inlet. No real way to clean it. Honestly, I don’t see a reason for the filter. There’s no way to replace it and it’s not easy to change out anyway. The particles were so small they could have passed through and not harmed the system. A better and more practical place for any filter would be just in front of the inlet that could just pop in every 2-3 years as needed preventatively in 5 minutes. Anyway, I reassembled and tested. Water flow was great. I think it cleans better too because the hot water fills the plastic reservoir faster and stays hot to clean more effectively.
Read less
Timothy from DURHAM, NC
Difficulty Level:
Easy
Total Repair Time:
30 - 60 mins
Tools:
Screw drivers, Socket set, Wrench (Adjustable), Wrench set
2 of 2 peoplefound this instruction helpful.
Was this instruction helpful to you?
Thank you for voting!
Would not fill with water
Ordered most likely part...water inlet valve.
1. Turn off water supply. 2. Remove the metal toe kick plate/insulation at the bottom of the dishwasher. 3. Remove hose to supply valve. 4. Take electrical plug off old valve. 5. Remove float valve because it was mounted it right in the way of
... Read more the 2 screws on the inlet valve bracket. 6. Remove those 2 screws now you can get to them, and move the inlet valve to one side so you can get to the hose clamp for the rubber hose out of the valve going to the dishwasher. 7, Take the old valve and bracket out, mount new valve on the bracket, crawl back down on the floor, reinstall rubber hose and bracket, and float valve and finally inlet hose. 8. Turn water on. Check hose connections for leaks. Yep, outlet hose didn't clamp enough now, allowing a drip. 9. Repeat the whole process AGAIN. Replace little clamp with a REAL hose clamp, reinstall the thing again. No leak this time. 10. Test run dishwasher thru a cycle. Check again for leaks at hose connections. OK ? Reinstall insulation pieces and toe kick plate.
Read less
James from JONESBOROUGH, TN
Difficulty Level:
Easy
Total Repair Time:
30 - 60 mins
Tools:
Nutdriver, Pliers, Wrench (Adjustable)
3 of 3 peoplefound this instruction helpful.
Was this instruction helpful to you?
Thank you for voting!
Dishes Weren't Getting Clean At All
The sump was very clogged with caulk like crud that we think was a chemical reaction from soap that was used the first two years. When I first started troubleshooting, the sump seemed to be the problem, so I replaced that. There was a small hose on the sump that was broken so it made sense to replace it anyhow.
When that didn
... Read more't help I put the dishwasher into service mode and observed that there just wasn't enough water to spin the sprayer. Therefore it was a water quantity problem, which can be caused by either the Water Inlet Valve or the Flood Switch.
I ordered both the Water Inlet Valve and the Flood Switch, just in case. I replaced the valve first and when that worked I did not install the switch.
Installation was performed with the dishwasher still inserted in the cabinet. If you have big hands, pull the dishwasher out. With sockets and nut drivers, I was able to remove the assembly. After pulling it out enough to clear the dishwasher, I was able to get a screwdriver on the outlet side clamp and a wrench on the inlet side hose.
My old valve had a 90° elbow on it and that was difficult to remove. Installing the elbow on the new valve was just as bad. The valves don't have enough clearance to get a wrench on them to keep them from turning while the elbow is tightened.
TIP: Take a picture of the valve before removing/disconnecting anything. I don't know if the electrical connector can attach either way but I made sure to put it back on exactly the same way it was.
Read less
James from HGHLNDS RANCH, CO
Difficulty Level:
A Bit Difficult
Total Repair Time:
30 - 60 mins
Tools:
Nutdriver, Screw drivers, Wrench set
2 of 2 peoplefound this instruction helpful.
Was this instruction helpful to you?
Thank you for voting!
Water leakage at valve
I watched the video that came with email on part. Gave instructions on how to. Thank you !
Jimmy G from SPRING, TX
Difficulty Level:
Very Easy
Total Repair Time:
Less than 15 mins
Tools:
Screw drivers, Wrench (Adjustable)
3 of 3 peoplefound this instruction helpful.
Was this instruction helpful to you?
Thank you for voting!
Leaking valve
Used teflon tape around new 3/8 elbow. Re-installed valve in originals postion. Connected supply hose and reconnected electrical to valve.
Turn off water .Remove 4 screws holding lower front panels.Remove panels, valve is on left . Remove 2 screws that hold valve , slip valve up over clip. Using pliers slide clamp back, remove hose from valve.disconnect wire clip , unscrew from water fill line. Install new valve in the reverse order
Joe from NEW RINGGOLD, PA
Difficulty Level:
Really Easy
Total Repair Time:
15 - 30 mins
Tools:
Nutdriver, Pliers
6 of 7 peoplefound this instruction helpful.
Was this instruction helpful to you?
Thank you for voting!
Valve leaked
Turn off power and water from dishwasher. Remove Base Access Panel. Remove the upper 2 screws that holds the dishwasher in place. Pull out dishwasher. Locate the valve and remove the 2 screws holding the mounting bracket. (I used a hex Nutdriver to remove the screws) Remove the valve. Disconnect the wire connector. Disconnect water
... Read moresupply. (Place a towel to catch the water) Loosen the hose clamp holding the inlet hose and remove the hose. (I used pliers to loosen the clamp) Remove the elbow from the old valve and reattach to the new valve. (Use teflon tape around the threads) Reverse the Process. Check for leaks. Piece of Cake. Part was an exact fit.
Read less
Thomas from LAS VEGAS, NV
Difficulty Level:
Really Easy
Total Repair Time:
30 - 60 mins
Tools:
Nutdriver, Pliers, Wrench (Adjustable)
4 of 4 peoplefound this instruction helpful.
Was this instruction helpful to you?
Thank you for voting!
The inlet pump stop working
Received part, removed lower panel and shut water and power off to appliance. Used flash light to see under dishwasher, removed the two screws that held part in place. Loosed clamp that held the water tube in place to part. Placed towel down to catch water. Pulled the line out so I could get to the nut that is attached to inlet part. U
... Read morenhooked the plug after all water was gotten up. The main knuckle that's attached to the pump was on so tight that I took it to my local gas station for an mechanic to unscrew it for me....I have arthritis in my hands. Station is only two mins from me and wasn't a problem for them to do for me. Came back put fresh Teflon tape on joint and reattached it to new part. Attached all hoses and clamps, plugged electrical prongs back in and attached bracket back to body of dishwasher. Turned water on and checked for leaks. Turned power back on and ran a cycle of dishes to wash....all went well. If the knuckle was on so tight the job would have only taken about 40 min at best.
Read less
Vanessa from FT WASHINGTON, MD
Difficulty Level:
A Bit Difficult
Total Repair Time:
1- 2 hours
Tools:
Pliers, Screw drivers, Socket set, Wrench (Adjustable), Wrench set
5 of 5 peoplefound this instruction helpful.
Was this instruction helpful to you?
Thank you for voting!
Had a water leak in bottom of dishwasher.
I simply removed the bad part and reversed the process. It was very easy and a 12 year old could do it. Thanks for the online tips and recommendations. You saved me over 400.00 which is what a new unit would run. Plus installation. Many Thanks.
Russell from MADISONVILLE, LA
Difficulty Level:
Very Easy
Total Repair Time:
15 - 30 mins
Tools:
Nutdriver, Pliers, Screw drivers, Socket set
1 of 2 peoplefound this instruction helpful.
Was this instruction helpful to you?
Thank you for voting!
< Prev
1
2
Next >
Questions and Answers
Ask our experts a question about this part and we'll get back to you as soon as possible!
18 questions answered by our experts.
Sort by:
< Prev
1
2
Next >
Search filter:
Clear Filter
Your search term must have 3 or more characters.
Keep searches simple. Use keywords, e.g. "leaking", "pump", "broken" or "fit".
Sorry, we couldn't find any existing answers that matched.Try using some different or simpler keywords, or submit your new question by using the "Ask a Question" button above!
Charles
December 12, 2017
Is this water inlet valve compatible or will it work with my GE dishwasher. Dishwasher will not fill with water. I poured a couple of pitchers of hot water up to the heater element to simulate the dishwasher was filled with water. I could hear it washing and it did drain, but dishwasher will not fill with water on its own.
For model number GSD4060N20SS
Hi Charles, Thank you for the question. Yes, this Valve is the correct valve for the model number provided. Good luck with the repair!
11 people found this helpful.
Was this helpful?
Thank you for voting!
Daniel
May 5, 2018
Considering buying new water inlet valve? The water would not stop running into dishwasher (even with door open) and even when power turned off. I shut off water and waited. After 10 minutes i turned water back on and it had stopped. I don't know what else it could be. I think if it were the float, the water would have stopped running when i opened the door (and when the power was turned off). Thoughts?
For model number PDW7900N10WW
Hello Daniel, thank you for your question. Yes, if the water continued to run into the unit even after the door was opened and power was off, the water valve is stuck in an open position. I would recommend replacing the water valve to fix this problem! Good luck with your repair!
9 people found this helpful.
Was this helpful?
Thank you for voting!
John
January 30, 2018
When the dishwasher fills up with water it does not stop water poured out on the floor. When I turned off the washer opened the door the water was still running in filling it up, I had to turn the water off to get it to stop. I replaced the float switch it did not help. What does the inlet valve do and could that be bad.
For model number GSD3300R15CC
Hi John, Thank you for the question. The valve releases water into the tub. If the float did not fix the issue the next part to replace would be the water inlet valve. Hope this helps!
6 people found this helpful.
Was this helpful?
Thank you for voting!
Thomas
November 19, 2017
On my dishwasher when the wash cycle is complete and the dishes are clean and the clean indicator light is on, there is a humming noise coming from inside the dishwasher when the door is closed, like something is still running. When the door is open, the noise stops. When the door is closed again the humming noise comes back. Can you help me?
For model number PDW9200N00WW
Hi Thomas,
Thank you for your question. It sounds like you may want to physically check your drain area. Something may be jammed, like the chopper assembly, your pump and motor mechanism, or your drain pump. You would have to pull out your dishwasher for this and take it apart a bit. I hope that helps. Good luck with your repair.
3 people found this helpful.
Was this helpful?
Thank you for voting!
Joel
September 30, 2019
Does the orientation of the prongs matter when reconnecting the solenoid on this part?
For model number CDWT980V05SS
Hello Joel, thank you for writing. We have an installation video for this Water Inlet Valve to assist you. Here is a link: https://www.youtube.com/watch?v=4ziL4S7iqrw. Good luck with your repair!
3 people found this helpful.
Was this helpful?
Thank you for voting!
Ed
October 14, 2019
I could visually see a leak coming from my old inlet valve (once i knew i had a leak!) so i ordered this replacement, which reconnected in just fine - except for the two screws to hold the bracket to the frame of the dishwasher. As mentioned in the video, the original screws are 5/16, but they won't screw into the new bracket (whether trying to attach it to the dishwasher or just trying screw right to bracket as a test). Did the threading on these change at some point so my original screws won't fit this new replacement part? (it didn't come with screws). Thanks.
For model number PDW9900N20BB
Hi Ed, I know this part does not come with screws. It is a replacement for an older part. The specs for the screws seem to be 10 - 32 t hex 7/16 s. Thank you for your question and good luck with your repair!
2 people found this helpful.
Was this helpful?
Thank you for voting!
Lewis
April 14, 2023
My dishwasher runs and drains ok, but over a few hours there is an accumulation of clean water in the bottom. Sometimes it as much as an inch. Does this suggest that the intake valve is not functioning correctly?
For model number PDW8900N00WW
Hi Lewis, thank you for your question. It is normal for some water to be present in the bottom of the dishwasher. But, if the water is present in large quantity may be the water inlet valve, part number PS3654179, is malfunctioning. Before replacing it check the drainage system is not clogged, which can restrict the water flow. We hope this sorts out your problem!
2 people found this helpful.
Was this helpful?
Thank you for voting!
Jerry
August 29, 2019
After dishes have been washed, the dishwasher fills with water when not in use.
For model number gld5708v00bb
Hello Jerry, thank you for writing. This could be due to a faulty Flood Switch, part number PS958959 for your model. You may also want to consider the Water Inlet Valve, part number PS3654179. Good luck with your repair!
1 person found this helpful.
Was this helpful?
Thank you for voting!
John
June 10, 2019
Will this fit my dishwasher. Water will not spray dishes. Cheked water supply line and it is good. I poured water in it and it will pump out.
For model number Gdwf100r30bb
Hello John, thank you for inquiring. Yes, this is the correct replacement for your model and may fix the issue. You may also want to consider either the Middle Spray Arm Hub part PS3499663 or the Main Conduit part PS651676. We hope this helps.
1 person found this helpful.
Was this helpful?
Thank you for voting!
Louis
August 22, 2019
Won't fill with water. Drains ok. It looks like the front motor impeller doesn't spin when it should. Sometimes it will move a little but not spin. I can kick start the motor impeller from the front with a screwdriver and it spins at a high rate fills with water and works. Sometimes this will fix the problem for a time or two but then the problem returns. Any ideas? Thanks.
For model number GE PDWT200V00WW
Hello Louis, thank you for inquiring. This could be due to a faulty pump and motor assembly, part number PS8756369 for your model. You may also want to consider this Water Inlet Valve part number PS3654179. Good luck with your repair!
Was this helpful?
Thank you for voting!
< Prev
1
2
Next >
✖
Ask a Question
Ask our experts a question on this part and we'll respond as soon as we can.


 Stay on this site
 Go to Canadian site


