Your coupon for will be reflected when you check out!
✖
Your coupon for
✖
Hello!
You're visiting the PartSelect site in U.S.
Would you like to shop on the Canadian site?
Stay on this site
Go to Canadian site
✖
Model Number Locations
1Select Category Type
Select Category Type
2Select Product Type
Select Product Type
3Select {MODEL} Type
Select {MODEL} Type
Sample Model Number Tags
Model numbers can be made up of numbers (1005400, for example) or a combination of letters and numbers (LAT1000AAE). The model number will most likely appear on either a paper sticker or a metal plate. Your appliance's model number tag may look similar to the sample model number tags shown here (model number highlighted in yellow):
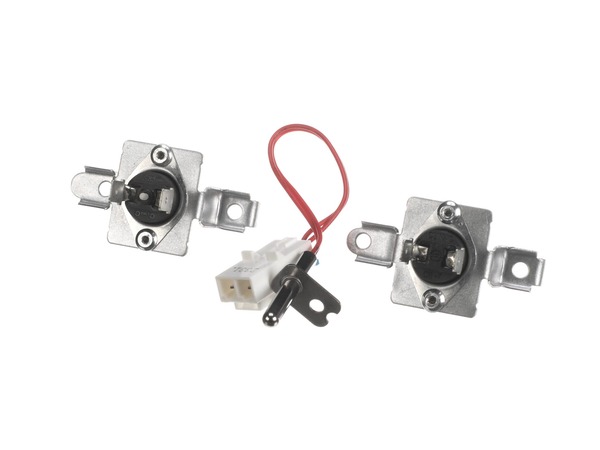
Hi-Limit Thermostat And Thermistor Kit Specifications
This dryer thermistor temperature sensor helps monitor and regulate the temperature inside a dryer. This part includes the wire harness. If your dryer overheats, does not produce enough heat, or takes too long to dry, then the thermistor might be defective or damaged. This can cause a fault code and could begin either prolonging or shortening drying time. As a safety precaution, make sure to unplug the dryer from the power source before beginning this installation, and wear gloves to protect your hands. Refer to the installation instructions provided by the manufacturer for further guidance.
How Buying OEM Parts Can Save You Time and Money
Why buy the real thing?
OEM stands for Original Equipment Manufacturer. Simply put, this means that the company who made your appliance is also supplying the replacement part for it.
Keep searches simple. Use keywords, e.g. "leaking", "pump", "broken" or "fit".
Sorry, we couldn't find any existing reviews that matched. Try using some different or simpler keywords.
★★★★★
★★★★★
Jason N - October 4, 2024
Verified Purchase
Everything went well
The videos help considerably, I am back in perfect order. Not sure which part was causing the issue, so it was nice to get them all at a good price.
★★★★★
★★★★★
Teresa S - December 5, 2021
Verified Purchase
So fast in shipping
No problems with this order at all, I ordered the wrong part yet return and ordered the right one was so fast my dryer was down only a day or two. Fired it up runs great. Thank you for a great part.
★★★★★
★★★★★
Peter A - July 18, 2018
Verified Purchase
Thermostat ordered online
The thermostat arrived on time and my dryer is working better than ever.
★★★★★
★★★★★
Arizena H - September 29, 2021
Verified Purchase
Great part
The part fit perfect and my dryer is working better than new.
★★★★★
★★★★★
Barbara P - January 16, 2020
Verified Purchase
Just as described. Fixed the problem
Part was just as described for issue we were having with our dryer. My husband replaced it and now dryer is working perfectly. Also very quick shipping. Definitely recommend 5*****
★★★★★
★★★★★
Kevin D - January 29, 2019
Verified Purchase
The parts worked perfect.
Parts received in a timely manner and were correct.
★★★★★
★★★★★
James M - January 9, 2019
Verified Purchase
Fit as advertised.
Arrived on time.
★★★★★
★★★★★
Guinter A - May 12, 2020
Verified Purchase
LG Dryer
Part came on time and worked nicely.????
★★★★★
★★★★★
Brent R - December 26, 2018
Verified Purchase
great price, right part, fast shipping!A+++++
The part was the exact part I needed. Once it was install the dryer was put to the test. Perfect results!
★★★★★
★★★★★
Clyde C - February 12, 2018
Verified Purchase
Cheap and easy fix
I was ready to scrap my LG dryer and buy a new one as my clothes would take forever to dry. When I found this part online and the description sounded exactly like my problem, I decided to give it a try. Thanks to the incredibly helpful, step-by-step video, I was able to easily replace the thermistor in less than an hour and now my clothes are dry in one cycle. Miraculous that this little gizmo could make such a difference.
< Prev
1
2
Next >
Customer Repair Stories
Average Repair Rating: 2.8 / 5.0, 11 reviews.
What's this?
Sort by:
< Prev
1
2
Next >
Search filter:
Clear Filter
Your search term must have 3 or more characters.
Keep searches simple. Use keywords, e.g. "leaking", "pump", "broken" or "fit".
Sorry, we couldn't find any existing installation instruction that matched.
igniter would not light
Initially replaced igniter. Didn't think it was bad though. Read other suggestions on another website. None were the correct diagnosis for my situation. And when I figured it out they did not offer correct part. The dryer thermistor temp sensor (probe sensor) is what I replaced. Found it on Parts Select. I did replace other parts also. Bu
... Read moret that's the one that ultimately was the issue. Was not hard at all if one is even a little handy.
Read less
Dave from SAINT JOHN, IN
Difficulty Level:
Easy
Total Repair Time:
15 - 30 mins
Tools:
Screw drivers
3 of 3 peoplefound this instruction helpful.
Was this instruction helpful to you?
Thank you for voting!
no heat
To install the repair part took about 5 minutes. It took a couple hours to take apart of put back together. Unfortunately the part I replaced was not the problem. I still have no heat. My own fault for not testing the parts before ordering. It seems there is no ignition of the gas for the hot air flow. I would be grateful for any su
... Read moreggestions. The video was FABULOUS...really step by step, screw by screw. Thanks for that. Barb Swenson
Read less
Barbara from CUDAHY, WI
Difficulty Level:
Really Easy
Total Repair Time:
30 - 60 mins
Tools:
Screw drivers
1 of 2 peoplefound this instruction helpful.
Was this instruction helpful to you?
Thank you for voting!
No heat; flow-sense error diagnosed but no blockage in exhaust.
The first thing I did was locate a copy of the Service Manual (not the User / Owner Manual). After looking at that and looking online I learned that there is no sensor for the Flow Sense feature itself. The Flow Sense doesn't detect a blockage. It detects excessive heat and the manufacturer has simply concluded that too much heat is most
... Read morelikely caused by a blocked duct and then it activates the Flow Sense safety feature: cutting off the heat source. Since I knew it was a heat problem I figured I'd get inside and check the two thermostats and the igniter. Igniter was fine, one thermostat was fine, the other one - the High Limit Thermostat - was giving inconsistent readings. I replaced it. Here's how: First I took the dryer apart. This is a little time consuming. There are a lot of parts that need to come out. I recommend that you put the screws in small baggies with a note as to where you took them out of so that you know where they go when you put it back together. You need to remove part of the back, the top and the front. I removed the electrical box because that is what is shown in the manual but I'm not convinced that I needed to. See if you can get the rest of the dryer apart without removing it but if you have to remove it it's not that big of a deal. It's a little tricky to detach the wire harnesses is all. And extra steps, of course. I did not remove the drum. Instead I just reached inside with the front off and pulled the wires off the thermostats to test them for resistance with a multimeter. It was kind of a pain and a little awkward but I did not want to mess with the drum tensioner. Once I figured out that the High Limit Thermostat was the likely culprit I removed it - which required a very short Phillips head screw driver and some patience since I could not actually see one of the screws. But all good. Just remember which wire goes on which terminal. Make a note for yourself: gray back / red front - something like that. Then I ordered the part and installed the new one and rebuilt the dryer in reverse from what I did.
Now, here's the thing: I actually did two things: aside from changing the thermostat I also thoroughly cleaned out the dryer. Somehow a lot of lint built up in there - no idea how since it all appeared to leave the dryer through the vent. but there must be some small gap somewhere. I cleaned everything including the flame detector. When I put it all back together it worked but I'm not 100% sure that the thermostat was bad. It's at least possible that all the lint and dirt was messing with the way the thermostats behaved. So what I would recommend, if you have this problem, is to clean it out first and then put it back together enough to run it and see of the heat comes on. It will take maybe 30-60 seconds for the heat to come on while the igniter lights. If not, go ahead and replace whichever thermostats or other parts you think are broken.
Read less
Daniel from MANALAPAN, NJ
Difficulty Level:
A Bit Difficult
Total Repair Time:
1- 2 hours
Tools:
Screw drivers
12 of 12 peoplefound this instruction helpful.
Was this instruction helpful to you?
Thank you for voting!
No heat
Pull off the top and front of the dryer and reached in and replaced the part it was easy. Had to clean all the dryer out real good with from the lint
Brent from HINCKLEY, UT
Difficulty Level:
Really Easy
Total Repair Time:
30 - 60 mins
Tools:
Screw drivers
5 of 7 peoplefound this instruction helpful.
Was this instruction helpful to you?
Thank you for voting!
Dryer would turn on but no heat to dry clothing
Unplugged dryer, pled forward to get access to back of dryer. Removed screws, enabling top, front control clip. door panel to be taken off. Lift out drum, replace heater assembly. drum belt, thermistor. Cleaned entire interior and reassembled, working good as new. All parts fit and were a exact match.
I'm not for reading instructions. So I just dove right in and took the dryer apart to get down to the motor. I gave the dryer a thorough cleaning and replaced the 3 parts I ordered from the online recommendation. Wish I would have ordered 2 sensors and the 2 thermostats that are near the burner. Just so replace beings I was in there. Repl
... Read moreacing the parts was easy, found them just by looking for matches to the new parts. Reassembled the dryer, dont think I put a single screw back where I got it lol. And still haven't put the top lid back on due to difficulty. Not sure if I even needed any parts, found a nest in my outside vent completely plugging it. But after a good cleaning and replacing the parts the dryer dries the best it has since we've owned it. The dryer came with our house which we bought 3 years ago and it was 2 years old when we purchased the house, so it is now 5 years old.
I followed video instruction in disassembling and set screws from each section into diferent small bowls in the order they were removed. Hardest part was some of the screws were really hard to get loose without stripping them and my control panel did not match video but I figured it out. Replacing the parts were easy and putting it back
... Read more together. While it was apart I cleaned everything including fan blower wheel. Thanks for the right parts and your online video. With your help and a prayer this 62 year old woman fixed the problem and dryer runs like new.
The customer support received from the this site individual. Was professional and very helpful. The video they recommended want me to the replacement part (Thermistor Ntc) step-by-step thanks to this site I had no problem at all
Ask our experts a question about this part and we'll get back to you as soon as possible!
14 questions answered by our experts.
Sort by:
< Prev
1
2
Next >
Search filter:
Clear Filter
Your search term must have 3 or more characters.
Keep searches simple. Use keywords, e.g. "leaking", "pump", "broken" or "fit".
Sorry, we couldn't find any existing answers that matched.Try using some different or simpler keywords, or submit your new question by using the "Ask a Question" button above!
Cody
March 19, 2023
How do you test the thermostat
For model number 61423
Hello Cody, thank you for your question. To test the thermostat, you need an ohmmeter. Hold the two probes of the meter, one probe at one terminal of the thermostat and the other probe at the other end of the terminal. If the meter shows infinite or zero resistance it means that the thermostat is bad. We hope this information is useful!
6 people found this helpful.
Was this helpful?
Thank you for voting!
Catherine
March 29, 2023
Hello is part AGM30045804 the heating mechanism part for this dryer. Problem is the clothes are not drying the heat is gone. Just making sure this is the right part?
For model number DLG7188RM
Hi Catherine, thank you for the question. The part number you provided is the dryer thermistor temperature sensor, which helps monitor and regulate the temperature inside a dryer. If the dryer is not producing heat, then this part may be defective, and you may need to replace it. However, if it is not faulty, then you may also need to check the blower thermostat, part number PS8747887, the moisture sensor, part number PS3529161, and the gas igniter, part number PS3527801. If any of these parts are faulty, you may need to replace them. We hope this helps!
Hello Phillip, thank you for reaching out. This kit includes 2 high-limit thermostats and 1 thermistor. We hope this information helps!
1 person found this helpful.
Was this helpful?
Thank you for voting!
Perry
January 2, 2025
when drier goes on the gas does ignite . flame burns for 45 to 60 seconds then goes out. i will restart and same thing will happen
For model number DLGX8001W
Hello Perry, thank you for getting in touch. We would recommend checking the gas valve assembly, part number PS16878121, to solve the problem. A malfunctioning gas valve can most probably cause this issue. We hope this helps!
I've replaced the high limit thermostat twice and was told to try installing a thermistor kit. I ordered the kit #AGM30045804 and had no trouble changing the sensor with the wire harness included. I can't find any videos on how to change the two thermostats, or thermistors (the other parts in the kit) anywhere for the model dryer I have. I found a parts diagram, and the corresponding #s for the kit, but i'm not sure where they go on my dryer. I'm assuming they don't connect to the heating element. Any help offered would be greatly appreciated!!!
Sincerely,
Missy
For model number 79681022900
Hi Missy, thank you for your question! Other two thermostats are the blower thermostats, blower thermostat is located on the blower housing of your dryer. We hope this information helps!
1 person found this helpful.
Was this helpful?
Thank you for voting!
PAUL
May 11, 2023
Does part number PS16878105 fit my dryer?
For model number DLEX3250V
Hi Paul,
Thank you for your question. This would not be the correct part for your dryer. Your dryer has a thermal fuse, part number PS3530485, a high limit thermostat, part number PS3530482, and a blower thermostat, part number PS8747887. We hope this helps!
ERROE CODE d9
I have cleaned the vent fully
dryer stops 5 minutes into cycle
For model number DLEX3250V
Hello Paul, thank you for contacting us. Based on the description that you have provided, we believe you have a faulty blower wheel. Check the blower wheel. If it is not working correctly, you may need to replace it, part number PS3528491. We hope this helps.
Hi Barbara, thank you for the question. Based on our understanding of the issue, we would recommend checking the thermostat assembly, part number PS3530482, as it is most likely faulty and may need to be replaced. Please submit a new question if you have any follow-ups!
Gas dryer was working, put in load of towels on high heat and smelled burning. Then it would not heat on any setting. Ideas on the part we need?
For model number DLG1502W
Hello Nicole, thank you for contacting us. Based on our understanding of the issue, we would recommend checking the high limit thermostat, part number PS16878105, to fix the issue. We hope this helps!
Was this helpful?
Thank you for voting!
Carley
May 3, 2024
Does this part fit my dryer? (DLE2301W)
For model number DLE2301W
Hello Carley, thank you for reaching out. Yes, the high limit thermostat you mentioned is compatible with your model. Glad to be of assistance!
Was this helpful?
Thank you for voting!
< Prev
1
2
Next >
✖
Ask a Question
Ask our experts a question on this part and we'll respond as soon as we can.