Your coupon for will be reflected when you check out!
✖
Your coupon for
✖
Hello!
You're visiting the PartSelect site in U.S.
Would you like to shop on the Canadian site?
Stay on this site
Go to Canadian site
✖
Model Number Locations
1Select Category Type
Select Category Type
2Select Product Type
Select Product Type
3Select {MODEL} Type
Select {MODEL} Type
Sample Model Number Tags
Model numbers can be made up of numbers (1005400, for example) or a combination of letters and numbers (LAT1000AAE). The model number will most likely appear on either a paper sticker or a metal plate. Your appliance's model number tag may look similar to the sample model number tags shown here (model number highlighted in yellow):
Model has been saved to My Models. If you're not signed in, your lists are available on this device and will expire within 30 days.
Model has been saved to My Models.
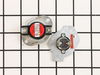
This kit includes one high limit thermostat with a limit of 250 degrees Fahrenheit, and one thermal cut-off fuse with a limit of 360 degrees Fahrenheit. The thermostat and fuse help prevent the dryer from overheating.
$34.95
In Stock
Order now and your part arrives in 2-3 business days!
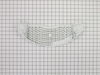
This is a replacement clutch assembly or cam kit for your washer. The clutch assembly is mounted on the drive shaft on the bottom of your washer. You may need to replace the clutch assembly if the spl...
$37.76
In Stock
Order now and your part arrives in 2-3 business days!
Add efficiency and precision to your laundry procedure with this Whirlpool Dryer Timer, a top-grade replacement part for your appliance. Constructed by Whirlpool, this authentic OEM component meshes s...
$133.38
In Stock
Order now and your part arrives in 2-3 business days!
Questions And Answers for WETLV27HW3
Be the first to ask our experts a question about this model!
✖
Ask a Question
Ask our experts a question on this model and we'll respond as soon as we can.
First I removed the back cover (several screws). Then, I disconected wires from the high-limit thermostat and the thermal cut-off fuse (both of these parts were included in the Thermal Cut-Off Kit). Then, I removed four screws that hold these two parts, replaced the parts, put the screws back, and attached the wires. Finally, I put back t
... Read morehe cover.
Removed the back of the dryer. Used a multimeter set to read Ohms to check each Thermal cut-off switch. Each one read with continuity and some resistance. The one that was bad read open. So i replaced this one and the other one that came in the kit since i already paid for both.Then i replaced the back ran the dryer and it worked great.