EasyApplianceParts is now PartSelect! We've merged our sites to provide a better shopping experience for you.   Full Details
Back
Back
Keep typing for more specific results...
Models > WET4027HW1 > Symptoms > Not Heating

Parts That Fix Whirlpool Washer Dryer Combo WET4027HW1 Not Heating

Not Heating is a commonly reported symptom for the WET4027HW1 Whirlpool Washer Dryer Combo, and we have put together a full guide on how to fix this. This advice is based on feedback from people who own this exact appliance. We have listed the most common parts for your WET4027HW1 Whirlpool Washer Dryer Combo that will fix Not Heating. We have included repair instructions, and helpful step-by-step video tutorials. If you are experiencing this issue, not to worry, DIYers just like you have fixed this, and shared their experience to help you!
Fixes Symptom 54% of time

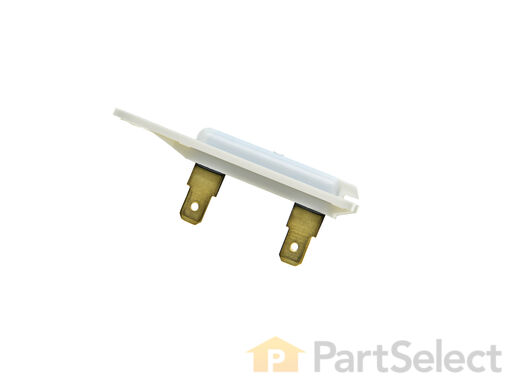
The Dryer Thermal Fuse (Thermal Cutoff, Temperature Fuse) is a 2 by ½ inch, white, plastic safety mechanism that stops the flow of electricity to the motor circuit when a dryer overheats. If the fuse is missing or broken, your dryer will not start. A thermal fuse fails when the exhaust temperature exceeds the fuse rating, that is when the temperature rises above the temperature that the fuse is designed to handle. This can occur when a heating element is shorted, a regulating thermostat or thermister fails, or with a partially restricted exhaust vent. The fuse attaches to the blower wheel housing. It must be replaced when there is no longer continuity between the terminals. This is a one-time fuse, meaning it cannot be re-set. The replacement part features two 3/16 inch terminals.

$ 17.90
  In Stock
PartSelect Number PS11741460
Manufacturer Part Number WP3392519

Replacing your Whirlpool Dryer Dryer Thermal Fuse

Replacing your Dryer Thermal Fuse

Customer Repair Stories

No heat but would run otherwise
Cleaning the lint out of the whole machine took quite a bit of time--it was everywhere. Underneath the lint trap was a collection that ultimately ruined the thermal fuse where it restricted the air flow considerably.

Ascertaining the problem was the most time consuming part.

The actual repair was quite simple and didn't take but 15-20 minutes.
  • Dana from Grassvally, CA
  • Difficulty Level:
    A Bit Difficult
  • Total Repair Time:
    More than 2 hours
  • Tools:
    Screw drivers
910 of 997 people found this instruction helpful.
Was this instruction helpful to you?
Thank you for voting!
Dryer was working, but no heat.
First I unplugged the dryer, then removed the back panel, this exposed most all of the wiring and I could see the heater coils.
Not knowing what the problem was I started looking at the coils and could not see any broken parts.
So then checked the thermal fuse for continuity I removed the two wires from it with a small pair of needle nose pliers, it was held in place by two screws, once they were removed the fuse came out easily, I checked continuity with a volt meter placing the meter on X1 Ohms and could not get a reading.
I replaced with a new one and put it all back together the way I took it apart.
Then I plugged it in and it worked first time, I now have warm dry clothes.
  • ANTHONY from CHESHIRE, CT
  • Difficulty Level:
    Easy
  • Total Repair Time:
    15 - 30 mins
  • Tools:
    Nutdriver, Pliers, Screw drivers
3036 of 3442 people found this instruction helpful.
Was this instruction helpful to you?
Thank you for voting!
Fixes Symptom 30% of time

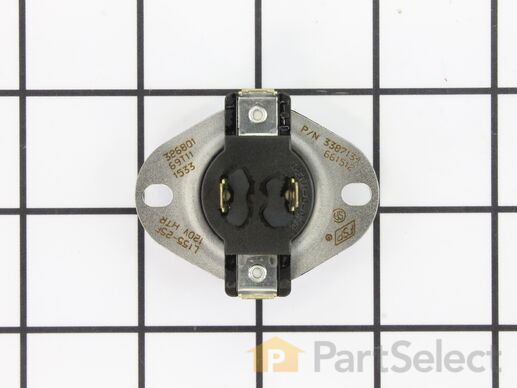
This thermostat (Dryer Operating Thermostat, Dryer Cycling Thermostat, Cycling Thermostat, Dryer Thermostat) is used to maintain a temperature of 155 degrees in the dryer drum. The internal bias heater also allows this thermostat to provide a low heat temperature of approximately 140 degrees when the low temperature setting is selected. The part measures 2 by 1.5 inches, comes in black/silver and is constructed of plastic and metal. The thermostat attaches to the blower wheel housing.

$ 27.17
  In Stock
PartSelect Number PS11741405
Manufacturer Part Number WP3387134

Replacing your Whirlpool Dryer Dryer Cycling Thermostat

Replacing your Dryer Cycling Thermostat

Customer Repair Stories

Dryer would leave clothes damp
First, I unplugged the dyer and then I removed all of the screws for the panel that covers the rear of the dryer. This exposed the cycling thermostat's location. I then removed the wires, one at a time so I would be able to put them back on in the same place. Then I removed the one screw using a nut driver and then put the new cycling thermostat in place. It was pretty easy.
  • Luke from Elmira, NY
  • Difficulty Level:
    Easy
  • Total Repair Time:
    Less than 15 mins
  • Tools:
    Nutdriver
10 of 15 people found this instruction helpful.
Was this instruction helpful to you?
Thank you for voting!
Dryer would not shut off on auto dry settings
I removed the discharge duct from the back of the dryer. Then, I removed the screws on the back of the dryer and the back itself. This exposed the cycling thermostat. I removed the screw holding the thermostat. I took the wires off the defective thermostat and reinstalled them on the new thermostat. Then, I reassembled in reverse order.
  • Wiliam from Belleville, MI
  • Difficulty Level:
    Really Easy
  • Total Repair Time:
    15 - 30 mins
  • Tools:
    Nutdriver
40 of 48 people found this instruction helpful.
Was this instruction helpful to you?
Thank you for voting!
Fixes Symptom 11% of time

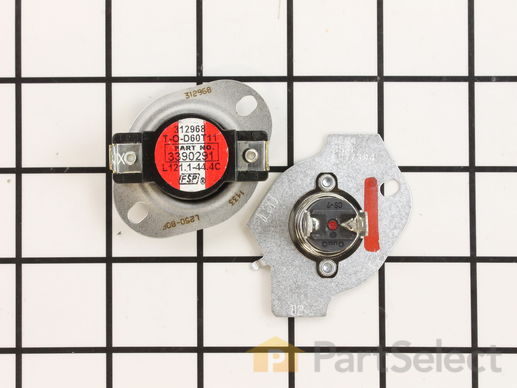
This kit includes a high-limit thermostat rated at 250°F and a thermal cut-off fuse rated at 360°F, both designed to prevent overheating in dryers. The thermostat monitors internal temperatures and interrupts power if the dryer exceeds safe operating limits, while the thermal fuse acts as a backup safety device, cutting off power if temperatures rise too high. These components are essential for maintaining safe dryer operation and protecting against fire hazards. If your dryer is overheating or not running at all, replacing these parts may restore proper function. Always disconnect power before installation and consult your appliance’s manual for placement and compatibility.

$ 34.85
  In Stock
PartSelect Number PS334278
Manufacturer Part Number 279769

Replacing your Kenmore Dryer Thermal Cut-Off Kit

Replacing your Thermal Cut-Off Kit

Customer Repair Stories

Dryer motor runs,drum turns but no heat.
Removed the back of the dryer. Used a multimeter set to read Ohms to check each Thermal cut-off switch. Each one read with continuity and some resistance. The one that was bad read open. So i replaced this one and the other one that came in the kit since i already paid for both.Then i replaced the back ran the dryer and it worked great.
  • Arron from El Reno, OK
  • Difficulty Level:
    Easy
  • Total Repair Time:
    15 - 30 mins
  • Tools:
    Pliers, Screw drivers
30 of 33 people found this instruction helpful.
Was this instruction helpful to you?
Thank you for voting!
Drum of the dryer was rotating but no heating
First I removed the back cover (several screws). Then, I disconected wires from the high-limit thermostat and the thermal cut-off fuse (both of these parts were included in the Thermal Cut-Off Kit). Then, I removed four screws that hold these two parts, replaced the parts, put the screws back, and attached the wires. Finally, I put back the cover.
  • Tomasz from University Heights, OH
  • Difficulty Level:
    Really Easy
  • Total Repair Time:
    Less than 15 mins
  • Tools:
    Socket set
45 of 52 people found this instruction helpful.
Was this instruction helpful to you?
Thank you for voting!
Fixes Symptom 6% of time

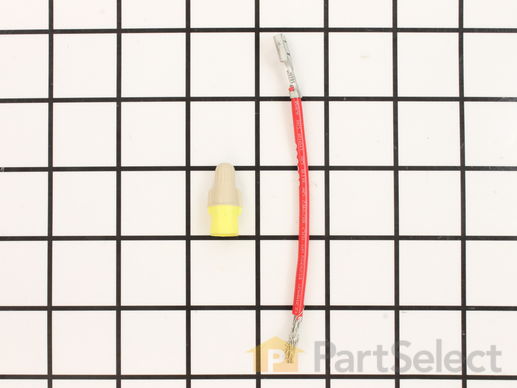
This kit is used for electric clothes dryers, and it comes with a yellow wire nut.

$ 9.92
  In Stock
PartSelect Number PS334206
Manufacturer Part Number 279457

Replacing your Whirlpool Dryer Heating Element Connection Wire Kit

Replacing your Heating Element Connection Wire Kit

Customer Repair Stories

Dryer stopped heating
(Always unplug dryer before making any repairs) I opened the dryer and checked the heating element. Making sure that the connection was good and nothing was damaged, I determined the problem was overheated wires. They melted and lots connection. I replaced them with the heating element wire connection kit. Easy to install and simple to get right. I cleaned the dryer again with a vaccum cleaner, removing all the lint, and checked the vents, making sure they were clear...I turned the breaker on (it was tripped when the dryer overheated)and everything worked great.
  • Joseph from Austin, TX
  • Difficulty Level:
    Really Easy
  • Total Repair Time:
    15 - 30 mins
  • Tools:
    Screw drivers, Socket set
5 of 6 people found this instruction helpful.
Was this instruction helpful to you?
Thank you for voting!
couldn't get the wire connection anywhere after we bought the heating element.
we received the two heating element wires in 3 days and connected the heating element with no problem works great.
  • Betty from Erie, PA
  • Difficulty Level:
    Really Easy
  • Total Repair Time:
    15 - 30 mins
  • Tools:
    Socket set
5 of 5 people found this instruction helpful.
Was this instruction helpful to you?
Thank you for voting!