Your coupon for will be reflected when you check out!
✖
Your coupon for
✖
Hello!
You're visiting the PartSelect site in U.S.
Would you like to shop on the Canadian site?
Stay on this site
Go to Canadian site
✖
Model Number Locations
1Select Category Type
Select Category Type
2Select Product Type
Select Product Type
3Select {MODEL} Type
Select {MODEL} Type
Sample Model Number Tags
Model numbers can be made up of numbers (1005400, for example) or a combination of letters and numbers (LAT1000AAE). The model number will most likely appear on either a paper sticker or a metal plate. Your appliance's model number tag may look similar to the sample model number tags shown here (model number highlighted in yellow):
Model has been saved to My Models. If you're not signed in, your lists are available on this device and will expire within 30 days.
Model has been saved to My Models.
The drum support roller kit (Dryer Repair Kit) allows the dryer to tumble properly by supporting the drum cylinder. The idler pulley provides the tension required for a multi-ribbed belt. The belt att...
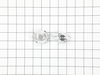
This Idler Pulley includes the tri-ring and gasket and everything included here is manufacturer-certified. This part maintains correct tension on the drive belt in order to spin the drum properly. If ...
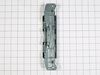
This drum support roller is sold individually. Most dryers require two. The tri-rings are included. This is a drum support roller for a dryer. It is a genuine replacement part. This part is sold separ...
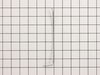
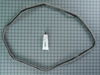
The Drive Belt is a 93 1/2" belt which wraps around the dryer drum to allow tension and movement. If broken the dryer will not turn properly, or there may be loud noises. The part is rated as "medium"...
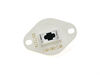
The internal-bias thermistor (Thermistor, Dryer Thermister, Dryer Thermistor) prevents the dryer from overheating by monitoring and controlling the temperature of the inside of the dryer drum. It is l...
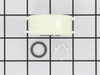
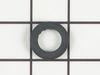
If you notice that your dryer is noisy or will not tumble, you may need to replace the tri ring. This part is triangular, and is less than an inch in size. Tri rings can be found both on the idler pul...
If your washer shakes or vibrates loudly when it reaches its max speed, check that the leveling legs are even. To ensure that the washer is firmly on the ground using all four legs, adjust the legs so...
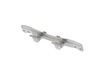
The idler pulley with bracket ensures proper tension on the dryer’s drive belt, allowing the drum to spin effectively. This assembly includes the pulley and arm, making it ideal for replacing a worn o...
The 5400W, 240-volt heating element is supplied directly by the manufacturer for use in various models of dryers. It is responsible for generating the heat needed to dry your laundry effectively. It i...
This is the moisture sensor for your dryer. It helps detect the amount of moisture in your clothes during the dryer cycle. If you notice your clothes are still wet after an automatic dryer cycle is do...
Also known as Thermal Cut-Off kit. The thermostat acts as a safety mechanism that keeps the dryer from overheating and the fuse is like a backup system - it's set to trip at a higher temperature than...
This kit is used for electric clothes dryers, and it comes with a yellow wire nut.
$9.95
In Stock
Questions And Answers for WED92HEFW0
Ask our experts a question about this model and we'll get back to you as soon as possible!
9 questions answered by our experts.
Sort by:
< Prev
1
2
Next >
Search filter:
Clear Filter
Your search term must have 3 or more characters.
Keep searches simple. Use keywords, e.g. "leaking", "pump", "broken" or "fit".
Sorry, we couldn't find any existing answers that matched.Try using some different or simpler keywords, or submit your new question by using the "Ask a Question" button above!
Kevin
December 3, 2022
No heating I change out the venting to new stuff would it be heating element. Or a high thermostat.
For model number WED92HEFW0
Hello Kevin, thank you for contacting us. Based on our research, we would recommend checking the following parts to fix your issue: high-limit thermostat and cut-off kit, part number PS334387, heating element, part number PS11746337, and thermostat, part number PS11746740. Please reach out to customer service if you need help placing an order, anyone will be happy to assist you. We hope that helps.
Hi Roger, thank you for reaching out. This error code, F3E1, is a shorted thermistor sensor error. The sensor is mounted to the blower wheel housing below the dryer drum. If the power cord is accessible, try resetting the machine by unplugging and replugging the machine's power cord into the wall outlet. If the problem persists, you will need to replace the thermostat, part number PS11746740. We hope this information helps!
Lint Screen not catching all lint. Does the screen come with a felt material that is attached to the outer perimeter of the screen?
I would like to order and or replace my current lint screen. Please advise, thanks.
For model number WED92HEFW0
Hello Sue, thank you for the question. As per the manufacturer, the felt seal is no longer needed with the lint filter. You will need to replace the whole lint filter, part number PS11755878. We hope this is helpful!
Dryer turns on. When I press and hold start it clicks, but nothing happens. The sensing light flashes, and the timer is working, but nothing is happening.
For model number WED92HEFW0
Hello Mark, thank you for getting in touch. If your dryer turns on, clicks when you press start, but does not actually start the drying cycle despite the sensing light flashing and timer working, the most likely culprit is a faulty thermal fuse. We would recommend checking the thermal fuse, part number PS11766766, to solve the problem. We hope that helps!
Dryer just stopped working. Wont turn on anymore. Digital display come on.
For model number WED92HEFW0
Hi Steve, thank you for the question. First, you need to check the drive belt, part number PS11722115. Over time, the belt can break from normal use. If the belt is broken, the dryer will not turn. To quickly determine if the belt is broken, reach into the dryer and turn the drum by hand. If the drum spins very easily, the belt is likely broken and will need to be replaced. If the belt is not faulty, you may need to check the idler pulley, part number PS334244. If the idler pulley is stuck, worn, or damaged, you may need to replace it. If the problem persists, you may need to check the drum roller, part number PS11752609. If the drum rollers are worn out, the dryer will not turn properly. If there is no issue with the drum rollers, you may need to check the blower wheel, part number PS11750462, as an obstructed blower wheel could prevent the drum from turning. If the blower wheel is not obstructed, you may need to check the drive motor, part number PS12723927. If you suspect the motor is at fault, you may need to replace it. We hope this is what you were looking for!
Grow a second set of hands. Always unplug any appliance. Remove lint screen. remove two screws (philips Head). I took a wooden shim lightly tapped w/hammer to pop front of dryer top free. Mine worked on hinges and just flipped back til it rested against the wall. Removed two 5/16 screws inside holding face on carefully raise face section
... Read moreoff the support clips at either side on the bottom. Pull drum out (I have the large style drum commercial size [approx.). Clean the inside free of all lint (known to be fire hazard). Sling new belt around drum. Get newly grown set of hands to hold drum in place. Pinch belt to fit between tensioner, lift tensioner and place belt around motor pulley. Spin drum couple times to make certain belt isn't twisted. Reverse dismantle proccess to put back together. Replace all parts that come with kit, you'll feel better knowing you got a new dryer, almost.
1st Unpluged power. 2nd removed two screws under lint screen cover. 3rd poped up lid with flathead screwdryer, then removed (2) 5/16 screws from door cover and unpluged lid switch, lifted up dryer door pannel 4th removed drum 5th took out plastic triangle wheel rings 6th removed old belt guild (to motor pully)
... Read more/>7th removed old wheels and plastic rings stops 8th cleaned excessive hair dust with shopvac 9th put new replaicment part in dryer. made sure to turn manually to make sure belt was lined up properly, then put all dryer peices back. 10th aditional work, took back cover off and removed the (4) 1/4 screws for lint screen case (left side in dryer) vacumed out any excessive dirt lint ect, also cleaned any excessive dust I found in back of dryer, dryer , exhaust ect, and put all back together. JUst like a new dryer aain after all PM was complete.
I asked for advise, looked around and priced heating elements and thermostats. This was the best combo offered for the price given. It was shipped and received it very quick. Installed it and 5 minutes later, she was running like a champ!


 Diagram and Parts List for Whirlpool Dryer")


 – Part Number: WP8544771")


")
