Your coupon for will be reflected when you check out!
✖
Your coupon for
✖
Hello!
You're visiting the PartSelect site in U.S.
Would you like to shop on the Canadian site?
Stay on this site
Go to Canadian site
✖
Model Number Locations
1Select Category Type
Select Category Type
2Select Product Type
Select Product Type
3Select {MODEL} Type
Select {MODEL} Type
Sample Model Number Tags
Model numbers can be made up of numbers (1005400, for example) or a combination of letters and numbers (LAT1000AAE). The model number will most likely appear on either a paper sticker or a metal plate. Your appliance's model number tag may look similar to the sample model number tags shown here (model number highlighted in yellow):
Model has been saved to My Models. If you're not signed in, your lists are available on this device and will expire within 30 days.
Model has been saved to My Models.
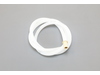
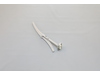
This is a replacement dishrack roller or wheel for your dishwasher. It is made of gray plastic, measures a little over an inch in diameter, and is sold individually. This roller is designed for the lo...
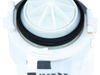
This micro filter is a genuine OEM replacement part that is compatible with dishwashers. Its primary function is to catch and trap small particles of food, debris, and other contaminants that may be p...
This lower dishrack keeps dishes stable during the wash cycle and fits specific dishwasher models. It is crafted for durability and easy installation. Always consult your dishwasher’s manual to ensure...
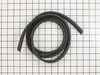
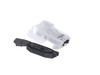
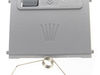
This seal is also referred to as a door gasket, and it is designed for use on dishwashers. It is installed on the door of the appliance, and it seals the space between the tub of the dishwasher and th...
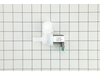
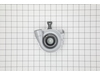
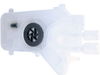
This water access valve, also known as a water inlet valve, is an authentic OEM replacement part used in dishwashers. The valve controls the flow of water into the dishwasher. It is responsible for al...
This OEM upper spray arm is sourced directly from the manufacturer for use in various models of dishwasher. It is responsible for spraying water onto the dishes that are placed in the top rack. It is ...
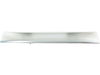
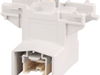
This is a door handle, which is is installed at the top of your dishwasher door and allows you to open and close it. However, if this part is missing or broken, the opening and closing your dishwasher...
This circulation pump with heater is for dishwashers.
Circulation pump with heater moves heated water through the spray arm to clean the dishes.
Unplug the dishwasher before installing this part...
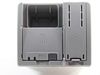
This genuine upper dishrack assembly fits select Bosch, Thermador, and Gaggenau dishwashers. It includes tine rows and rollers for effective dish placement and smooth operation. Ensure model compatibi...
Ask our experts a question about this model and we'll get back to you as soon as possible!
1 question answered by our experts.
Sort by:
< Prev
1
Next >
Search filter:
Clear Filter
Your search term must have 3 or more characters.
Keep searches simple. Use keywords, e.g. "leaking", "pump", "broken" or "fit".
Sorry, we couldn't find any existing answers that matched.Try using some different or simpler keywords, or submit your new question by using the "Ask a Question" button above!
Lori
January 4, 2023
Displaying a code of 09. Not heating. Is this the heating element?
For model number SHP65T55UC
Hello Lori, thank you for your question! If the E09 error code appears on the appliance display it means that your heating element is defective. If your salt LED is on at the same time, please check that your dishwasher salt sensor is not dirty and causing your appliance to assume there is dishwasher salt when it has not been topped up. If this does not help you need to replace the heat pump, part number PS8761336.Unfortunately, you can not change the element only as it comes complete with the pump. If this does not help you need to check the control panel, part number PS8737362. Customer service is always available to help you place an order if you are having trouble doing so. Good luck with your repair.
The bottom rack of our Bosch dishwasher was discontinued & no longer available anywhere, so we ordered an OEM replacement rack from PartSelect.com & hoped that it would fit.
The new rack fits perfectly & is actually an improvement over the old one. The new rack doesn't have a vase tower, but that is actually a big design impr
... Read moreovement because it can store more dishes & is more flexible than the old one. The new rack comes without a handle cover, but it was very easy to move the handle cover from our old rack to the new one.
The E:15 error code means water is detected in the pan under the unit. There are several ways this can happen.
In this case, it was caused by a bad inlet valve. It did not close properly and led to an overflow of water inside that eventually spilled into the pan underneath the unit.
I see now why the pump keeps run
... Read morening after this error. In this case, it would have led to a big flood in the kitchen if it did not.
I was actually able to run the unit while broke by manually operating the valve under our sink that provides water to the unit.
Be sure to turn off breaker before servicing. Don't get shocked!
Be sure to turn off water before starting! Or, you'll have a flood.
Anyway, I just pulled the unit out (was secured by 2 screws on the sides). I lifted up the insulation material on the left side to get at the valve. Pushed a little green tab to release the electrical plug. Then, use pliers to move clamp off the white water hose on the inside. Then, pull of white hose. This was hard in my case. Took a lot of force. Then, reach behind the unit and use pliers to unscrew water hose. Now, the whole gray panel there can pop out with some force. Then, slip the old valve out and slip new one in. Reconnect hoses and clamp. Note that I put some caulk on the connector where white hose goes. Not sure if needed or not.
I removed the 3 #20 torn screws in the handle, and the six #20 tore screws inside the door that hold the outer door skin in place.
The plastic handle has a series of molded hooks that allow it to snap into the stainless steel skin.
To avoid damaging the skin, use a utility knife to cut behind the two large hooks o
... Read moren the bottom of the handle and the one on each end. One trimmed, the handle easily slides out of the door skin.
The new one will effortlessly snap in-place, then reposition the door skin and fasten with the 9 screw previously removed.