


S35KMK35UC-64 Bosch Dishwasher - Overview
Sections of the S35KMK35UC-64
[Viewing 6 of 6]
Keep searches simple, eg. "belt" or "pump".


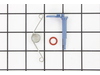
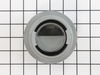
Dishwasher Wheel
PartSelect #: PS10058839
Manufacturer #: 12004485
This wheel kit is used for the lower rack of your dishwasher. The kit includes 8 wheels and axels. To install you can simply clip the wheel onto the frame. There are eight wheels on the lower rack in...
$44.54
On Order


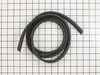
Dishwasher Door Seal
PartSelect #: PS8723143
Manufacturer #: 00494772
This seal is also referred to as a door gasket, and it is designed for use on dishwashers. It is installed on the door of the appliance, and it seals the space between the tub of the dishwasher and th...
$30.98
In Stock

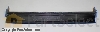
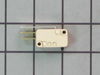
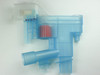
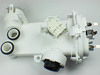
Water Valve
PartSelect #: PS8728724
Manufacturer #: 00622058
The dishwasher water inlet valve controls the water flow into your appliance, ensuring proper fill levels for effective cleaning. This genuine OEM replacement part is compatible with select Bosch, The...
$53.37
In Stock

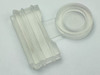
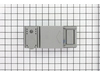
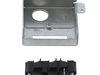
Dishwasher Micro Filter
PartSelect #: PS8727803
Manufacturer #: 00615079
This micro filter basket assembly is used in dishwashers. The filter is responsible for filtering the water inside the dishwasher. All of the food and debris particles that are removed from your dishe...
$62.27
In Stock

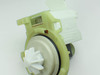
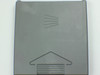
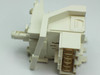
Drain Pump
PartSelect #: PS8729769
Manufacturer #: 00642239
The drain pump ejects the water from the dishwasher.
$136.87
In Stock


Lower Door Seal
PartSelect #: PS8714648
Manufacturer #: 00432490
This door seal, also known as a door gasket, is an authentic manufacturer replacement part for your dishwasher. It is responsible for creating a watertight seal between the tub and dishwasher door and...
$43.00
In Stock

Dishwasher Dishrack Stopper Kit
PartSelect #: PS8697039
Manufacturer #: 00165254
A holder is used in dishwashers, it is known as the dishrack stop kit. This kit comes with both the front and the rear stop, these parts are installed at either end of the rails that the upper rack sl...
$12.01
In Stock


Questions And Answers for S35KMK35UC-64
We're sorry, but our Q&A experts are temporarily unavailable.
Please check back later if you still haven't found the answer you need.
Common Symptoms of the S35KMK35UC-64
[Viewing 10 of 10]Leaking
Fixed by
these parts
these parts

Show All
Not draining
Fixed by
these parts
these parts
Show All
Will not dispense detergent
Fixed by
these parts
these parts
Show All
Will not fill with water
Fixed by
these parts
these parts
Show All
Not cleaning dishes properly
Fixed by
these parts
these parts

Show All
Door latch failure
Fixed by
these parts
these parts

Show All
Will Not Start
Fixed by
these parts
these parts
Show All
Door won’t close
Fixed by
these parts
these parts

Show All
Noisy
Fixed by
these parts
these parts
Show All
Not drying dishes properly
Fixed by
these parts
these parts
Show All
Keep searches simple. Use keywords, e.g. "leaking", "pump", "broken" or "fit".
The plastic clip on the roller broke
We let this go for a shameful amount of time before I decided I could probably fix it. The roller broke so you could only pull it out about halfway or it would come off the track. I looked up the part, and bought it. Actually bought two in case it happened again. When I arrived I looked at how it was put together on the other side and t
... Read more
hen just basically pushed it onto the rod and it was fixed. I am ashamed it took so long to do it. Never be afraid to try it yourself. It was a total of $10 shipped to fix it.
Read less
Parts Used:
-
Catherine from AMHERST, NY
-
Difficulty Level:Very Easy
-
Total Repair Time:Less than 15 mins
21 of 31 people
found this instruction helpful.
Was this instruction helpful to you?
Thank you for voting!
Spring assembly on detergent and rinse aid dispenser broke so the sliding lid would not operate
Here are the steps you need to take to do the job properly:
1. turn off electrical circuit breaker to the dishwasher
2. remove 8 total hex screws (3 on each side and 2 at the top) of the inside door panel. The door panel will slide off so be careful and it happens pretty quickly when the last hex screw is removed.
3 ... Read more . unplug the wiring harness to the detergent/rinse aid dispenser
4. you need to use a flat head screw driver to lift the metal flanges on the top and bottom of the detergent/rinse aid dispenser.
5. the unit will pop out toward the inside of the dishwasher
6. insert the new detergent rinse/aid dispenser and very important all metal flanges are pulled back over the plastic edge (top and bottom) of the dispenser unit. The screw driver needs to be used to assist in pushing the dispenser unit as tight to the frame of the door to ensure the metal flanges grab hold and lock in.
7. re-attach the wiring harness
8. re-install the dishwasher door with 8 hex screws. Doing this step alone is challenging as the door frame will want to keep going up to close. I used a small foot stool and placed it inside the dishwasher front area on top of the inside metal door area so the door would stay open roughly half way. I then used my knees to prop up the outer door cover while i got 2 screws started then was able to easily complete the job.
9. run the dishwasher with a detergent packet loaded into your new dispenser. I checked for 15-20 minutes during initially running to insure no issues or leaks.
10. One last note - my Bosch dishwasher had a custom wood door installed to the outer panel to blend in with our kitchen cabinets. The door itself was much heavier as a result. Some of you may not experience the slight difficulty i noted above in step 8. Good luck.
Read less
Parts Used:

-
Steven from SUWANEE, GA
-
Difficulty Level:A Bit Difficult
-
Total Repair Time:30 - 60 mins
-
Tools:Screw drivers
18 of 25 people
found this instruction helpful.
Was this instruction helpful to you?
Thank you for voting!
My dishwasher was not draining
With the help of You Tube, this 50 year old Mom got the job done. Not that complicated if you watch the step by step instructions on the Appliance Pro video. My repairman and husband were both determined to just buy a new one but this 20 year old dishwashing genius was just in need of a little repair. Only need a screwdriver, and sli
... Read more
ghtly confusing as wires hook on a little different on new pumps. I suggest watching video the whole way through and then playing it step by step as you do the repair. Worked great for me. Thanks.
Read less
Parts Used:
-
Karen from CRESTON, IA
-
Difficulty Level:Easy
-
Total Repair Time:15 - 30 mins
-
Tools:Screw drivers
17 of 25 people
found this instruction helpful.
Was this instruction helpful to you?
Thank you for voting!