


RM2520 MTD Trimmer - Overview
Models starting with RM2520
Click on the best match to narrow your results.
Keep searches simple, eg. "belt" or "pump".

Trimmer Fuel Tank Assembly
PartSelect #: PS10009586
Manufacturer #: 753-06183
This fuel tank assembly is supplied by the original manufacturer for use in trimmers. It is responsible for storing and transferring fuel to the engine for combustion. The assembly consists of a plast...
$15.20
Special Order

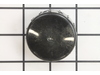
Trimmer Bump Head Knob
PartSelect #: PS9306452
Manufacturer #: 791-153066B
This genuine bump head knob assembly, sometimes known simply as the bump head, is black and approximately 2 inches long. Sold individually, this plastic part releases the cutting line. Over time, this...
$14.78
In Stock

Trimmer Carburetor
PartSelect #: PS9119300
Manufacturer #: 753-06190
It is an authentic manufacturer-sourced replacement part that i supplied for Craftsman trimmers. The function of a carburetor is to mix the air and the gas into a highly combustible mix before it goes...
$39.54
In Stock

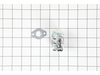
Trimmer Small Clutch Assembly
PartSelect #: PS9303676
Manufacturer #: 753-05860
This clutch assembly is a genuine OEM replacement kit for outdoor lawn equipment. The kit includes the clutch drum, clutch, clutch washer, and screw. The clutch assembly transfers power from the engin...
$28.58
In Stock


Trimmer Inner Reel
PartSelect #: PS9119496
Manufacturer #: 753-1155
This spool is for line trimmers.
Spool houses the cutting line and fits inside the cutting head to cut grass and weeds.
Wear work gloves to protect your hands when installing this part.
$24.40
In Stock


Trimmer Switch
PartSelect #: PS10014381
Manufacturer #: 791-182405
This Switch is a black, plastic on/off switch for a trimmer. Installation of this manufacturer-certified switch is rated as "Easy" and requires a screwdriver, wrench set and socket set. Refer to your ...
$12.77
In Stock

Trimmer Air Cleaner Cover Assembly
PartSelect #: PS10009648
Manufacturer #: 753-06415
$13.10
Special Order


Common Symptoms of models starting with RM2520
[Viewing 3 of 3]Will Not Start
Fixed by
these parts
these parts

Show All
Engine stops after a few seconds or minutes
Fixed by
these parts
these parts
Show All
Cutting line does not come out
Fixed by
these parts
these parts
Show All

Keep searches simple. Use keywords, e.g. "leaking", "pump", "broken" or "fit".
Fuel line broke
Removed the two screws holding the fuel tank to the main unit. Removed the two fuel lines and any stuck on rubber. Installed and installed two screws to mount the new tank. Slid fuel lines on their respective connectors. Done.
Parts Used:
-
Erik from ROBERTSDALE, AL
-
Difficulty Level:Really Easy
-
Total Repair Time:15 - 30 mins
-
Tools:Screw drivers
12 of 14 people
found this instruction helpful.
Was this instruction helpful to you?
Thank you for voting!
string trimmer would not start
emptied fuel from tank. pulled off the 2 fuel lines from the carburetor.opened the air cleaner door. removed the 2 torque screws that hold on the carburetor. removed the carburetor and air cleaner gasket. installed new carburetor and gasket and put back and tightened the 2 torque screws. closed air cleaner door and pushed the fuel lines o
... Read more
nto the new carburetor.put some fuel in the tank. started the trimmer. runs great.
Read less
Parts Used:
-
john from SHARPSVILLE, PA
-
Difficulty Level:Really Easy
-
Total Repair Time:15 - 30 mins
6 of 8 people
found this instruction helpful.
Was this instruction helpful to you?
Thank you for voting!
Trimmer Would Not Start
The replacement of the carburetor, O-ring, and gasket was simple. I removed 2 screws that held the air cleaner and carburetor in place, swapped them out, and replaced the screws. What took longest was finding a piece of fuel line after breaking one of them. It was brittle after hanging in my garage for several years. I found some in my
... Read more
garage and replaced it. It took a few pulls to get it started, but ran very smooth.
Additional information: rather than mixing my fuel, I purchased 40:1 pre-mix fuel to prevent gunking up the carburetor in the future. I use it in my other trimmer and have not had any issues.
Additional information: rather than mixing my fuel, I purchased 40:1 pre-mix fuel to prevent gunking up the carburetor in the future. I use it in my other trimmer and have not had any issues.
Read less
Parts Used:
-
Ricardo from FORT WORTH, TX
-
Difficulty Level:Easy
-
Total Repair Time:30 - 60 mins
-
Tools:Pliers, Screw drivers
3 of 4 people
found this instruction helpful.
Was this instruction helpful to you?
Thank you for voting!