


RK767G*D1 Hotpoint Wall Oven - Overview
Sections of the RK767G*D1
[Viewing 3 of 3]


Keep searches simple, eg. "belt" or "pump".

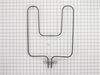
Oven Bake Element 240v
PartSelect #: PS249424
Manufacturer #: WB44X200
This is a 240 volt bake element for your oven or range. The kit comes with two installation screws and the element. The element functions by supplying heat from the bottom of the oven to bake or cook ...
$44.95
In Stock
 – Part Number: 40A15")
Light Bulb (40W)
PartSelect #: PS217532
Manufacturer #: 40A15
This 40-Watt light bulb is sold individually and is a genuine OEM replacement option for your home appliances. It is specially designed to withstand extreme temperatures, so this bulb is compatible wi...
$19.10
In Stock

Range Light Cover
PartSelect #: PS247415
Manufacturer #: WB36X192
This light bulb lens covers the interior light bulb in an oven, range, or stove. No tools are necessary to replace this part. Simply slide off the wire bracket to remove the existing light bulb lens. ...
$21.95
In Stock

Broiler Pan - Large
PartSelect #: PS1517612
Manufacturer #: WB48X10056
This large broiler pan is found in the bottom of your oven and is used to catch drippings from broiling foods. This part includes the grate and bottom pan and is made of porcelain. The grate measures ...
$40.95
In Stock

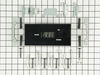
Electronic Clock and Timer Kit
PartSelect #: PS233996
Manufacturer #: WB19X10006
This electronic clock replaces the mechanical clocks with a more reliable digital timer. As per the manufacturer, this part should be installed by appliance repair person.
$325.58
In Stock


Thermostat
PartSelect #: PS235956
Manufacturer #: WB21X5209
The length of this thermostat's capillary is 62 inches.
No Longer Available


Questions And Answers for RK767G*D1
We're sorry, but our Q&A experts are temporarily unavailable.
Please check back later if you still haven't found the answer you need.
Common Symptoms of the RK767G*D1
[Viewing 8 of 8]Little to no heat when baking
Fixed by
these parts
these parts
Show All
Element will not heat
Fixed by
these parts
these parts
Show All
Oven not heating evenly
Fixed by
these parts
these parts
Show All
Will Not Start
Fixed by
these parts
these parts
Show All
Oven is too hot
Fixed by
these parts
these parts
Show All
Little to no heat when broiling
Fixed by
these parts
these parts
Show All
Timer will not advance
Fixed by
these parts
these parts
Show All
Touchpad does not respond
Fixed by
these parts
these parts
Show All
Keep searches simple. Use keywords, e.g. "leaking", "pump", "broken" or "fit".
Replacment of the bake unit
The hardest part was removing the old nuthead screws off the old bake burner. Once those were off installing the new bake element was simple. One screw in each wire terminal, two hex head screws to hold the unit in place. Works like a charm!
Parts Used:
-
Beth from Matthews, NC
-
Difficulty Level:Easy
-
Total Repair Time:Less than 15 mins
-
Tools:Nutdriver, Socket set
611 of 626 people
found this instruction helpful.
Was this instruction helpful to you?
Thank you for voting!
oven lower burner burned out
Very easy, remove two screws, pull burner unit out slightly, then remove the two screws attaching the wires, one to each side, remove old unit and replace with new unit and replace screws.
Works fine perfect replacement.
Works fine perfect replacement.
Parts Used:
-
james from franklin, TN
-
Difficulty Level:Really Easy
-
Total Repair Time:Less than 15 mins
-
Tools:Nutdriver, Screw drivers
509 of 592 people
found this instruction helpful.
Was this instruction helpful to you?
Thank you for voting!
Bake element was on its last legs, starting to crack but still functional.
Removed the racks, unscrewed the back plate which holds the element, unscrewed the leads from the element, removed the old part.
Reversed the process to install the new element.
Turned the oven on for a few minutes to burn any contaminates off the new element, replaced the racks.
And that was it; quite ea ... Read more sy.
Reversed the process to install the new element.
Turned the oven on for a few minutes to burn any contaminates off the new element, replaced the racks.
And that was it; quite ea ... Read more sy.
Read less
Parts Used:
-
Lawrence from San Jose, CA
-
Difficulty Level:Easy
-
Total Repair Time:Less than 15 mins
-
Tools:Nutdriver, Screw drivers
223 of 373 people
found this instruction helpful.
Was this instruction helpful to you?
Thank you for voting!