Your coupon for will be reflected when you check out!
✖
Your coupon for
✖
Hello!
You're visiting the PartSelect site in U.S.
Would you like to shop on the Canadian site?
Stay on this site
Go to Canadian site
✖
Model Number Locations
1Select Category Type
Select Category Type
2Select Product Type
Select Product Type
3Select {MODEL} Type
Select {MODEL} Type
Sample Model Number Tags
Model numbers can be made up of numbers (1005400, for example) or a combination of letters and numbers (LAT1000AAE). The model number will most likely appear on either a paper sticker or a metal plate. Your appliance's model number tag may look similar to the sample model number tags shown here (model number highlighted in yellow):
PSB2200NBB01 General Electric Microwave - Overview
Save your modelModel Saved!
Save your model for later to make things easier.
Model has been saved to My Models. If you're not signed in, your lists are available on this device and will expire within 30 days.
Model has been saved to My Models.
This ceramic microwave fuse is just over an inch in length. It is white in the center, and metal on both ends. This is a 20-amp fuse, and is used to power your microwave. If the touch pad on the micro...
This light bulb is a 12 Volt/20 Watt bi-pin base halogen lightbulb, meaning it emits a bright, white light which is similar to natural daylight and is inserted into its socket, as opposed to being rot...
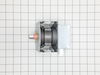
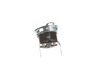
Introducing the GE Microwave Thermostat - a vital safety component for your microwave. Crafted with precision, this thermostat is specifically designed to prevent overheating scenarios which can cause...
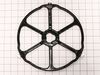
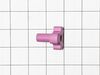
This GE Turntable Shaft, also known as a Shaft Turntable, is an essential component for your microwave. Manufactured by trusted brand, GE, it is designed with precision to ensure your microwave's turn...
Introducing the GE Encoder Board, an essential appliance part for maintaining the top-tier performance of your beloved GE appliances. This original manufacturer-approved component is designed to ensur...
Turned out the issue was easily solved by replacing a single, inexpensive fuse.
First off, UNPLUG THE MICROWAVE.
The fuse is located under the plastic grill at the top of the microwave. It's held on by two screws. Once you've removed the screws and taken off the plastic grill, you go to the right side of the mic
... Read morerowave and remove another screw that holds a small metal grill in place. Removing the small metal grill is probably the toughest part of this repair. You kind of have to rock it back and forth a bit to get it to release. Once that's off, you can get to the fuse. I removed the burnt out one with a pair of needle nose pliers. I also put a small piece of cardboard under the fuse when I did this so I didn't accidentally drop it into the innards of the microwave. I did the same thing when I replaced the new fuse. I then plugged the appliance back in and made sure it worked. Once that was confirmed, I replaced both grills.
Unscrewed the light cover beneath the microwave with a phillips head screwdriver. The bulb is very tiny and has 2 straight parallel prongs that slide into 2 small holes. Grab bulb from both sides with each hand firmly and slide STRAIGHT out (no twisting or pushing). Don't worry about breaking even though it may take a fair amount of pr
... Read moreessure to pull out. New bulb arrived within a couple of days. Due to high shipping cost, suggest buying 2 or more bulbs at once. Bulb is often used as a kitchen night light so that is probably why I only got 9 months out of it.
Unpluged power cord!! Removed front control panel to expose electronics (need to remove top horizontal vent cover to expose mounting hardware). Unplugged leads to control panel board. Removed magnetron with Tstat (3- phillip heads, need stubby). Installed new parts and control panel, plugged it in tested. Done.