Your coupon for will be reflected when you check out!
✖
Your coupon for
✖
Hello!
You're visiting the PartSelect site in U.S.
Would you like to shop on the Canadian site?
Stay on this site
Go to Canadian site
✖
Model Number Locations
1Select Category Type
Select Category Type
2Select Product Type
Select Product Type
3Select {MODEL} Type
Select {MODEL} Type
Sample Model Number Tags
Model numbers can be made up of numbers (1005400, for example) or a combination of letters and numbers (LAT1000AAE). The model number will most likely appear on either a paper sticker or a metal plate. Your appliance's model number tag may look similar to the sample model number tags shown here (model number highlighted in yellow):
PEB7226DF2BB General Electric Microwave - Overview
Save your modelModel Saved!
Save your model for later to make things easier.
Model has been saved to My Models. If you're not signed in, your lists are available on this device and will expire within 30 days.
Model has been saved to My Models.
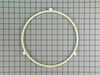
The roller glide in your microwave rests under the microwave plate, and allows it to rotate when the microwave is running. It is a round plastic ring with 3 wheels spaced out around the perimeter. If ...
This part is the replacement wave guide cover for your microwave. It is gray in color and is approximately 3-1/2 inches long and 4 inches wide. The wave guide cover transmits microwave radiation while...
Brighten up your kitchen with the GE Lamp, a high-quality replacement part for your appliance. This product is specifically designed to bring you a reliable and long-lasting lighting solution to keep ...
Ask our experts a question about this model and we'll get back to you as soon as possible!
2 questions answered by our experts.
Sort by:
< Prev
1
Next >
Search filter:
Clear Filter
Your search term must have 3 or more characters.
Keep searches simple. Use keywords, e.g. "leaking", "pump", "broken" or "fit".
Sorry, we couldn't find any existing answers that matched.Try using some different or simpler keywords, or submit your new question by using the "Ask a Question" button above!
Kelly
November 30, 2019
Microwave will turn on, but will not heat.
For model number PEB7226DF2BB
Hi Kelly,
Thank you for your question. If the microwave will not heat, there are some parts that you will need to check to see which one is causing the issue. You will need to check the diode, the door switch and the magnetron. I hope this helps. Thank you and have a great day!
Was this helpful?
Thank you for voting!
Sallie
December 2, 2024
How do I repair the push button opener that does not always open?
For model number PEB7226DF2BB
Hi Sallie,
Thank you for your great question. Here is some general information on how to remove and install a microwave door button. Before you begin this repair, unplug the microwave from the electrical outlet. Then unthread the rear and side screws securing the microwave cover. Then pull the rear side of the cover out and lift it up and pull it back to remove it. Then to avoid injury, you will need to release the potentially dangerous charge from the capacitor by placing a screwdriver with an insulated handle across the terminals for a few minutes. Be careful not to touch the metal portion of the screwdriver. Then use a screwdriver to unthread the screws securing the control panel. Then open the door and lift the control panel up to detach. Take note of how the wires connected to the electronic control board are arranged or take a photo of them and then disconnect the wire connectors. Then lift up the door release lever and then depress the retaining tabs to release the old door button. Verify that the springs are interlocked and then slide them into the posts of the new button and align the posts with the control panel and snap the button into place. Then reinstall the control panel by connecting the wire connectors to the appropriate terminals on the control board making sure that the door release lever is positioned under the latch lever. Then insert the lower tabs of the of the control panel into the slots in the frame and thread the screw to secure the panel. Then reinstall the microwave cover by aligning it correctly on the microwave frame and secure it with the screws. Restore power to the microwave and the button should now work for you. We hope this helps!
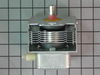
First, I read the PartsSelect DIY report by Linda, Warsaw, IN. With confidence, I purchased the magnetron. Upon receipt, I took the built-in microwave out of the cabinet, set the unit on the kitchen floor, and was stopped cold by the Safety Torx nuts on the reverse of the unit. Borrowing the right wrench allowed the 20 minute start-to-
... Read morefinish part changeout and reinstallation of the unit in the cabinet to proceed. The old magnetron was the defective part. Discovery of the 10-year Parts-Only warranty on the less than 10-year old unit was insufficinet to guide me to take the unit in for their Labor bill to repair. New part in hand, it just was that easy - and assumed to be no less expensive.
1. Unplug the microwave, or cut power at the fuse box. 2. Clean the microwave in case there is any food splatters or residue. 3. Using a flathead screwdriver, pop off the plastic rivets that hold the waveguide cover in place. They should not take much to pop out. 4. Replace the damaged waveguide cover with the replacement,
... Read morereinsert plastic rivets. 5. Restore power to the microwave and test.