Your coupon for will be reflected when you check out!
✖
Your coupon for
✖
Hello!
You're visiting the PartSelect site in U.S.
Would you like to shop on the Canadian site?
Stay on this site
Go to Canadian site
✖
Model Number Locations
1Select Category Type
Select Category Type
2Select Product Type
Select Product Type
3Select {MODEL} Type
Select {MODEL} Type
Sample Model Number Tags
Model numbers can be made up of numbers (1005400, for example) or a combination of letters and numbers (LAT1000AAE). The model number will most likely appear on either a paper sticker or a metal plate. Your appliance's model number tag may look similar to the sample model number tags shown here (model number highlighted in yellow):
Model has been saved to My Models. If you're not signed in, your lists are available on this device and will expire within 30 days.
Model has been saved to My Models.
This touch-up paint can be used on a wide variety of household appliances. It is most often used on washers, dryer, refrigerators, dishwashers, ranges, freezers, trash compactors, or microwaves. It is...
$12.58
In Stock
Order now and your part arrives in 2-3 business days!
If you notice an unusual noise coming from your freezer, the evaporator fan blade might be the problem. Frost-free freezer models use evaporator fans to move air through the evaporator for more effici...
$14.63
In Stock
Order now and your part arrives in 2-3 business days!
The light socket in your refrigerator houses the light bulb and connects it to the power source. If your refrigerator light is not coming on when you open the door, you may need to replace the light s...
$49.28
In Stock
Order now and your part arrives in 2-3 business days!
Appliance spray paint is a great way to cover up any chips and scratches that have appeared on your appliances. Instead of replacing the part entirely, this is an easy fix. This is also a great way to...
$26.17
In Stock
Order now and your part arrives in 2-3 business days!
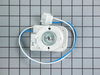
This evaporator fan motor is located in the back of the freezer, and circulates air over the refrigerator coils. These coils will convert the heat into cool air, which is then circulated.
$181.41
In Stock
Order now and your part arrives in 2-3 business days!
This part is a temperature sensing devise. It senses the rise in evaporator temperature during a defrost cycle and cycles the defrost heater off after all frost is melted. It is calibrated to permit...
$53.46
In Stock
Order now and your part arrives in 2-3 business days!
Questions And Answers for MQF1656TEW01
Ask our experts a question about this model and we'll get back to you as soon as possible!
2 questions answered by our experts.
Sort by:
< Prev
1
Next >
Search filter:
Clear Filter
Your search term must have 3 or more characters.
Keep searches simple. Use keywords, e.g. "leaking", "pump", "broken" or "fit".
Sorry, we couldn't find any existing answers that matched.Try using some different or simpler keywords, or submit your new question by using the "Ask a Question" button above!
Rae Lynn
January 15, 2020
I have replaced the thermometer and the timer and it stays cold for several days then starts loosing its coldness again and goes from 10 to 30 degrees even since we replaced both parts. What is happening?
For model number MQF1656TEW01
Hi Rae Lynn, thank you for your question. When you are having temperature problems in your appliance, there are a few parts that could cause the issue. You can use a multi meter to test most of the parts. Make sure you cut power to your appliance before doing any repairs or tests. First you should test your defrost thermostat. Place the thermostat in ice cold water for 2-3 minutes after removing it from your appliance. It should be reading 0 ohms to be working correctly. Another part to check would be your defrost heater. Remove it from the appliance. It should be reading anywhere between 0 - 50 ohms to be working. If both of those parts are fine you may need to take a look at your evaporator fan motor for being the issue. It could be that it is not circulating the air. Good luck with your repair.
1 person found this helpful.
Was this helpful?
Thank you for voting!
Ella
March 21, 2022
Bottom of freezer is covered in solid sheet of ice. I’ve thawed all ice and lines but within days it is back again. Getting frost on packages in there also.
For model number MQF1656TEW01
Hi Ella,
Thank you for your question. If there is ice frozen on the bottom of the freezer floor, the drain tube is likely clogged with debris and it will need to be cleaned out. If you have any questions, please let us know. We are open 7 days a week. We look forward to hearing from you!
I used a flat-head screwdriver to pop out the old light rocker switch. Then, I unplugged the wires, plugged them into the new light rocker switch, and then popped the new switch into the hole. That's it! Lights began working again.
Removed shelves from inside freezer then removed 4 screws holding cover panel. Pulled panel up and slightly pulled forward to remove. Removed wiring connections then removed two screws that held the motor & fan assembly. Removed the support bracket from the old motor and installed same on the support bracket. Reversed removal procedur
... Read morees for installation. Cover panel is a little bit of a problem when trying to reinstall. Put in panel as high as you can and then slide down. You must then exert a little pressure on the bottom portion to get it to seat correctly. Install four remaing screws and you are done. I had this repaired previously by a professional repairman and noticed from the pictures you folks provided that he had installed the screws on the support bracket incorrectly. That was the reason for the fan blade to rip apart.
First I removed the old lightbulb from the socket and replaced it with a new one to confirm that the bulb was not the problem. I then pryed the socket out with a flat-head screwdriver. I could tell that the socket was anchored in its hole with clips so it was relatively easy to pry it out. Once the socket was out, I disconnected the le
... Read moread wires and ordered a replacement socket kit from Partselect. When the new one arrived, I reconnected the lead wires to it, snapped it back into its hole, screwed in a new lightbulb, and presto!! The light was back on with no further problem. Thank you, Partselect!! A $15.00 part saved me what probably would have been at least a $100. service call and heaven knows what the technician would have told me I needed!!!


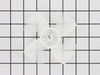
 Diagram and Parts List for Maytag Freezer")


 – Part Number: 72017")


 – Part Number: 350930")