Your coupon for will be reflected when you check out!
✖
Your coupon for
✖
Hello!
You're visiting the PartSelect site in U.S.
Would you like to shop on the Canadian site?
Stay on this site
Go to Canadian site
✖
Model Number Locations
1Select Category Type
Select Category Type
2Select Product Type
Select Product Type
3Select {MODEL} Type
Select {MODEL} Type
Sample Model Number Tags
Model numbers can be made up of numbers (1005400, for example) or a combination of letters and numbers (LAT1000AAE). The model number will most likely appear on either a paper sticker or a metal plate. Your appliance's model number tag may look similar to the sample model number tags shown here (model number highlighted in yellow):
Model has been saved to My Models. If you're not signed in, your lists are available on this device and will expire within 30 days.
Model has been saved to My Models.
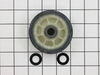
The drum support roller (Dryer Drum Support Roller, Drum Roller and Washer Assembly) holds the drum in the proper position while it spins on the support wheels. This part rotates on the roller shaft w...
The front glide is located at the front of the dryer, the drum rides along it. If you hear a metal-on-metal noise when your dryer is running, your front glide may be worn out and require replacing. Th...
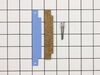
This roller shaft is also known as a support roller shaft or a drum roller axle, and is a part for your dryer. The function of this piece is to act as the axle for the drum roller; it provides a place...
This multi rib belt spins the dryer drum during the drying cycle. This belt is 91-5/8 inches in length, 3/8th of an inch wide and has five ridges. It is black in color and made of rubber. You may need...
This part is a retaining ring, sometimes called a retaining clip, that holds the drum support roller onto the shaft of a dryer. It is made entirely of metal and measures less than an inch in diameter....
The idler pulley tightens the drive belt to properly spin the dryer drum. It is attached to an idler bracket. This part comes with the idler pulley and center bearing. To replace this part, you will n...
If you notice that your dryer is noisy or will not tumble, then you may need to replace the drum roller shaft washer. This drum roller shaft washer is just under an inch in diameter and is sold indivi...
This is a drum felt seal for your dryer. It creates an airtight seal between the dryer rear panel and the back of the drum. It is important that this seal be flexible so it does not interfere with the...
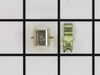
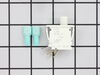
This door catch kit is designed for use in dryers. This is an authentic OEM replacement part. This catch assembly ensures the door of your appliance will close, and remain closed. It allows your appli...
This part moves the clothes around inside your dryer and helps to direct the flow of hot air during the drying cycle.
$31.95
In Stock
Questions And Answers for MDE16CSAYW
Ask our experts a question about this model and we'll get back to you as soon as possible!
1 question answered by our experts.
Sort by:
< Prev
1
Next >
Search filter:
Clear Filter
Your search term must have 3 or more characters.
Keep searches simple. Use keywords, e.g. "leaking", "pump", "broken" or "fit".
Sorry, we couldn't find any existing answers that matched.Try using some different or simpler keywords, or submit your new question by using the "Ask a Question" button above!
Arkadi
March 20, 2025
How to find out why dryer has no heat which parts I have to check and How to check. Thank you
For model number MDE16CSAYW
Hi Arkadi, thank you for reaching out. We would suggest checking the cycling thermostat, part number PS11743793, for continuity. Use the multimeter to test the terminals for continuity. If there is no continuity, you may need to replace it to fix the issue. We hope this sorts out your problem!
From the first time the motor buzzed (but dryer tumbler then started to turn), 2 weeks elapsed for the dryer drum to stop turning altogether. If this occurs, DO NOT continue to push the start button because the motor armature wiring will heat up and the insulation will begin to melt and smell - a SAFETY HAZARD. Unplug dryer and lockout/
... Read moretagout as appropriate.
Through basic troubleshooting, discovered the motor had seized up. Since the unit was about 10 years old and it had to be disassembled for replacement, the decision was made to replace "likely to fail mechanical components including motor, belt, both rear drum rollers/shafts, idler arm pulley/assembly/wheel, associated washers, snap rings and both front glides. Reviewed the PartSelect website and drawings, ordered the parts and they delivered on time. Buy the correct sized snap rings at a local hardware, they're much less expensive. Also once inside your dryer, you'll likely find alot of lint to vacuum out...have fun.
I went online and Googled several resources that showed how to remove the front dryer panels, as well as PartSelect repair stories. From that point on, I took photos as I was disassembling so I would know how to put it back together. Utilize pictures or whatever system you prefer to keep track of taking something apart and putting it back together.
Remove the dryer door, then the front panel Disconnect wires to the light, dryness sensor and door switch. Note belt and pulley configuration that is near the motor-this will help you later when reinstalling the belt. Also note if the ribbed side or the flat side of the belt is against the outer drum wall. Remove the door shroud.
Slip the belt off the idler pulley wheel. Remove front drum support, then dryer drum Note which end of the dryer drum is the front and the orientation of the glides on the drum support. Discard old belt. Drill out and remove the old front glide supports, then install/rivet the new glides.
Remove both old rear drum rollers/shafts, washers, etc. The rear drum roller shafts are secured to a back bracket by a hex nut....feel around you'll figure it out. Replace new roller shafts. Lightly grease using a high quality silicon grease, then replace new washers, roller, snap ring, etc
Carefully unplug wiring harness on motor, there are fragile clips on each end. Don't forget a separate ground wire from the harness is attached to the motor mount bracket. Carefully release tension on the idler arm spring. Using the correct size nut driver, remove three screws (on this model) then take out the motor/idler arm assembly. Remove the old idler arm/pulley assembly. Remove the motor mount clips on each end of the mount (I used a wide blade screwdriver). Remove and replace the motor. Motor configurations changed after Whirlpool bought Maytag, so orient it correctly insuring mounting gasket "nubs" on each end of the motor correspond to the cutouts on the motor mount. Reinstall the motor mount clips. Replace the new idler arm assembly/pulley wheel; grease moving parts with high quality wheel bearing grease. Replace motor/mount bracket assembly back into the dryer. Replace ground wire to motor mount bracket and plug wiring harness back in. Reinstall idler arm spring.
Place belt back on the dryer drum and move into place on rear rollers. Reinstall front drum support. Dryer drum should turn relatively easy. Insure belt is oriented on the drum correctly before connecting belt to motor shaft end and idler arm wheel pulley (the picture you took comes in handy here).
removed door, removed screws to lift top panel, removed screws that held old baffles, replaced with new baffles, took off front panel and cleaned out excess lint while I was in there.


 Diagram and Parts List for Maytag Dryer")


 Diagram and Parts List for Maytag Dryer")