


LRG5115 LG Range - Overview
Sections of the LRG5115
[Viewing 1 of 1]
Keep searches simple, eg. "belt" or "pump".

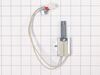
Temperature Sensor
PartSelect #: PS11732697
Manufacturer #: EBG61305805
This temperature sensor, also known as a thermistor, is compatible with various makes and types of appliances. This thermistor uses electrical currents to detect the interior temperature of the applia...
$81.87
In Stock

Igniter
PartSelect #: PS3535362
Manufacturer #: MEE61841401
This gas range oven igniter is compatible with various models of LG gas ranges. It is made up of the igniter element, wire harness, connector and mounting bracket. The igniter is responsible for gener...
$193.39
In Stock

Window,Glass
PartSelect #: PS3524129
Manufacturer #: 4890W1N005A
Discover the LG oven door inner window glass. This genuine LG component serves as a see-through heat barrier, protecting you while adding to the efficiency of your range oven. Ensure the oven surface ...
$130.29
On Order

MOTOR,AC FAN
PartSelect #: PS11761138
Manufacturer #: EAU62343001
This genuine OEM convection fan motor powers the fan that circulates hot air evenly throughout the oven cavity, ensuring consistent temperatures and uniform cooking and baking. This motor is typically...
$119.63
In Stock

CAP,BURNER
PartSelect #: PS3627296
Manufacturer #: MBL61908604
The burner cap attaches to the top of the burner head and acts like a cover for the burner head. This part helps to protect the burner from spills and helps to even the flame while cooking. The cap is...
$71.26
On Order

Oven Rack
PartSelect #: PS11761984
Manufacturer #: MHL63411403
This genuine OEM rack is placed inside your oven cavity, serving as a stable surface for your cookware. It measures approximately 25 inches by 17 inches. The wires can warp due to repeated temperature...
$68.19
In Stock

Burner Right Front
PartSelect #: PS11775890
Manufacturer #: MBE62002902
This LG Cooktop Burner, ideal for several models of LG range ovens, promises quality as a genuine OEM item. Its purpose is significant as it ensures an even distribution of gas through specific holes ...
$71.26
In Stock


Accessory Assembly
PartSelect #: PS11732652
Manufacturer #: AAA75946003
Upgrade your LG range with this bone-fide LG-made accessory assembly that is specifically designed to convert your appliance to run on liquid propane (LP) gas. The LP conversion kit features all the n...
$93.12
In Stock
Questions And Answers for LRG5115
We're sorry, but our Q&A experts are temporarily unavailable.
Please check back later if you still haven't found the answer you need.
Common Symptoms of the LRG5115
[Viewing 6 of 6]Little to no heat when baking
Fixed by
these parts
these parts

Show All
Oven not heating evenly
Fixed by
these parts
these parts

Show All
Element will not heat
Fixed by
these parts
these parts
Show All
Gas igniter glows, but will not light
Fixed by
these parts
these parts
Show All
Will Not Start
Fixed by
these parts
these parts
Show All
Oven is too hot
Fixed by
these parts
these parts
Show All
Keep searches simple. Use keywords, e.g. "leaking", "pump", "broken" or "fit".
Replace Inner Oven glass because it shattered
Go onto youtube, such as https://www.youtube.com/watch?v=-ITkrwhDNMQ and watch similar videos for DYI. The process is very similar to other models.
Once the door is removed, place oven door on a towel or soft place so it does not scratch the door. Unscrew the screws and make sure you notice where each screw goes, so you know ... Read more the process of where each screw goes when you re-assemble.
Once the inner cover is removed, remove the insulation, too so you don't damage it. Use Wet/Dry Shop Vac to clean the shattered glass. (WORD OF ADVICE: I did not remove the insulation and the suction of the Shop Vac removed part of the insulation, so now instead of a quick turn around repair turns into a few weeks repair, because the insulation is on back order 10-14 days from the supplier. DON"T MAKE THE SAME MISTAKE!)
Once the glass has been removed, the new inner glass is replaced, begin by re-assemble the oven door with the correct screws and attached the oven door to the range.
Hope this helps
Read less
Parts Used:
-
Jeffrey from CERRITOS, CA
-
Difficulty Level:Really Easy
-
Total Repair Time:30 - 60 mins
-
Tools:Screw drivers
15 of 32 people
found this instruction helpful.
Was this instruction helpful to you?
Thank you for voting!
Convection Fan stopped working, would spin but not continuously on its own
Unplugged oven electric and turned gas off. Removed all back covers from the unit. Removed the cover on the inside covering the burner and fan in the back of the convection oven. Removed the nut securing the fan to motor shaft with helper holding the motor. Removed the three electrical wires attached to motor, making note where they go.
... Read more
Removed screws mounting the motor to oven. Removed motor cooling fan and shaft spacer from old motor. Fit in same orientation on new motor. Replace all parts in reverse order, restore gas and electric, turn on and test.
Read less
Parts Used:
-
Barry from PIERRE, SD
-
Difficulty Level:A Bit Difficult
-
Total Repair Time:30 - 60 mins
-
Tools:Nutdriver, Screw drivers
9 of 14 people
found this instruction helpful.
Was this instruction helpful to you?
Thank you for voting!
Oven wouldn't ignite
Took off the oven door then took out the racks and two screws in the oven bottom and removed it . Then removed the heat deflector. Then un plugged the old igniter and removed the burner to make it easier to remove the old igniter. Then installed the new igniter and reversed the process
Parts Used:
-
Martin from KEWASKUM, WI
-
Difficulty Level:Easy
-
Total Repair Time:15 - 30 mins
-
Tools:Nutdriver
8 of 16 people
found this instruction helpful.
Was this instruction helpful to you?
Thank you for voting!