Parts That Fix LG Refrigerator LMXS28596D Leaking
Leaking is a commonly reported symptom for the LMXS28596D LG Refrigerator, and we have put together a full guide
... Read more
on how to fix this. This advice is based on feedback from people who own this exact appliance. We have listed the most common parts for your LMXS28596D LG Refrigerator that will fix Leaking.
We have included repair instructions, and helpful step-by-step video tutorials. If you are experiencing this issue, not to worry, DIYers just like you have fixed this, and shared their experience to help you!
Read less
Leaking is a commonly reported symptom for the LMXS28596D LG Refrigerator, and we have put together a full guide on how to fix this.
This advice is based on feedback from people who own this exact appliance. We have listed the most common parts for your LMXS28596D LG Refrigerator that will fix Leaking.
We have included repair instructions, and helpful step-by-step video tutorials. If you are experiencing this issue, not to worry, DIYers just like you have fixed this, and shared their experience to help you!
Fixes Symptom 73% of time
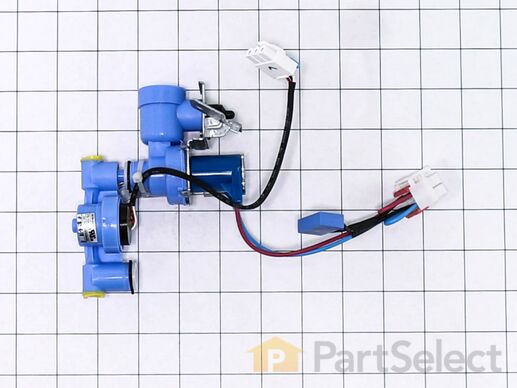
This includes the primary and secondary valves along with the wire harness.
$
120.70
In Stock
PartSelect Number PS3533117
Manufacturer Part Number AJU72992601
Replacing your LG Refrigerator Water Inlet Valve Assembly

Customer Repair Stories
Leaking connection from the valve to the Ice Maker line
Saw the leak, unplugged refrigerator, turned off water. Disconnected water line, removed back panel. Removed part and unplugged electrical connectors. Removed ice maker supply line, cut it about 2 feet ups and put a splicer/connector in. Replaced with a new line from there back to the valve. Inserted new tube in valve and made sure it wa
... Read more
s deep enough in and then secured it. (I replaced part of the line because it was not smoothed and that is where the leak was coming from). Reconnected the electrical connections and attached valve back to refrig. Put panel back on and then reconnected the water supply line. Turned water back on and checked for leaks. Plugged refrig back in and pushed back in place.
Read less
-
Robert from Bridgeport, WV
-
Difficulty Level:Really Easy
-
Total Repair Time:30 - 60 mins
-
Tools:Screw drivers, Wrench set
5 of 5 people
found this instruction helpful.
Was this instruction helpful to you?
Thank you for voting!
replace leaking water inlet valve assembly
1. Shut off water to refrigerator. 2. Removed bottom sheet metal cover (6 screws). 3. Removed leaking water inlet valve assembly from refrigerator (1 screw). 4. Remove water inlet tube (loosen nut) and tube back to refrigerator (pull from water valve after remove cotter pin washer). 5. Detach two electrical wire harnesses. 6. Install new
... Read more
water inlet valve assembly to refrigerator (1 screw). 7. Replace both water tubes to water inlet assembly. 8. Re-attach both wiring harnesses. 9. Turn water to refrigerator on. 10. Check for leaks. 11. Re-attach bottom sheet cover (6 screws).
Read less
-
Richard from JACKSONVILLE, FL
-
Difficulty Level:Really Easy
-
Total Repair Time:15 - 30 mins
-
Tools:Screw drivers
33 of 62 people
found this instruction helpful.
Was this instruction helpful to you?
Thank you for voting!
Fixes Symptom 27% of time
The water reservoir holds the water for the water dispenser as the water chills.
$
60.87
In Stock
PartSelect Number PS3618757
Manufacturer Part Number AJL72911502
Customer Repair Stories
While moving the moving company removed the doors on the fridge but did not drain the tank it froze and broke
I opened the door removed the door shelf behind it is the compartment that the tank is located. There is one screw that needs to be removed. Then there are small clips that hold it in position which you pop loose. the tank is held in place by the to water lines connected to it.They are a pressure release quick disconnect. once removed in
... Read more
stalled the tank tested for leaks after the water was turned back on re-installed in reverse order. INSURE WATER IS TURNED OFF BEFORE REPLACING THIS TANK. We had the water off because it was broken. If it is not broken and your replacing insure water is off.
Read less
-
William from Olympia, WA
-
Difficulty Level:Really Easy
-
Total Repair Time:Less than 15 mins
-
Tools:Screw drivers
2 of 4 people
found this instruction helpful.
Was this instruction helpful to you?
Thank you for voting!


