Your coupon for will be reflected when you check out!
✖
Your coupon for
✖
Hello!
You're visiting the PartSelect site in U.S.
Would you like to shop on the Canadian site?
Stay on this site
Go to Canadian site
✖
Model Number Locations
1Select Category Type
Select Category Type
2Select Product Type
Select Product Type
3Select {MODEL} Type
Select {MODEL} Type
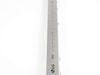
Sample Model Number Tags
Model numbers can be made up of numbers (1005400, for example) or a combination of letters and numbers (LAT1000AAE). The model number will most likely appear on either a paper sticker or a metal plate. Your appliance's model number tag may look similar to the sample model number tags shown here (model number highlighted in yellow):
Model has been saved to My Models. If you're not signed in, your lists are available on this device and will expire within 30 days.
Model has been saved to My Models.
The dishwasher roller assembly connects to the dishrack, and is located in the lower level of the dishwasher. It allows the dishrack to easily slide in and out. If the lower rack keeps falling off the...
$13.75
In Stock
Order within the next 8 hrs and your part ships today!
This holder, also known as a mounting bracket, is responsible for securing the dish rack in place inside your dishwasher during cleaning. It is a genuine OEM replacement part sourced directly from LG ...
$13.75
In Stock
Order within the next 8 hrs and your part ships today!
This is a dishrack holder designed for various models of LG dishwashers. The purpose of this holder is to secure various parts within the dishwasher, such as the cutlery basket. This holder measures a...
$13.75
In Stock
Order within the next 8 hrs and your part ships today!
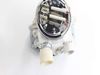
This diverter motor, or stepper motor, controls the movement of the spray arms in your dishwasher. It directs water between the drain pump and the spray arms by turning a check valve inside the pump, ...
$51.71
In Stock
Order within the next 8 hrs and your part ships today!
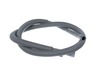
This LG drain hose assembly is a genuine OEM replacement that is compatible with various LG washers. The assembly includes the hose and plastic connectors. The flexible rubber hose transports used wat...
$64.01
In Stock
Order within the next 8 hrs and your part ships today!
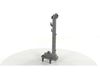
This part is the replacement inlet valve for your dishwasher. It is approximately 4-1/2 inches by 3-1/2 inches. The water inlet valve in your dishwasher connects to the water source and solenoid wire...
$93.04
In Stock
Order within the next 8 hrs and your part ships today!
This genuine OEM Control Panel Assembly fits select LG dishwashers, housing the buttons and display for managing cycles. Verify compatibility and unplug the appliance before installation.
$276.55
In Stock
Order within the next 8 hrs and your part ships today!
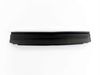
Featuring robust and durable construction, this Upper Dishrack is designed for use with select LG Dishwashers models. Manufactured as a genuine OEM item by LG, this rack is developed to hold your dish...
$158.90
In Stock
Order within the next 8 hrs and your part ships today!
Order within the next 8 hrs and your part ships today!
Questions And Answers for LDF5545ST
Ask our experts a question about this model and we'll get back to you as soon as possible!
2 questions answered by our experts.
Sort by:
< Prev
1
Next >
Search filter:
Clear Filter
Your search term must have 3 or more characters.
Keep searches simple. Use keywords, e.g. "leaking", "pump", "broken" or "fit".
Sorry, we couldn't find any existing answers that matched.Try using some different or simpler keywords, or submit your new question by using the "Ask a Question" button above!
Bob
March 23, 2024
HOW AND WHERE DO YOU INSTALL THE CONTROL PANEL
For model number LDF5545ST
Hi Bob, Thank you for asking. You will need to cut power at the breaker or unplugging the appliance. Next remove 6 screws from the panel and unplug old control board. Plug in new board and put screws back in with the panel. The screws are accessible with the door open. Good luck!
2 people found this helpful.
Was this helpful?
Thank you for voting!
Tim
January 19, 2024
Where is the thermistor located
For model number LDF5545ST
Hello Tim, Thank you for your inquiry. We are showing the thermistor/temperature sensor is located near the circulation pump, which you can access by taking out the racks and removing the lower spray arm. Good luck with your repair.
Replacing this pump is pretty easy. Disconnect the power and drain hose, and pull your dishwasher out from the counter. Lay it on its side on a towel. There WILL be spillage. Disconnecting the pump is simple. There are a couple hoses, one single wire connection (the thermistor) and one multi-wire plug. The pump is held in place by a
... Read morepair of thick rubber holders which can be pulled off by hand. That's it!
After removing the pump, I disassembled it to find out why these fail so soon. It's a very poor design. I found that the nose of the electric motor, where the bearings are located, sits in a plastic cup formed by the top of the pump body. Any leakage from the pump around the motor shaft will be held in place against the motor bearing. It has no place to go. This causes rusting of the bearing. I expect I'll be replacing this one in a few years. :(
But kudos to PartsSelect for getting the right pump assembly for me, after getting the wrong one from another supplier!
This is apparently a widely known issue for LG, and since their call center was closed due to Coronavirus, I had no luck getting them to cover the repair. Not wanting to wait weeks of months for them to get off their duffs, I ordered the part and unscrewed the six screws holding the control panel on and unplugged the old part, plugged in
... Read more the new part, and replaced the screws.
The inside gasket deteriorates over time - However replacement is easy. the main thing you have to remember is after you remove the old gasket, install the new one starting at the middle top of the tub and work your way down both sides. Also, don't push the gasket all the way in...only enough to hold in place. When you close the door the
... Read moregasket will form a better seal around the door.