Your coupon for will be reflected when you check out!
✖
Your coupon for
✖
Hello!
You're visiting the PartSelect site in U.S.
Would you like to shop on the Canadian site?
Stay on this site
Go to Canadian site
✖
Model Number Locations
1Select Category Type
Select Category Type
2Select Product Type
Select Product Type
3Select {MODEL} Type
Select {MODEL} Type
Sample Model Number Tags
Model numbers can be made up of numbers (1005400, for example) or a combination of letters and numbers (LAT1000AAE). The model number will most likely appear on either a paper sticker or a metal plate. Your appliance's model number tag may look similar to the sample model number tags shown here (model number highlighted in yellow):
Model has been saved to My Models. If you're not signed in, your lists are available on this device and will expire within 30 days.
Model has been saved to My Models.
This an authentic OEM 40-Watt replacement light bulb, used in a number of household appliances. It is specially designed to withstand extreme temperatures, which is why these replacement bulbs are mos...
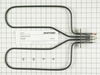
The bake element is the heating element that is found at the bottom of the oven and is responsible for 90 percent of the bake heating. This spade style bake element is 16 inches wide, and connects wit...
This oven rack is sold individually. The functionality of the oven rack is to provide a reliable cooking surface for cookware inside your oven. This specific oven rack is roughly eighteen inches wide ...
This is a broil element for the oven on your range. It fastens to the oven ceiling, and when activated it will supply the heat for the broiling function. This model comes with four screws and an instr...
First I removed the two screws that hold the element in place. I then pulled the element out about 3 inches and disconnected the two wires. I threw away the old pieces.
Then I connected the two wires on the new element. I pushed the wires back in the insulation in the wall of the cabinet. Then I inserted the two screws and t
... Read moreightened them in.
SUPER EASY!!!!!
This $40 part saved me $1500 on a new double wall oven.
Removed 2 screws, pulled element out. My husband used an ohmmeter to see if the electricity needed to be turned off. It showed no voltage. He could not remove electrical connectors by hand, so he used insulated pliers. When he touched the connectors, a shower of sparks covered the inside of the oven and tripped the breaker switch. Th
... Read moreen we noticed the pliers were welded to the side of the oven. Thankfully the pliers had insulated handles and he was not hurt. It might be a good idea to put in the instructions to TURN OFF POWER TO OVEN in the breaker panel because our oven was definitely HOT. Oven works perfectly now.
I removed two retainer screws which released the outside panel. Next I removed 2 screws which hold the middle glass pane from one of its retainer brackets. The was another panel with 4 screws to remove before reaching the final glass inner assembly. Once that panel was reoved with the broken glass it was time to put the rep
... Read moreacement glass assembly back together.


 – Part Number: 8009")


")

