Your coupon for will be reflected when you check out!
✖
Your coupon for
✖
Hello!
You're visiting the PartSelect site in U.S.
Would you like to shop on the Canadian site?
Stay on this site
Go to Canadian site
✖
Model Number Locations
1Select Category Type
Select Category Type
2Select Product Type
Select Product Type
3Select {MODEL} Type
Select {MODEL} Type
Sample Model Number Tags
Model numbers can be made up of numbers (1005400, for example) or a combination of letters and numbers (LAT1000AAE). The model number will most likely appear on either a paper sticker or a metal plate. Your appliance's model number tag may look similar to the sample model number tags shown here (model number highlighted in yellow):
Model has been saved to My Models. If you're not signed in, your lists are available on this device and will expire within 30 days.
Model has been saved to My Models.
This oven rack is chrome in color and is approximately 24.76 inches wide by 15.78 inches deep. If your old oven rack is damaged, you should consider replacing it. Many of our customers have determined...
$81.45
In Stock
Order within the next 5 hrs and your part ships today!
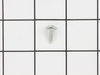
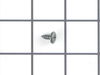
This is a multi-use and multi-appliance screw. It can be used on a microwave, refrigerator, range/oven, air conditioner, dehumidifier, washer, or dryer. The measurements of this screw are 8 x 1/2 inch...
$20.95
In Stock
Order within the next 5 hrs and your part ships today!
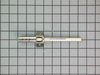
Sold individually. This surface burner grate is for ranges.
Surface burner grate provides a stable surface for cookware on the surface burner.
Wait until the surface is cool to the touch before ...
$104.78
In Stock
Order within the next 5 hrs and your part ships today!
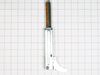
The temperature sensor measures the temperature inside the oven. If your oven is too hot, not heating evenly, is not heating enough when baking, or simply will not start, you could have a faulty tempe...
$68.26
In Stock
Order within the next 5 hrs and your part ships today!
This touch-up paint can be used on a wide variety of household appliances. It is most often used on washers, dryer, refrigerators, dishwashers, ranges, freezers, trash compactors, or microwaves. It is...
$12.58
In Stock
Order within the next 5 hrs and your part ships today!
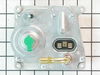
This thermostat is also known as a thermal cut-off fuse and is used in conjunction with your range. This part establishes and maintains the internal temperature of the oven cavity. When the temperatur...
$56.79
In Stock
Order within the next 5 hrs and your part ships today!
This part is a light bulb that is 120-130 volts and 15 watts, and is used in conjunction with your range or wall oven. The function of this bulb is to illuminate the interior of the oven.Before making...
$48.24
In Stock
Order within the next 5 hrs and your part ships today!
This part is the replacement door gasket for your oven. It is made of gray rubber and is sold individually. The door gasket runs along the circumference of the oven door and creates a seal that insula...
$45.14
In Stock
Order within the next 5 hrs and your part ships today!
We're sorry, but our Q&A experts are temporarily unavailable.
Please check back later if you still haven't found the answer you need.
5 questions answered by our experts.
Sort by:
< Prev
1
Next >
Search filter:
Clear Filter
Your search term must have 3 or more characters.
Keep searches simple. Use keywords, e.g. "leaking", "pump", "broken" or "fit".
Sorry, we couldn't find any existing answers that matched.Try using some different or simpler keywords, or submit your new question by using the "Ask a Question" button above!
Fadi
February 22, 2020
The gas oven does not start.
For model number KGRS807SSS00
Hi Fadi,
Thank you for your question. If the gas oven does not start, there are some parts that you will need to check to see which one is causing the issue. You will need to check the high limit thermostat, the spark module, the broil igniter, the temperature sensor, the range gas valve assembly, the bake burner assembly, the temperature probe, the transformer, the burner head and the wiring harness. We hope this helps. Thank you and have a great day.
Was this helpful?
Thank you for voting!
Abraham
March 24, 2020
All burners click non stop even if knobs are off. Burners light up.
For model number KGRS807SSS00
Hello Abraham,
Thank you for your question. In order to find the correct parts for this specific model, we will also need the serial number for the mower. Please resubmit your question with both your model and serial number, and help find the correct parts. We hope to hear from you soon.
Was this helpful?
Thank you for voting!
John
January 17, 2022
Initially my range problem was intermittent oven malfunction. The oven would self ignite and bring oven to operating temp. Then some times after 15-45 minutes, I could hear the igniter clicking (4-5 times), but no ignition sound. Oven temp reading stayed on set number. After several minutes and cycles of the oven trying to ignite with no success, I would shut it off. and then start it again. Would now show a lower temp as it was preheating. Sometimes it would ignite the gas, sometime I can only hear the igniter clicking. I then did a stupid thing and ran a self cleaning cycle (I selected shortest cycle). The next day I tried using the oven. Now it was even more temperamental. First couple tries, it only ran for 10 mins. Now neither the oven or broiler will not even attempt to operate (no spark, no gas). NOTE: When the oven igniter could be heard but not igniting, the range top igniters were also sparking.
What do you suggest?
For model number KGRS807SSS00
Hi John,
Thank you for your question. When you placed the oven on the self-clean mode, this may have damaged an already malfunctioning igniter and possibly the temperature sensor and the bake/broil spark electrode. You will need to inspect these parts to see which one is causing the issue. If the surface burners are clicking, moisture may have gotten into the burners. If water recently boiled over from one of your cooking pots or if you have recently cleaned them, allow them to dry out. We hope this helps! If you have any questions, please let us know.
The oven burner and the broiler burner will not light. Replaced the Range Gas Valve Assembly. This did not resolve the problem. Tested the Temperature Sensor, it’s fine. Further review produced a F2E1 error code in the diagnostics. Replaced the Membrane Switch, error F2E1 still there.
I believe the next step is to replace the Electronic Control Board WP9762794 followed by the Spark Module WPW10331686. Please can you confirm or point me in the right direction. Thanks
For model number KGRS807SSS00
Hi Patrick, thank you for getting in touch. The F2E1 error code means stuck key. Since you have already replaced the membrane switch but the issue persists, we would recommend checking checking the electronic control board, part number PS11747371, as it is most likely faulty and may need to be replaced. We hope this is helpful!
What is the part number for kitchenaid KGRS807SSS00 left knob nickle plated?
For model number KGRS807SSS00
Hi Tanvin, Thank you for the great question. The Nickle Plated Knob is showing as PartSelect Number PS7320464 for this model. Let us know if you have further questions!
Something Kitchen Aid wont tell you but running a self clean on this model stove blows the fuse located on the back of the stove.
First I slid the stove out and removed the back of the stove held in place by 8 Phillips screws. The thermostat fuse is located near the top middle on the back of the stove. Remove the 2 screws hold
... Read moreing it in place. Disconnect the wires, plug in the new part. Put it all back together. Job done in less than 30 minutes.
This repair would have cost $164 through A&E factory service.
My wife used the self cleaning function for the first time after 1.5 years of owning, of course out of warranty. A quick google search identified the problem. Called Kitchenaid, they said of course it can't be that simple, they had never heard of this problem, need to schedule a service call. Googled and found this site, Ordered the part
... Read more, came in, only took a screwdriver and about 20 minutes, just like all the other posts.
shame on Kitchenaid for not owning up to the problem. I even e-mailed them all the links, they did not acknowledge them.
My husband did the repair and said it was very easy to do with the following instructions that I got from the Fix Ya website.
This is a design flaw in the Kitchenaid convection ovens. I can help fix this problem if you have a built in oven (I don't know if the parts are located in the same place for stand alone ovens). Firs
... Read moret it is not a FUSE that has blown rather it is the thermostat in the rear of the oven. (Part #4452223) This small part cost about $37 US and after shipping it will cost you about $47. I tried to get an estimate from an electrician as to what of frustration I decided to tackle the problem mthey would charge for the part and to come out and fix the oven an the price was about $90 for the part and anywhere between $100 and $170 more for the service call + repair! After a day myself.
The very first thing you must do is shut off the circuit breaker to the oven and put a very large sign on the panel that reads DO NOT TOUCH! That is 220 volts to that oven and while most panels have just the oven ont circuit you dont want anyone reactivating that circuit by mistake!
The next part requires a little work. Find the side panel screws (usually located in the oven door) and remove the two panel flanges that cover the 2 or 4 mounting screws that keep the oven in the wall. Now go underneath the oven and find the power junction box, take off the cover and disconnect the wires that run from the oven. Remember which goes where. Next remove the little nut that holds the electical conduit cable to the junction box then loosen the wires. Once this is done you can now slide the oven out and get to the thermostat.
This part requires a little elbow grease. Find a platform or table that fits just under where the stove will slide out and slide the oven on top of the table or whatever for support. In the back of the oven there will be a sheet metal panel that covers the thermostat and other wires, remove the 5 or 6 screws that hold this panel on and put the panel aside. Almost in the middle of the oven's back you will see a little black device with two wires running out of it (one red the other white or yellow). It will have the part number on its front, remove the wire and notice that the thermostat is half red and half white (remember this for the new part will have the same markings) the red wire goes onto the lead coming from the red markings. When you have the new part simply put the new one in (remember: the red side to the red wire), attach it to the back of the oven, replace the sheet metal cover and slide the oven back into place securing it with the screws. Viola! you are done! Turn on the power and then test the oven (I used the broil setting to warm it up then switch to a temperature setting). The entire process took me about an hour and I am NOT a handyman!


 Diagram and Parts List for KitchenAid Range")


 – Part Number: WP9761557CB")

 – Part Number: 72017")


 – Part Number: WP4173175")


 – Part Number: W11675844")


")


")

