Your coupon for will be reflected when you check out!
✖
Your coupon for
✖
Hello!
You're visiting the PartSelect site in U.S.
Would you like to shop on the Canadian site?
Stay on this site
Go to Canadian site
✖
Model Number Locations
1Select Category Type
Select Category Type
2Select Product Type
Select Product Type
3Select {MODEL} Type
Select {MODEL} Type
Sample Model Number Tags
Model numbers can be made up of numbers (1005400, for example) or a combination of letters and numbers (LAT1000AAE). The model number will most likely appear on either a paper sticker or a metal plate. Your appliance's model number tag may look similar to the sample model number tags shown here (model number highlighted in yellow):
Model has been saved to My Models. If you're not signed in, your lists are available on this device and will expire within 30 days.
Model has been saved to My Models.
This genuine OEM microwave turntable tray is a circular plate made of glass and has a diameter of approximately 16 inches. It rotates food in your microwave oven, so that your food cooks evenly. It is...
$65.61
In Stock
Order now and your part arrives in 2-3 business days!
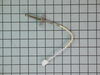
This part is for oven ranges, it connects individual wires and protects the device from electrical surges, voltages, and current. With this part, the house power is connected to the range wire harness...
$26.95
In Stock
Order now and your part arrives in 2-3 business days!
This touch-up paint can be used on a wide variety of household appliances. It is most often used on washers, dryer, refrigerators, dishwashers, ranges, freezers, trash compactors, or microwaves. It is...
$12.58
In Stock
Order now and your part arrives in 2-3 business days!
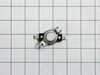
This thermal fuse is a manufacturer-approved replacement part for your oven. It is common for the oven to lose power after completing a self-cleaning cycle, and the thermal fuse is often at fault. Rep...
$28.30
In Stock
Order now and your part arrives in 2-3 business days!
This is cookware designed for use in your range or oven. It is a two-piece dish that is used to grill or cook food while the broil function is on, meaning it can withstand high temperatures. This set ...
$47.20
In Stock
Order now and your part arrives in 2-3 business days!
Appliance spray paint is a great way to cover up any chips and scratches that have appeared on your appliances. Instead of replacing the part entirely, this is an easy fix. This is also a great way to...
$26.17
In Stock
Order now and your part arrives in 2-3 business days!
Order now and your part arrives in 2-3 business days!
Questions And Answers for KEMS309BSS01
Ask our experts a question about this model and we'll get back to you as soon as possible!
5 questions answered by our experts.
Sort by:
< Prev
1
Next >
Search filter:
Clear Filter
Your search term must have 3 or more characters.
Keep searches simple. Use keywords, e.g. "leaking", "pump", "broken" or "fit".
Sorry, we couldn't find any existing answers that matched.Try using some different or simpler keywords, or submit your new question by using the "Ask a Question" button above!
Jeff
January 25, 2020
The microwave light burned out. Do I have to remove the entire dual wall unit to replace the bulb? If so, any helpful hints to ease the process. I am pretty handy. This is a very popular unit, so the repair should be common.Thanks
For model number KEMS309BSS01
Hi Jeff. Please watch our video here: https://www.youtube.com/watch?v=NejD2wd1sjs. Thank you for your question and good luck with your repair.
Was this helpful?
Thank you for voting!
Kim
December 9, 2021
Both of my microwave and oven went out. I bought this house just a year ago. I do not have any paperwork on the appliances. I have the error code F6E8 on the microwave and F6E0 on the oven. Please tell me what to do.
Thank you
Kim
For model number KEMS309BSS01
Hi Kim,
Thank you for your question. The F6 E8 and the F6 E0 error codes indicate a problem with the electronic control boards or the wiring in both the microwave and the oven. To remove the codes, turn the power off to both appliances for 1 minute and then turn them back on. If the error codes reappear you will need to replace the electronic control boards in each appliance. We hope this helps! If you have any questions, please let us know.
The microwave starts and works for about 15 seconds then the timer quits and then code f1 e5 comes up. Changed out the inverter, same problem.
For model number KEMS309BSS01
Hello Brad, Thank you for your inquiry. We have researched this for you and it can also be caused by the door switches, the magnetron, the sensor or the main control board. You can test the parts with a multimeter. If you are unfamiliar with how a multimeter functions, we have videos available to assist you. For safety reasons, since the microwave capacitor can still store electricity even when the microwave is unplugged, it is usually advised that you discharge the capacitor before any attempt at repair. We have included a link on how to do so.
https://www.partselect.com/Microwave+discharge-capacitor+repair.htm
Good luck with your repair.
Please help me to locate possible parts to replace. Microwave of this unit stop running. The power and panel is working as well as both oven. However, when I try to use microwave, the light inside microwave flashes few times with some clicking noise. It looks the the machine trying to turn on and run. Please let me know if additional information or video I can provide. Thank you
For model number KEMS309BSS01
Hi Wesley, thank you for your inquiry. A faulty turntable motor can cause the clicking sounds coming from your microwave. This motor powers the turntable, and a faulty motor causes the plate to stop turning altogether. Replacing the turntable motor, part number PS11769794, will fix the problem. Customer service is available 7 days a week if you need help placing an order. Glad to be of assistance!
Purchased new oven racks and am having trouble fitting lower sliding rack back in ps9494675. Where am i going wrong? Thanks
For model number KEMS309BSS01
Hello Greg and thank you for writing.
The bottom rack is a sliding rack. The slides are not provided with part number PS9494675. You would have to use the slides from the old rack and use them with the new part. We hope this helps. Please contact us anytime if you require further assistance.
Part No. PS11766760 Ignore the other repair comments on this page!!! The new replacement part can no longer be put into place as simply as the original bracket. This is a r3eplacement part with a modified design. Significant parts of the microwave (MW) must be dismantled in order to provide access for insertion of the new part. Th
... Read moreis is confirmed by notes at other web sites which provide this part. My approach also required cutting/drilling holes into sheet metal panels.
Kitchenaid/Whirlpool must have realized that the original part is inherently weak at the point at which it is supported at the ceiling of the MW. The replacement part is a good option from a strength standpoint, but a horrible one for ease of insertion. The original is a single ceramic piece. The replacement part includes a metal clip which holds the top stem of the ceramic bracket from the top ("roof") side of the MW. Getting at the top of the MW cavity is the difficult part. One needs to pull the entire built in oven from its location and remove at least the control panel from the front of the unit.
It took me 3-4 hours one day to see how to install the replacement part. I failed since I unexpectedly found that there are two sheet metal panels above the MW cavity which need to be removed in order to access the slot through which the bracket stem must be inserted. Maybe somebody else can think of a way to remove the metal panels, but I could not do it so I put the MW back together again.
After this failure I considered trying to repair the original part again (this was the second time it had broken). The first repair broke when the conventional heating element was used in the MW. This option might again be an interim solution so I went back to trying to install the new replacement part.
This time it took over 3 hours to remove the control panel, several wiring units, a transformer, and several side and top sheet metal panels. Each removal step was preceded with a photograph of the item to be removed so that everything could be put back as they were originally located. After all of this work it was determined that the MW would have to virtually be totally dismantled in order to access the bracket slot at the top of the MW cavity. There were simply too many items on top of the sheet metal panels to allow for bending the panels up to access the necessary slot in the oven ceiling.
Fortunately, my wife asked why I didn't consider drilling through the existing sheet metal panels at the top of the MW. Had she suggested that earlier in the dismantling, it would have saved hours of work.
After reassembling the side panels I drilled access holes through the two sheet metal panels over the top of the MW oven. Certainly one needs to be careful in measuring the location for such holes. The holes were to be rectangular, developed by drilling multiple holes around the perimeters of the final "holes." The two sheet metal panels are about 3/4" apart and the lower panel is about 3/4" above the MW oven cavity. After drilling out the holes (about 1/2" x 1") I successfully found the desired slot in the oven ceiling. Then the drill cuttings needed to be cleaned out with a vacuum cleaner - including inside the MW oven.
Inserting the replacement part was not trivial. One needs to hold the ceramic part in the oven, with the heating element in its proper place on the bracket, and then simultaneously place the metal clip onto the stem which has been inserted through the slot at the top of the MW oven. Long tweezers are handy for putting the clip into place. Then the fun begins. Somehow the metal clip must be pushed down onto the ceramic stem. This is a trial and error task with various long blunt tools used to try and push the clip down while not pushing it off to the side. Somehow I got the clip onto the stem and the part was finally in place.
Another hour (+) to re-assemble the MW and push the oven back into the cabinet and the job was finally done.
btw, the only reason it was relatively easy to pull the oven out of the cabinet (and push it back in) was that we have two office chairs at home (without arms) which come up to about the right height for having the oven sit on the chairs. Adding some 2x4's on the seats of the chairs brought it to exactly the right height. The wheels on the chairs also helped. Given the weight of the oven, removing and replacing the oven unit is not a trivial task and one needs to be careful at all times.
There were several observations I made about the new replacement part which also "froze me in my tracks" early in this project. That is why I kept thinking of ways in which to repair the original part more effectively than I had done previously. The problem is that the ceramic section of the replacement part is not the same size as the original. It holds the heating element higher against the ceiling of the microwave and the horizontal section which holds the heating element is shor
After popping the last few kernals of popcorn, we hear a different kind of pop sound come from our microwave oven. When we looking inside, we found that the glass turntable had broken unevenly in half. Although we didn't understand why it had happned, we did know we'd be without the use of the microwave without a new one. After less th
... Read morean 10 minutes surfing online, I had found the correct part on PartSelect.com and had arranged to have it shipped to me by speedy delivery. Once it arrived, I just popped the new turntable into the microwave and used the box to dispose of the broken one. It could not have been easier and it saved me the cost of a service call and likely further delay.


 – Part Number: 72017")


 – Part Number: 350930")