


KCMS1555SSS0 KitchenAid Microwave - Overview
Sections of the KCMS1555SSS0
[Viewing 6 of 6]


Keep searches simple, eg. "belt" or "pump".

Microwave Glass Cooking Tray
PartSelect #: PS11744901
Manufacturer #: WP8172138
This tray rotates in your microwave ensuring more even temperatures. It is used to hold containers and plates of food or beverages that you heat up inside of the appliance. If you notice that the tray...
$52.44
In Stock

Microwave Door Latch Bracket
PartSelect #: PS11745265
Manufacturer #: WP8205451
Replace this part if the microwave door won't open.
$46.15
In Stock

Fastener Screw
PartSelect #: PS389896
Manufacturer #: 8169475
Sold individually.
No Longer Available

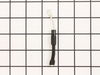
Black Sleeve Diode
PartSelect #: PS11747959
Manufacturer #: WPR9800486
In your microwave, the diode allows current to flow one-way only, converting alternating current to direct current. If you notice that your microwave does not heat properly, you may need to replace th...
$24.95
In Stock

Microwave Turntable Support w/Wheels
PartSelect #: PS11750386
Manufacturer #: WPW10207752
This roller guide sits underneath the glass turntable tray.
$24.95
In Stock

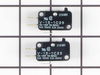
Door Interlock Switch Kit
PartSelect #: PS373050
Manufacturer #: 4392027
This part is a genuine manufacturer door interlock switch kit, also known as primary micro switch or microwave switch kit, for a microwave. The function of this part is to sense when the door of the m...
$80.22
In Stock

SCREW
PartSelect #: PS12728594
Manufacturer #: W11380570
Sold individually. For white and almond models.
$20.95
In Stock

Microwave Spring
PartSelect #: PS11742286
Manufacturer #: WP4158178
Door open button spring.
$9.95
In Stock


Microwave Magnetron
PartSelect #: PS11731447
Manufacturer #: W10859575
This part is used to generate microwave energy/heat.
$193.49
In Stock


Manuals & Care Guides for KCMS1555SSS0
Click to downloadQuestions And Answers for KCMS1555SSS0
We're sorry, but our Q&A experts are temporarily unavailable.
Please check back later if you still haven't found the answer you need.
Sort by:
- < Prev
- 1
- Next >
Search filter:
Clear Filter
Your search term must have 3 or more characters.
Keep searches simple. Use keywords, e.g. "leaking", "pump", "broken" or "fit".
Sorry, we couldn't find any existing answers that matched.Try using some different or simpler keywords, or submit your new question by using the "Ask a Question" button above!
Zarrin
February 8, 2024
smells bad
For model number KCMS1555SSS0
Hi Zarrin, thank you for the question. To remove the smell from the microwave, you may need to use the lemon juice or vinegar. Thoroughly clean the interior of the microwave using mild soap and water with a soft cloth or sponge. Remove any food debris or spills. Heat 1 cup of water with 1 tablespoon of either lemon juice or vinegar for 2 to 5 minutes in the microwave. Dry the interior with a microfiber cloth. We hope this solves your problem!
Was this helpful?
Thank you for voting!
- < Prev
- 1
- Next >
Common Symptoms of the KCMS1555SSS0
[Viewing 6 of 6]Door stuck closed
Fixed by
these parts
these parts


Show All
No heat
Fixed by
these parts
these parts

Show All
Tray won’t turn
Fixed by
these parts
these parts


Show All
Won’t turn on
Fixed by
these parts
these parts

Show All
Doesn’t shut off
Fixed by
these parts
these parts
Show All
Door not closing properly
Fixed by
these parts
these parts
Show All
Keep searches simple. Use keywords, e.g. "leaking", "pump", "broken" or "fit".
I dropped and broke the glass cooking tray
After shopping all over town trying to find a new tray I discovered PartSelect.com, I called and ordered the tray and received it the next afternoon. It couldn't have gone smoother.
Parts Used:
-
Tami from Quincy, IL
-
Difficulty Level:Really Easy
-
Total Repair Time:Less than 15 mins
471 of 475 people
found this instruction helpful.
Was this instruction helpful to you?
Thank you for voting!
Cooking Glass Tray was broken
EXCEPTIONAL service! WOW! Order it Thursday online and it arrived Saturday. I will definitely use your service again. Thank you again!!
Mr. & Mrs. Charles
Mr. & Mrs. Charles
Parts Used:
-
Charles from Newark, DE
-
Difficulty Level:Really Easy
-
Total Repair Time:Less than 15 mins
366 of 376 people
found this instruction helpful.
Was this instruction helpful to you?
Thank you for voting!
microwave door stuck....wont open
The reason the door would not open upon pressing the door opener is because the BRCKT-LATCH was broken. I discovered that after opening the microwave enclosing. The BRCKT-LATCH has two ends sticking out....each fits into a hole. One of the ends on the LATCH was broken and therefore it was not tightly fit. No upon pushing the door opener t
... Read more
he LATCH would not function properly since it was loosely fit and hence the door would not open.
To Fix this issue:
1) Buy a new BRCKT-LATCH
2) Remove the microwave enclosing. I had to use a special screwdriver, since the screws were security protected on my microwave. After removing the case, I opened the door by manually pressing the door latch upwards (please make sure that the microwave is not connected to the electric socket before removing the enclosing).
3) pull out the old LATCH from the microwave.
4) carefully insert the new LATCH. Try not to put too much pressure when trying to fit the latch, or else the ends may snap again!!
5) Close the door and try opening it by pressing the door opener. it should work now!!
Read less
Parts Used:
-
Sailendra from Round Rock, TX
-
Difficulty Level:Really Easy
-
Total Repair Time:30 - 60 mins
-
Tools:Screw drivers
78 of 98 people
found this instruction helpful.
Was this instruction helpful to you?
Thank you for voting!