Your coupon for will be reflected when you check out!
✖
Your coupon for
✖
Hello!
You're visiting the PartSelect site in U.S.
Would you like to shop on the Canadian site?
Stay on this site
Go to Canadian site
✖
Model Number Locations
1Select Category Type
Select Category Type
2Select Product Type
Select Product Type
3Select {MODEL} Type
Select {MODEL} Type
Sample Model Number Tags
Model numbers can be made up of numbers (1005400, for example) or a combination of letters and numbers (LAT1000AAE). The model number will most likely appear on either a paper sticker or a metal plate. Your appliance's model number tag may look similar to the sample model number tags shown here (model number highlighted in yellow):
Model has been saved to My Models. If you're not signed in, your lists are available on this device and will expire within 30 days.
Model has been saved to My Models.
The temperature sensor, also known as the oven temperature sensor assembly is usually found in the back of the oven. The function of the oven temperature sensor assembly is to measure the temperature ...
$28.95
In Stock
Order now and your part arrives in 2-3 business days!
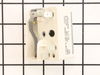
This genuine GE drawer support is an original replacement part sourced from the manufacturer and is designed for use with electric ranges. Made of durable plastic, it attaches to the rear of the drawe...
$13.95
In Stock
Order now and your part arrives in 2-3 business days!
This is an authentic GE oven rack, sourced directly from the manufacturer. It is made of metal, and provides a stable surface for cookware inside the oven. If your current oven rack is damaged or miss...
$49.95
In Stock
Order now and your part arrives in 2-3 business days!
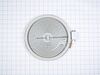
This is a dual ceramic surface burner for ranges. This burner, also known as a heating element, is used within electric ranges to act as a stovetop burner. This burner measures approximately 10 inches...
$98.89
In Stock
Order now and your part arrives in 2-3 business days!
This part is the replacement bake element for your range. It is in an M shape, and is approximately 18 inches wide and 18 inches long.This is an OEM part and is sold individually.
$66.28
In Stock
Order now and your part arrives in 2-3 business days!
This part is the replacement door trim for your oven. It is white in color and is approximately 30 inches long and 2 inches wide. The bottom door trim supports the outer glass from the bottom. The mai...
$16.95
In Stock
Order now and your part arrives in 2-3 business days!
This window pack assembly, also known as inner door glass, is supplied directly by the manufacturer for use in range ovens. It has measurements of approximately 22 inches by 14 inches. The inner door ...
$293.95
In Stock
Order now and your part arrives in 2-3 business days!
Questions And Answers for JB645DK8WW
Ask our experts a question about this model and we'll get back to you as soon as possible!
1 question answered by our experts.
Sort by:
< Prev
1
Next >
Search filter:
Clear Filter
Your search term must have 3 or more characters.
Keep searches simple. Use keywords, e.g. "leaking", "pump", "broken" or "fit".
Sorry, we couldn't find any existing answers that matched.Try using some different or simpler keywords, or submit your new question by using the "Ask a Question" button above!
DIANE
December 28, 2023
What size light bulb goes in oven?
How do I remove light bulb cover and bulb?
For model number JB645DK8WW
Hi Diane,
Thank you for your question. Before removing and replacing the light bulb, unplug the range from the electrical outlet. Wear latex gloves when doing this repair as the oils from your hands may damage the bulb and shorten its life. To remove the old light bulb, turn the glass cover counterclockwise until the glass is removed. Then remove the bulb by pulling it straight out. Then install the new bulb. Be sure the replacement bulb is rated 120 volts or 130 volts (NOT 12 volts) and has a G9 base. Push the new bulb straight into the receptacle all the way. Then replace the glass cover and reconnect the power to the oven. We hope this helps!
Was this helpful?
Thank you for voting!
< Prev
1
Next >
✖
Ask a Question
Ask our experts a question on this model and we'll respond as soon as we can.
Removed six 1/4" hex nuts on rear of oven. Then through front/inside removed a single 1/4" hex nut to actually remove sensor. Unplug sensor connector, remove. Reversed steps, push oven back in place and plugged in. Tested oven function.
Unplugged appliance and removed 5 screws on back of stove/oven and removed plate. Disconnected the sensor and unscrewed it on the inside of the oven. Pulled the cord through and replaced with new sensor. Replaced all parts and plugged in the appliance and tested. Worked great.
The repair went very easy. The replacement part was designed differently than the original part. It installed on the rear of the drawer with a screw as the original snapped into the side. This was a bit confusing when researching and looking up the part online.


 – Part Number: WB07X42948")