Your coupon for will be reflected when you check out!
✖
Your coupon for
✖
Hello!
You're visiting the PartSelect site in U.S.
Would you like to shop on the Canadian site?
Stay on this site
Go to Canadian site
✖
Model Number Locations
1Select Category Type
Select Category Type
2Select Product Type
Select Product Type
3Select {MODEL} Type
Select {MODEL} Type
Sample Model Number Tags
Model numbers can be made up of numbers (1005400, for example) or a combination of letters and numbers (LAT1000AAE). The model number will most likely appear on either a paper sticker or a metal plate. Your appliance's model number tag may look similar to the sample model number tags shown here (model number highlighted in yellow):
Model has been saved to My Models. If you're not signed in, your lists are available on this device and will expire within 30 days.
Model has been saved to My Models.
The temperature sensor, also known as the oven temperature sensor assembly is usually found in the back of the oven. The function of the oven temperature sensor assembly is to measure the temperature ...
$28.87
In Stock
Order now and your part arrives in 2-3 business days!
This 40-Watt light bulb is sold individually and is a genuine OEM replacement option for your home appliances. It is specially designed to withstand extreme temperatures, so this bulb is compatible wi...
$19.05
In Stock
Order now and your part arrives in 2-3 business days!
This electronic control board is the central component of your wall oven, managing functions such as temperature regulation and heating elements. The manufacturer has modified the wiring on this part,...
$140.21
In Stock
Order now and your part arrives in 2-3 business days!
This genuine GE drawer support is an original replacement part sourced from the manufacturer and is designed for use with electric ranges. Made of durable plastic, it attaches to the rear of the drawe...
$13.91
In Stock
Order now and your part arrives in 2-3 business days!
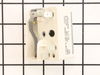
This infinite control switch regulates the power delivered to a surface heating element, allowing precise temperature control during cooking. It functions by cycling power on and off based on user inp...
$47.82
In Stock
Order now and your part arrives in 2-3 business days!
This surface element control switch, also known as an infinite switch, regulates the power supplied to a 6-inch, 1560-watt heating element on electric ranges. It allows for precise adjustment of heat ...
$47.82
In Stock
Order now and your part arrives in 2-3 business days!
This is an authentic GE oven rack, sourced directly from the manufacturer. It is made of metal, and provides a stable surface for cookware inside the oven. If your current oven rack is damaged or miss...
$49.81
In Stock
Order now and your part arrives in 2-3 business days!
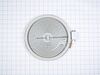
This is a dual ceramic surface burner for ranges. This burner, also known as a heating element, is used within electric ranges to act as a stovetop burner. This burner measures approximately 10 inches...
$101.78
In Stock
Order now and your part arrives in 2-3 business days!
This part is the replacement bake element for your range. It is in an M shape, and is approximately 18 inches wide and 18 inches long.This is an OEM part and is sold individually.
$66.09
In Stock
Order now and your part arrives in 2-3 business days!
This part is the replacement light socket for your oven. The oven light socket provides power to the light, and at the same time holds the light bulb in place.
$15.91
In Stock
Order now and your part arrives in 2-3 business days!
Questions And Answers for JB645DK1BB
Ask our experts a question about this model and we'll get back to you as soon as possible!
6 questions answered by our experts.
Sort by:
< Prev
1
2
Next >
Search filter:
Clear Filter
Your search term must have 3 or more characters.
Keep searches simple. Use keywords, e.g. "leaking", "pump", "broken" or "fit".
Sorry, we couldn't find any existing answers that matched.Try using some different or simpler keywords, or submit your new question by using the "Ask a Question" button above!
Theo
November 29, 2023
i replaced the element. On smooth top oven it works fine but won't lower heat on large and small coil which is why I changed whol thing in the first place what am i missing
For model number JB645DK1BB
Hello Theo, thank you for getting in touch. According to our research, the issue is with the surface element switch. Your model comes with the 6 inches and 9/6 inches elements. The surface element switch for 6 inches elements is part number PS236754, and the surface element switch for 9/6 inches elements is part number PS11729102. We hope this information helps!
1 person found this helpful.
Was this helpful?
Thank you for voting!
Jung
March 30, 2025
The burner which can be used selectively large or small has an issue. Large or small, whatever I select, It turns on and heat only for 30 seconds. And stays warm with the lowest heat level.
Is there a problem on the sensor? Or the control knob?
Please let me know what part I need to replace.
For model number JB645DK1BB
Hi Jung,
Thank you for your question. If you are unable to adjust the setting for the dual element, you will need to check both the element and the burner switch for continuity with a multimeter on the Rx1 setting to see which part is causing the issue. Before removing and checking these parts, unplug the washer from the electrical outlet. When testing the element, you should receive a reading between 19 and 115 ohms. If you get any other reading, you will need to replace the element. When testing the switch, touch the L1 and H1 terminals with the probes. Once you have completed that test, touch the probes to the L2 & H2 terminals. If your test results indicate that there is no continuity between one or both sets of terminals, you need a replacement burner switch. We hope this helps!
My large burner will not heat up and also my hot cooktop light on surface will not go out GE Stove model # JB645DK1BB Thanks
For model number JB645DK1BB
Hello William, thank you for your question. You will need to replace the Light Indicator Switch PS8767096. For the Element, the issue is most likely the switch but you really should test both the Switch PS11729102 and the element PS11729126. Good Luck with your repair.
Hi Farrell, thank you for asking. The "F2" error code indicates the oven temperature has exceeded a safe threshold and the sensor PS10059162 could be defective and needs to be replaced. You can verify this by testing the sensor. With the sensor at room temperature, measure the resistance between the two prongs at the end of the sensor connector. The resistance of the sensor should read approximately 1080 – 1090 ohms at room temperature. If the sensor is good, you may have a faulty oven control board. We hope this information helps!
On the control screen it is showing "un lock door" , however the door isnt locked. It will start to preheat the oven prior to showing this code then it wont do anything untill it cools down
For model number JB645DK1BB
Hi Erick, we do not have much information on this symptom, my best guess is a faulty latch or control board.Thank you for your question and good luck with your repair!
Removed six 1/4" hex nuts on rear of oven. Then through front/inside removed a single 1/4" hex nut to actually remove sensor. Unplug sensor connector, remove. Reversed steps, push oven back in place and plugged in. Tested oven function.
After removing the back of the range the oven control board was visible and accessible by removing four nuts. There was some resistance removing the leads from the oven coils and light-bulb mechanisms but with some leverage and pliers they came loose. The only challenge was the face plate of the unit is attached using adhesive and neede
... Read mored to be carefully peeled off and added to the new oven control board. Getting this right was just a matter of taking time and lining up the components correctly. After applying the face, the new control board went right in. I reattached the back, plugged the unit back in, and the over has worked great for the past week. Part select being able to identify the part numbers listed from the component likely saved me at least $100 of having a GE certified repair technician come in.
The existing terminal block on my Ge oven/Range had melted due to a loose wire causing sparking and starting the plastic casing of the terminal block on fire and melting it, Part select made the part easy to find and had it at my house in 2 days. All I had to do was remove six screws to take the back sheet metal cover off of the oven. U
... Read morenscrew the terminal connections remove two mounting screws that held the terminal on to the oven body. This was a little trickier than it should have been because the melted plastic had reformed making it very hard to access the mounting screws. i then mounted the new piece and plugged the oven in, it took 15 minutes and was very easy. definitely saved me at-least a $100 for the service call i would have made if finding the part wasn't so convenient