Your coupon for will be reflected when you check out!
✖
Your coupon for
✖
Hello!
You're visiting the PartSelect site in U.S.
Would you like to shop on the Canadian site?
Stay on this site
Go to Canadian site
✖
Model Number Locations
1Select Category Type
Select Category Type
2Select Product Type
Select Product Type
3Select {MODEL} Type
Select {MODEL} Type
Sample Model Number Tags
Model numbers can be made up of numbers (1005400, for example) or a combination of letters and numbers (LAT1000AAE). The model number will most likely appear on either a paper sticker or a metal plate. Your appliance's model number tag may look similar to the sample model number tags shown here (model number highlighted in yellow):
Model has been saved to My Models. If you're not signed in, your lists are available on this device and will expire within 30 days.
Model has been saved to My Models.
This an authentic OEM 40-Watt replacement light bulb, used in a number of household appliances. It is specially designed to withstand extreme temperatures, which is why these replacement bulbs are mos...
$17.80
In Stock
Order now and your part arrives in 2-3 business days!
This long oven sensor is also commonly known as a temperature sensor. It is designed for use with ovens and ranges. It is similar to a thermostat; it measures and regulates the internal temperature of...
$41.95
In Stock
Order now and your part arrives in 2-3 business days!
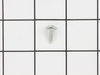
This is a multi-use and multi-appliance screw. It can be used on a microwave, refrigerator, range/oven, air conditioner, dehumidifier, washer, or dryer. The measurements of this screw are 8 x 1/2 inch...
$20.95
In Stock
Order now and your part arrives in 2-3 business days!
This is a replacement oven rack and it is designed for use with ranges and ovens. This is a genuine OEM replacement part. The rack provides a level and stable surface for cookware inside of your appli...
This bake element is found on the bottom of the oven. his bake element is for ranges.
The bake element is at the bottom of the oven and supplies the heat for baking.
Unplug the range or shut off...
$79.19
In Stock
Order now and your part arrives in 2-3 business days!
The oven door gasket on your range functions as a seal between the warm interior of your oven, and the outside. It prevents heat from fleeing your oven when the door is closed. Before making any repai...
$70.64
In Stock
Order now and your part arrives in 2-3 business days!
This touch-up paint can be used on a wide variety of household appliances. It is most often used on washers, dryer, refrigerators, dishwashers, ranges, freezers, trash compactors, or microwaves. It is...
$12.58
In Stock
Order now and your part arrives in 2-3 business days!
This bottle of non-abrasive cooktop cleaner breaks down and gets rid of the hardest baked-on stains and residue without causing any harm to your appliance. The bottle is 10 oz and does not require a l...
The Infinite switch 6-inch surface element control from Whirlpool is the perfect solution for seamless control of your cooking range. Made from high-quality materials, this genuine OEM part ensures op...
$41.95
In Stock
Order now and your part arrives in 2-3 business days!
Ask our experts a question about this model and we'll get back to you as soon as possible!
1 question answered by our experts.
Sort by:
< Prev
1
Next >
Search filter:
Clear Filter
Your search term must have 3 or more characters.
Keep searches simple. Use keywords, e.g. "leaking", "pump", "broken" or "fit".
Sorry, we couldn't find any existing answers that matched.Try using some different or simpler keywords, or submit your new question by using the "Ask a Question" button above!
Paul
March 6, 2023
Oven Light burned out, replaced with 40 wt appliance bulb, restored power, Light doesn't work . Tested bulb in lamp. selected oven light and other buttons, opened and closed the door, checked power to the oven light socket. I did work at removing the base of the broken bulb from the socket and might have fouled up the socket. What else might be the problem?
For model number GY397LXUB03
Hello Paul, thank you for contacting us. According to our research, we would recommend checking that the light bulb is replaced correctly. If the issue still occurs, you may need to check the light bulb, part number PS884734, and light socket, part number PS11744525. We hope this helps!
Removed the oven door by opening slightly, then pic door up to remove. Remove 2 screws holding oven sensor in place, gently pull on sensor to remove, had to remove about 8 inches to get at plastic connector. Unplug connector, had to use an adapter cable supplied with the PartSelect kit to install new sensor, push cable back into opening,
... Read morereinstall 2 screws. The oven works fine! Note that due to thermal lag the temperature overshoots to 370 degrees and undershoots to 340 degrees, this appears to be normal oven operation. Putting door back in place was easy.
I numbered every part. ex: 1 L., for first part removed left side. I used a magic marker to circle the holes and wrote the number of screws used on the part, set the srews in a separete place, so that I new where these screws went to. The cleanup was pretty time consuming, but I was able to keep my stove, when every repairman I called to
... Read more fix my stove told me I was better off buying a new stove. ($600.00 stove 2 years old)Please Note: The insulation blanket needed for the entire stove is two pieces, the sides and top are one part # and the bottom and back, are another part #. I did not know this. I just purchased the top and sides. I got lucky, the back and bottom were still in good shape. So I guess I should have read the description of the part more carefully to see what it covers, before I ordered it. It took two people two hours to do the work, it was really nice to have an extra set of eyes, to remember what direction pieces of metal from the stove went. I would do it all over in a heart beat instead of buying a new stove.
First turn off circuit breaker to stove. Slide the stove out about 4 inches from the counter to expose the two phillips head screws, one on the left side and one on the right side of touch panel. Take out screws. Then take out four Phillip head screws on the bottom side of panel, this will set panel loose from stove. Carefully pull up tou
... Read morech pad (switch membrane) from control panel; it is sticky glued in place. Disconnect ribbon cables on switch membrane from control panel by depressing cable locks while pulling firmly. Remove switch membrane. Clean area before installing new membrane. Reassemble turn on power and you are done.


 Diagram and Parts List for Whirlpool Range")
 – Part Number: 8009")


 – Part Number: 72017")


")


 – Part Number: WPW10207928")