Your coupon for will be reflected when you check out!
✖
Your coupon for
✖
Hello!
You're visiting the PartSelect site in U.S.
Would you like to shop on the Canadian site?
Stay on this site
Go to Canadian site
✖
Model Number Locations
1Select Category Type
Select Category Type
2Select Product Type
Select Product Type
3Select {MODEL} Type
Select {MODEL} Type
Sample Model Number Tags
Model numbers can be made up of numbers (1005400, for example) or a combination of letters and numbers (LAT1000AAE). The model number will most likely appear on either a paper sticker or a metal plate. Your appliance's model number tag may look similar to the sample model number tags shown here (model number highlighted in yellow):
GXSF27B01 General Electric Water Softener - Overview
Save your modelModel Saved!
Save your model for later to make things easier.
Model has been saved to My Models. If you're not signed in, your lists are available on this device and will expire within 30 days.
Model has been saved to My Models.
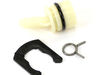
Introducing the GE Drain Hose Adapter Kit, a necessity for your appliance repair needs. This high-quality part is renowned for its durability, precision-engineered to ensure long-lasting functionality...
$103.83
In Stock
Order now and your part arrives in 2-3 business days!
water softener was leaking due to a broken clip. turned off water and drained the pipes. some how managed to remove the broken clip from the inlet side. i than was able to remove the good clip from the outlet side, without breaking it. i replaced the washer on the leaking side, cleaned and resealed all the joints. finally i reattached the
... Read more manifold to the water softener. no leaks so far. next time i will discarge the unit before repair.
Remove the top back lid/unlatch 2 clips. Unscrew the small brine tube nut (white) from left side of control unit. Cut the tube to remove nut from old tube with utility knife. Keep nut for use on new assembly. Not included. Remove brine well cover. Pull the tube out of the top and from behind resin tank and remove assembly from brine well
... Read more. Discarded the old brine valve assembly. Removed the bit of old tube from the nut, w/ utility knife. Careful not to damage the old nut. Snake the new brine tube from front right side through the back of the resin tank to the old hole on the left. Follow the old path. Insert the new brine tube into the top section through the hole the old one came out of. Attached nut to new brine tube. Screw nut/new brine tube to the connector of control unit. Small fingers help. Adjust/slide the float assembly 6-8 inches inches above the valve, e.g. Styrofoam/Metal Weight slides up/down the white stalk. Re-inserted the brine assembly into the brine tank. Replace top. Manually regenerate to make sure new brine assembly is not leaking and filling the brine tank properly. Done.