Back
Back
Keep typing for more specific results...
Models > GU2275XTVY0 > Symptoms > Not drying dishes properly

Parts That Fix Whirlpool Dishwasher GU2275XTVY0 Not drying dishes properly

Not drying dishes properly is a commonly reported symptom for the GU2275XTVY0 Whirlpool Dishwasher, and we have put together a full guide on how to fix this. This advice is based on feedback from people who own this exact appliance. We have listed the most common parts for your GU2275XTVY0 Whirlpool Dishwasher that will fix Not drying dishes properly. We have included repair instructions, and helpful step-by-step video tutorials. If you are experiencing this issue, not to worry, DIYers just like you have fixed this, and shared their experience to help you!
Fixes Symptom 74% of time

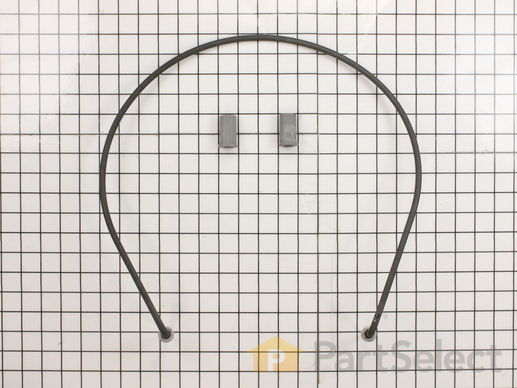
This manufacturer-certified heating element is used to create heat during the dry cycle and increase water temperature during portions of the wash cycle when certain options are selected. If your dishes are not drying or the water in the dishwasher is not getting hot you may need to replace the element. This kit includes the heater, two heater fasteners, and is a genuine OEM part. Please remember to disconnect the power before starting the repair. Use a multi-meter to test your heating element for continuity to determine whether this is the part that is causing your symptom. This part does not include any washers. To make your repair, disconnect the wires from the bottom of the element in the back, remove the plastic nuts holding it in place, remove the element, and repeat these steps in reverse order to install your new part. This is an easy repair that requires only a screwdriver, wrench set, and should take less than 30 minutes.

$ 44.07
  In Stock
PartSelect Number PS8260087
Manufacturer Part Number W10518394

Replacing your Whirlpool Dishwasher Dishwasher Heating Element

Replacing your Dishwasher Heating Element

Customer Repair Stories

clean light flashing 7 times would not run
removed screws holding dishwasher to counter top,raised leveling pads,pulled dishwasher out, unplugged wiring,removed hold down nuts from inside dishwasher and installed new heater element, this was all easy the hard part was finding the code to reset the dishwasher there was no paperwork inside the dishwasher although there was an empty plastic holder.The code that worked for my model was with the door open to push the normal wash button then the high temp button three times as fast as you can within four seconds then close the door. It worked and reset the dishwasher which ran a short cycle then shut down as normal and is now working fine.After doing this select the beverage of your choice and relax. Hope this helps someone.
  • Mark from Winchester, VA
  • Difficulty Level:
    Really Easy
  • Total Repair Time:
    30 - 60 mins
  • Tools:
    Screw drivers, Wrench (Adjustable), Wrench set
14 of 18 people found this instruction helpful.
Was this instruction helpful to you?
Thank you for voting!
Heater element broken.
Step 1: Remove the screws in the bottom of the countertop.

Step 2: Remove the screws holding the bottom kickplate.

Step 3: Loosen leveling legs.

Step 4: Pull dishwasher out of hole.

Step 5: Unlplug dishwasher.

Step 6: Disconnect wires from bottom of element in back.

Step 7: Remove plastic nuts holding element in place.

Step 8: Remove element.

Step 9: Reverse Steps 1-7.

Step 10: Drink beer.
  • Dennis from Sedro Woolley, WA
  • Difficulty Level:
    Really Easy
  • Total Repair Time:
    Less than 15 mins
  • Tools:
    Screw drivers, Wrench set
229 of 265 people found this instruction helpful.
Was this instruction helpful to you?
Thank you for voting!
Fixes Symptom 13% of time

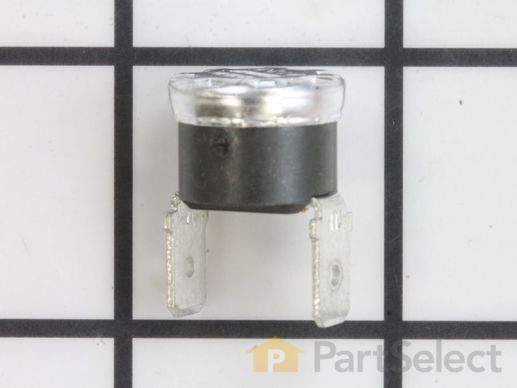
This part acts as as safety mechanism that keeps the dryer from overheating. Once the dryer temperature reaches a certain point, this part will shut down power to the heating element.

$ 27.95
  In Stock
PartSelect Number PS11743423
Manufacturer Part Number WP661566

Replacing your Kenmore Dishwasher Dishwasher High Limit Thermostat

Replacing your Dishwasher High Limit Thermostat

Customer Repair Stories

No heat. Replaced thermostat
Was able to replace and repair without taking the dishwasher out. Thermostat is behind and to the left of the power junction box. Has 2 wires going to it. It is up against the bottom of tub. I used an angled mirror to see what I was doing. 1 small screw to detach and pull down thermostat. Be sure power is off before you start. Also reprogrammed defaults. Hit any button 1-2-3, 1-2-3, 1-2-3, fast and close door. Let it sit 15 min to run and re-set defaults. Now I have heat and dry dishes.
  • Tim from BURTONSVILLE, MD
  • Difficulty Level:
    Really Easy
  • Total Repair Time:
    30 - 60 mins
  • Tools:
    Screw drivers, Socket set
12 of 12 people found this instruction helpful.
Was this instruction helpful to you?
Thank you for voting!
Dishes wouldn't dry
I shut off the power to the dishwasher, then I removed the front panel under the door. On the right side just behind the electrical box there are two wires going up to the hi-limit thermostat, (you may need a small mirror to see it), remove one screw that is holding the thermostat bracket, unplug the wires from the old thermostat and install new one. Screw bracket and thermostat back to the underside of the dishwasher, reinstall the front panel, turn on the power, done.
  • George from Lisbon, CT
  • Difficulty Level:
    Really Easy
  • Total Repair Time:
    15 - 30 mins
  • Tools:
    Screw drivers
37 of 49 people found this instruction helpful.
Was this instruction helpful to you?
Thank you for voting!
Fixes Symptom 8% of time

The rubber washer is a part which is specific to dishwashers and should not be substituted by a similar part. It works with the heating element to seal the receptacle opening where the heating element is attached. The rubber washer is used to prevent water leaking from your dishwasher during its cycle. Before making any repairs to your dishwasher make sure that you disconnect the power by finding the breaker for the dishwasher, and turning it off. The tools you will need to complete this repair include an adjustable wrench, and a 1/4 inch nut driver. This specific rubber washer is sold individually.

$ 8.37
  In Stock
PartSelect Number PS11743934
Manufacturer Part Number WP717273

Replacing your Whirlpool Dishwasher Dishwasher Rubber Washer

Replacing your Dishwasher Rubber Washer

Customer Repair Stories

Dishwasher Not Heating top rack wet dishes and heating rod looks rusted
It took all of 30 minutes from beginning to end remove the old parts and replaced them and run a diagnostic test before I could wash dishes. The parts were exact and Parts Select has always provided the right parts, shipped fast and never disappointed me.
  • Jose from HOUSTON, TX
  • Difficulty Level:
    Very Easy
  • Total Repair Time:
    15 - 30 mins
  • Tools:
    Screw drivers, Wrench (Adjustable)
1 person found this instruction helpful.
Was this instruction helpful to you?
Thank you for voting!
Dishes would'nt come clean or dry from torn boot
Was a simple task to perform, a child could have done it. The technical skills diagnosing it was a bit hard though. The skills finding the culprit was indeed simple. Rubber was torn. Dishes would not come clean especially on the top & would not dry properly. The rubber piece being torn in half made it hard for the water & soap to despense to the top through thh center plastic tube, but now it cleans great. Thank's
Now to find out why it won't dry properly at the heating element is another task. It leaves water droplets on the dishes.
Once I got the rubber screw on attachment installed the dishes are clean & dry now & no water dropplets on the dishes.
The water dispenses up to the top like it suppost to throught the small tube to wash the upper rack dishes.
The wife is happy now she doesn't have to clean & dry them by hand.
Thank's so very much!!
Now on to the next project in hand to submit later on.
  • David from Sallisaw, OK
  • Difficulty Level:
    Really Easy
  • Total Repair Time:
    Less than 15 mins
7 of 17 people found this instruction helpful.
Was this instruction helpful to you?
Thank you for voting!
Fixes Symptom 3% of time

The rinse aid cap (sometimes referred to as the dispenser cap), covers the rinse aid dispenser on the dishwasher door. If your dishwasher will not dispense detergent, or it is leaking detergent, there could be an issue with the rinse aid cap. Check the cap and its gasket for any damage or melting. If the cap has melted or it is not sealing the dispenser properly, the part should be replaced right away. This rinse aid cap comes with the gasket, so you should discard the existing gasket and rinse aid cap at the same time. The repair is relatively straightforward, and requires no tools.

$ 25.95
  In Stock
PartSelect Number PS11746426
Manufacturer Part Number WP8558307

Replacing your Whirlpool Dishwasher Dishwasher Rinse Aid Cap

Replacing your Dishwasher Rinse Aid Cap

Customer Repair Stories

replaced cap for the jet dry liquid
Sears could not supply us with the replacement cap for the dishwasher. We were saved by being able to get the cap here on your web page.Your web sight is like going into the garage and finding the part you saved up for many years that you knew you would need down the road.
  • Debby from Revere, MA
  • Difficulty Level:
    Really Easy
  • Total Repair Time:
    Less than 15 mins
32 of 38 people found this instruction helpful.
Was this instruction helpful to you?
Thank you for voting!
Cap came off and melted
Opened door and installed cap. Not much effort. But really got good service from Parts Select. Received order much faster than I had expected.
  • James from Mesquite, TX
  • Difficulty Level:
    Really Easy
  • Total Repair Time:
    Less than 15 mins
76 of 77 people found this instruction helpful.
Was this instruction helpful to you?
Thank you for voting!
Fixes Symptom 1% of time

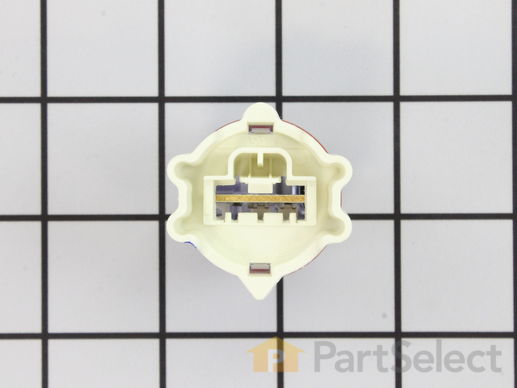
Measures level of soil in the water.

$ 31.45
  In Stock
PartSelect Number PS11757214
Manufacturer Part Number WPW10705575

Replacing your KitchenAid Dishwasher Dishwasher Turbidity Sensor

Replacing your Dishwasher Turbidity Sensor

Customer Repair Stories

Failed diagonistics test for OWI sensor
Pulled the dishwasher out from the counter, on the lower right hand side, about mid way back there is a bundle of all yellow wires, follow that to the sensor which mounts into the bottom of the wash tub. The sensor is easily removed by grasping it by hand and turn it about a half turn (can't remember which direction). It then just pulls out. Disconnect the wire bundle by pushing on the retaining clip and the install is the reverse.
  • Mark from Lancaster, NY
  • Difficulty Level:
    Easy
  • Total Repair Time:
    15 - 30 mins
  • Tools:
    Screw drivers
62 of 87 people found this instruction helpful.
Was this instruction helpful to you?
Thank you for voting!
Fixes Symptom less than 1% of time

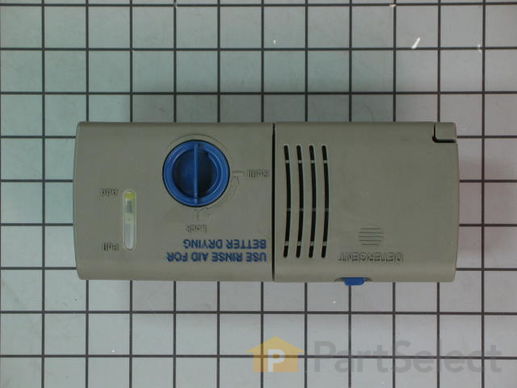
This part releases the detergent and rinse aid into the dishwasher. Light grey in color. The detergent dispenser attaches to the inner door panel and holds the dishwasher detergent and rinse agent in a covered compartment.

$ 122.93
  In Stock
PartSelect Number PS11750167
Manufacturer Part Number WPW10199696

Replacing your KitchenAid Dishwasher Dishwasher Detergent Dispenser Assembly

Replacing your Dishwasher Detergent Dispenser Assembly

Customer Repair Stories

Plastic catch that releases the soap dispenser door broke off, the soap dispenser door wouldnt stay shut.
Removed the screws holding the metal front of the dishwasher on, removed the 6 screws holding the dispenser in place. Put the new part in and put all screws back in where they were. Put the front back on the dishwasher with its screws, done.
  • Patrick from Byron Center, MI
  • Difficulty Level:
    Easy
  • Total Repair Time:
    Less than 15 mins
  • Tools:
    Nutdriver
88 of 110 people found this instruction helpful.
Was this instruction helpful to you?
Thank you for voting!
latch on dispenser cover broke
Printed door assembly parts list and photo from KitchenAid website. (With the absence of instructions, it was a big help.) Remove door cover. You'll need a star driver bit. Remove the old dispenser. Note how the metal clamp and black cover sheet are positioned. Install the new dispenser. Insure the wiring harness is snapped in place. Replace the door cover. Not difficult; just some patience. One more hint ... be careful when taking the door cover off and you won't have to disconnect any other wiring.
  • Craig from Austin, TX
  • Difficulty Level:
    Easy
  • Total Repair Time:
    30 - 60 mins
  • Tools:
    Nutdriver, Screw drivers, Socket set
141 of 155 people found this instruction helpful.
Was this instruction helpful to you?
Thank you for voting!