


GTM1 Refrigerator - Overview
Models starting with GTM1
Click on the best match to narrow your results.
- GTM13XETAWW General Electric Refrigerator
- GTM13YETBSA General Electric Refrigerator (*ref.Ge 12 Silv.Gray 281 Lj.Sd)
- GTM14XETACS General Electric Refrigerator
- GTM14XETAWW General Electric Refrigerator
- GTM14YETATR General Electric Refrigerator
- GTM14YEYLVN0 General Electric Refrigerator
- GTM14YEYLVR0 General Electric Refrigerator
- GTM14YEYRVN0 General Electric Refrigerator
- GTM14YEYRVR0 General Electric Refrigerator
- GTM175WH1 Frigidaire Refrigerator (Top Mount)
- GTM17XETAWW General Electric Refrigerator
- GTM17YETACS General Electric Refrigerator
- GTM17YETASW General Electric Refrigerator
- GTM17ZDTACS General Electric Refrigerator
- GTM17ZDTASW General Electric Refrigerator
- GTM18GBEDRES General Electric Refrigerator
- GTM18GBEGRES General Electric Refrigerator
- GTM18GBEHRES General Electric Refrigerator
- GTM18GCEDRES General Electric Refrigerator
Keep searches simple, eg. "belt" or "pump".

Evaporator Fan Motor
PartSelect #: PS12741350
Manufacturer #: WR60X31522
This 115-volt 60Hz evaporator fan motor is located in the back of the freezer and circulates air over the refrigerator coils. These coils will convert the heat into cool air, which is then circulated....
$71.47
In Stock

Refrigerator Ice Maker
PartSelect #: PS1993870
Manufacturer #: WR30X10093
This 10 by 5 inch ice maker (Electromechanical Icemaker Kit, Ice Maker Assembly) produces ice. This particular model will produce seven crescent shaped cubes every cycle. It is constructed of plastic ...
$173.95
In Stock

Refrigerator Fan Grommet
PartSelect #: PS963756
Manufacturer #: WR02X12008
If you notice that your refrigerator or freezer is noisy or too warm, you may need to replace the evaporator fan grommet. This part is red in color, and is about 1 inch in diameter. The evaporator fan...
$12.95
In Stock

Refrigerator Door Fixed Shelf
PartSelect #: PS964507
Manufacturer #: WR17X11889
This door shelf is a replacement part for your refrigerator. It is very easy to install and requires no tools. Simply pull out the existing shelf bar and snap the new one into place, making sure the l...
$29.95
In Stock
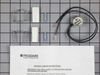
 – Part Number: 215846602")
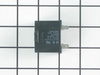
Defrost Timer (60hz 120v)
PartSelect #: PS423801
Manufacturer #: 215846602
This Defrost Timer works like a clock by switching on the defrost heater circuit after a predetermined amount of compressor run time. This allows the defrost circuit to clear the evaporator of ice or ...
$37.95
In Stock
 – Part Number: WR17X11890")
Refrigerator Door Fixed Shelf (White)
PartSelect #: PS1015918
Manufacturer #: WR17X11890
This part is the door fixed shelf, also known as the door shelf bar, and it is built for your refrigerator. It allows food and beverages items to stay in the door shelf. It is made of white plastic. I...
$23.95
In Stock

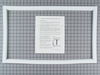
Refrigerator Drawer Shelf Frame
PartSelect #: PS964313
Manufacturer #: WR17X11662
Frame only. Glass NOT included.
$72.47
In Stock

Refrigerator Evaporator/Condensor Fan Grommet
PartSelect #: PS284555
Manufacturer #: WR02X10098
This evaporator fan motor grommet, or condenser fan grommet is built for refrigerators. It provides a cushion between the fan motor and the motor mounting bracket. It is made or round, black plastic a...
$13.95
In Stock
 – Part Number: 40A15")
Light Bulb (40W)
PartSelect #: PS217532
Manufacturer #: 40A15
This 40-Watt light bulb is sold individually and is a genuine OEM replacement option for your home appliances. It is specially designed to withstand extreme temperatures, so this bulb is compatible wi...
$19.10
In Stock


Refrigerator Outlet Valve Kit
PartSelect #: PS304375
Manufacturer #: WR57X10033
The water inlet valve on your refrigerator allows water to enter the ice maker and water dispenser. If your ice maker or water dispenser is not functioning properly, or you notice a leak, you may need...
$48.95
In Stock

Refrigerator Ring
PartSelect #: PS1015726
Manufacturer #: WR02X12149
This compression ring is meant to hold the evaporator fan motor in place in the freezer compartment of your refrigerator. This is is a genuine OEM part. The tools needed to complete this repair are a ...
$13.95
In Stock
Common Symptoms of models starting with GTM1
[Viewing 22 of 22]Noisy
Fixed by
these parts
these parts


Show All
Fridge too warm
Fixed by
these parts
these parts

Show All
Ice maker not making ice
Fixed by
these parts
these parts


Show All
Light not working
Fixed by
these parts
these parts


Show All
Freezer section too warm
Fixed by
these parts
these parts

Show All
Freezer not defrosting
Fixed by
these parts
these parts
Show All
Leaking
Fixed by
these parts
these parts
Show All
Will Not Start
Fixed by
these parts
these parts
Show All
Fridge and Freezer are too warm
Fixed by
these parts
these parts
Show All
Fridge runs too long
Fixed by
these parts
these parts

Show All
Fridge too cold
Fixed by
these parts
these parts
Show All
Door won’t open or close
Fixed by
these parts
these parts


Show All
Ice maker won’t dispense ice
Fixed by
these parts
these parts
Show All
Clicking sound
Fixed by
these parts
these parts

Show All
Freezer too cold
Fixed by
these parts
these parts
Show All
Frost buildup
Fixed by
these parts
these parts

Show All
Too warm
Fixed by
these parts
these parts
Show All
Door Sweating
Fixed by
these parts
these parts
Show All
Won’t start
Fixed by
these parts
these parts
Show All
Ice maker dispenses too little ice
Fixed by
these parts
these parts
Show All
Ice maker dispenses too much ice
Fixed by
these parts
these parts
Show All
Not dispensing water
Fixed by
these parts
these parts
Show All


")


Keep searches simple. Use keywords, e.g. "leaking", "pump", "broken" or "fit".
Fridge got warm and freezer coils were frosted
Fridge is a side by side. The freezer is pretty narrow for a guy with wide shoulders.
Pulled plug.
Had to remove bottom drawers then used nut driver to remove screws closest to back wall in drawer runners. Once the back screws were removed the runners could be swung up or down out of way so back cover could be re ... Read more moved.
Once back cover was removed thermostat was located attached to top pipe going into coil using a spring clamp.
Cut the wires just outside the crimp connectors going into thermostat. Released the spring clamp buy squeezing botton together.
Removed old badly corroded thermostat.
I wish I had attached the crimp connectors to the new thermostat wires before mounting it. Reaching way in the back, while turning shoulders verticly and trying to get the wire connectors set from both sides was awkward and uncomfortable...The biggest PIA of the whole task.
Once connected I let the fridge (thermostat) cool for 10 min. Turned the dial defrost timer to get it into defrost mode. Stupidly touched the heating element to see if it was getting warm...it was very hot.
Coils steamed...every looked like it was working. Unplugged, put back cover back on and retattached drawer mounts.
Plugged back in and everying is working great!
Read less
Parts Used:

-
Stephen from Warrington, PA
-
Difficulty Level:Easy
-
Total Repair Time:30 - 60 mins
-
Tools:Nutdriver, Pliers, Screw drivers
338 of 403 people
found this instruction helpful.
Was this instruction helpful to you?
Thank you for voting!
Freezer Fan
I removed two srews from the back panel inside fthe reezer compartment and the two that hold the air manifold/baffle? and pulled the baffle out. Then, I removed the two srews that hold the front part of the fan bracket behind the baffle and the back panel came out easily. Two more screws and one quick connect plug attached to the fan and
... Read more
I was done with removal. Insallation was even quicker, I slid the original fan right off the old motor and slid it on the new motor's shaft. Piece of cake! Thanks Partselect.
Read less
Parts Used:

-
Luis from College Station, TX
-
Difficulty Level:Really Easy
-
Total Repair Time:15 - 30 mins
-
Tools:Screw drivers, Socket set
263 of 297 people
found this instruction helpful.
Was this instruction helpful to you?
Thank you for voting!
Noisy fan
1. Removed the 7 nuts using the nut driver from the freezer back panel inside the freezer.
2. Remove the back panel. The evaporator motor and fan are located above the coils.
3. Unplug the wiring harness.
4. Remove the two gold mounting screws holding the motor and fan in place.
5. Remove the motor and fan including th ... Read more e brackets.
6. Install the new motor and fan onto the mounting bracket.
6a. Attach the green ground to the mounting bracket.
7. Screw the two gold screws back into the freezer.
8. Attach the new wiring harness. Note, the old harness had a mounting hole/space for it to connect to the wiring harness of the freezer. The new motor's harness was not long enough for this, so it is connected freely to the freezer harness.
9. Use the hair dryer to melt any ice that may have formed on the coils and hole where the fan goes.
10. Turn the freezer on to see if the fan turns on.
11. Reinstall the back panel.
All done!
Read less
Parts Used:


-
Jordan from Maumee, OH
-
Difficulty Level:Easy
-
Total Repair Time:1- 2 hours
-
Tools:Nutdriver
153 of 180 people
found this instruction helpful.
Was this instruction helpful to you?
Thank you for voting!