Your coupon for will be reflected when you check out!
✖
Your coupon for
✖
Hello!
You're visiting the PartSelect site in U.S.
Would you like to shop on the Canadian site?
Stay on this site
Go to Canadian site
✖
Model Number Locations
1Select Category Type
Select Category Type
2Select Product Type
Select Product Type
3Select {MODEL} Type
Select {MODEL} Type
Sample Model Number Tags
Model numbers can be made up of numbers (1005400, for example) or a combination of letters and numbers (LAT1000AAE). The model number will most likely appear on either a paper sticker or a metal plate. Your appliance's model number tag may look similar to the sample model number tags shown here (model number highlighted in yellow):
Model has been saved to My Models. If you're not signed in, your lists are available on this device and will expire within 30 days.
Model has been saved to My Models.
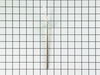
This an authentic OEM 40-Watt replacement light bulb, used in a number of household appliances. It is specially designed to withstand extreme temperatures, which is why these replacement bulbs are mos...
$17.75
In Stock
Order now and your part arrives in 2-3 business days!
This oven temperature sensor, for ranges, works together with the oven control board to measure and regulate the oven temperature. The sensor detects the temperature in the oven cavity. If the followi...
$72.75
In Stock
Order now and your part arrives in 2-3 business days!
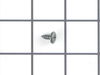
This is a multi-use and multi-appliance screw. It can be used on a microwave, refrigerator, range/oven, air conditioner, dehumidifier, washer, or dryer. The measurements of this screw are 8 x 1/2 inch...
$20.89
In Stock
Order now and your part arrives in 2-3 business days!
This oven rack is a piece for your range. The oven rack is sold individually and is silver in color. The function of this part is to provide a balanced and flat surface for your cookware to sit inside...
$78.16
In Stock
Order now and your part arrives in 2-3 business days!
This is a radiant surface element with limiter, and it works in conjunction with your range. The function of this part is to give heat to the surface directly above it, on cooking area stove top.This ...
$133.31
In Stock
Order now and your part arrives in 2-3 business days!
This touch-up paint can be used on a wide variety of household appliances. It is most often used on washers, dryer, refrigerators, dishwashers, ranges, freezers, trash compactors, or microwaves. It is...
$12.54
In Stock
Order now and your part arrives in 2-3 business days!
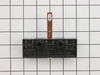
This surface element control switch, also known as an infinite switch, is a genuine OEM replacement designed for 6-inch electric burners on select ranges. It regulates the power supplied to the surfac...
$50.22
In Stock
Order now and your part arrives in 2-3 business days!
This is the replacement large surface element for your cooktop or range. It is approximately 10-inches in diameter and is 1200/2500 watts. The large surface element is installed under the cooktop and ...
$133.31
In Stock
Order now and your part arrives in 2-3 business days!
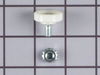
The light socket on your electric range connects the power source to the light bulb. If your oven light is malfunctioning, you may need to replace the light socket. The light socket is located in the ...
$59.48
In Stock
Order now and your part arrives in 2-3 business days!
Ask our experts a question about this model and we'll get back to you as soon as possible!
3 questions answered by our experts.
Sort by:
< Prev
1
Next >
Search filter:
Clear Filter
Your search term must have 3 or more characters.
Keep searches simple. Use keywords, e.g. "leaking", "pump", "broken" or "fit".
Sorry, we couldn't find any existing answers that matched.Try using some different or simpler keywords, or submit your new question by using the "Ask a Question" button above!
Jeffery
September 15, 2021
The wiring harness to bottom bake element clip burnt off need 3 ft harness
For model number GR563LXSQ1
Hello Jeffery, Thank you for contacting us. We have researched the model you have provided and have found the part you are looking for is PartSelect Number PS6011925 for the Bake Element Wire Harness. If you need help placing an order, customer service is open 7 days a week. Please feel free to give us a call. We look forward to hearing from you!
Hello Dianne, thank you for the question. If the outer ring heats up but not the inner ring, most likely the element itself has failed and you will need to check the dual surface element, part number PS11764902. Inspect it for a small break in the coil. We hope this information is useful!
Hello Ron, thank you for your question. We have a testimonial form a customer who has replaced it and has posted how: To access the hidden bake element you have to remove the warmer drawer and the left side panel (your left from the back of the oven). To remove the side panel you need to access 3 screws under the side of the glass top, to lift the glass top open the oven door and remove 2 screws from the bottom side of the glass top. Once the drawer and side panel are removed you can use a flat head screwdriver to pry out the false bottom on the front side of the oven and remove 2 more screws on the side so it drops down. Move the insulation out of the way and release the element tray by prying out 2 tabs on the front side. Unplug the connectors from the element terminals and remove the bolt holding the element. Fold the side of the element tray down to remove the element. Reverse order to install. We hope this helps.
Was this helpful?
Thank you for voting!
< Prev
1
Next >
✖
Ask a Question
Ask our experts a question on this model and we'll respond as soon as we can.
Turned the breaker off, I removed 2 screws securing the range top to the range, opened the top and secured it in the up position, Removed the 2 screws securing the element ,one at a time I swapped the quick connectors from the old element to the new and repeated the process in reverse. I save over $100.00 in labor, plus most companies get
... Read more you for a trip charge. It was easy!!
Thermal switch is integral to element and can not be changed, must replace entire element.
Turn off power. Removed front two screws above oven door jamb and lifted the top. Removed the bracket that holds the element against the glass top and removed the element. Moved brackets from old element to new one, aligning to same numer
... Read moreical position and then moved wiring to new element. Slide new element under bracket and reinstalled single screw. Replaced top and screwed down. Turn on power and test .