Your coupon for will be reflected when you check out!
✖
Your coupon for
✖
Hello!
You're visiting the PartSelect site in U.S.
Would you like to shop on the Canadian site?
Stay on this site
Go to Canadian site
✖
Model Number Locations
1Select Category Type
Select Category Type
2Select Product Type
Select Product Type
3Select {MODEL} Type
Select {MODEL} Type
Sample Model Number Tags
Model numbers can be made up of numbers (1005400, for example) or a combination of letters and numbers (LAT1000AAE). The model number will most likely appear on either a paper sticker or a metal plate. Your appliance's model number tag may look similar to the sample model number tags shown here (model number highlighted in yellow):
Model has been saved to My Models. If you're not signed in, your lists are available on this device and will expire within 30 days.
Model has been saved to My Models.
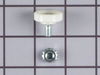
This an authentic OEM 40-Watt replacement light bulb, used in a number of household appliances. It is specially designed to withstand extreme temperatures, which is why these replacement bulbs are mos...
$17.75
In Stock
Order now and your part arrives in 2-3 business days!
This inner door glass is used in ranges. It creates a transparent heat barrier inside your oven door. For this installment, the only tool needed is a #2 Phillips screwdriver. To repair, first remove t...
$77.84
In Stock
Order now and your part arrives in 2-3 business days!
This touch-up paint can be used on a wide variety of household appliances. It is most often used on washers, dryer, refrigerators, dishwashers, ranges, freezers, trash compactors, or microwaves. It is...
$12.54
In Stock
Order now and your part arrives in 2-3 business days!
This is cookware designed for use in your range or oven. It is a two-piece dish that is used to grill or cook food while the broil function is on, meaning it can withstand high temperatures. This set ...
$47.07
In Stock
Order now and your part arrives in 2-3 business days!
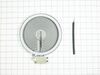
This is the replacement large surface element for your cooktop or range. It is approximately 10-inches in diameter and is 1200/2500 watts. The large surface element is installed under the cooktop and ...
$133.31
In Stock
Order now and your part arrives in 2-3 business days!
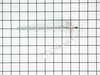
The light socket on your electric range connects the power source to the light bulb. If your oven light is malfunctioning, you may need to replace the light socket. The light socket is located in the ...
$59.48
In Stock
Order now and your part arrives in 2-3 business days!
This bottle of non-abrasive cooktop cleaner breaks down and gets rid of the hardest baked-on stains and residue without causing any harm to your appliance. The bottle is 10 oz and does not require a l...
The light cover lens in your oven is designed to protect the light bulb. If your light cover lens is damaged, you will need to replace it. This part is made of clear glass and is roughly 3 inches in d...
$52.29
In Stock
Order now and your part arrives in 2-3 business days!
Ask our experts a question about this model and we'll get back to you as soon as possible!
5 questions answered by our experts.
Sort by:
< Prev
1
Next >
Search filter:
Clear Filter
Your search term must have 3 or more characters.
Keep searches simple. Use keywords, e.g. "leaking", "pump", "broken" or "fit".
Sorry, we couldn't find any existing answers that matched.Try using some different or simpler keywords, or submit your new question by using the "Ask a Question" button above!
Roberta
January 30, 2020
Light bulbs in oven will not stay on. If you wiggle the bulb it will come on for a short time then goes out. Now on the one side will not come on at all anymore
For model number GLP85800
Hello Roberta, thank you for your question. If the oven light is malfunctioning like you described, you may need to replace the Light Socket. Many of our customers have rated this repair as easy, and it should take less than 15 minutes. Before you begin this repair, make sure to disconnect the power source from your range. I hope this helps.
Water is running from the freezer down into the back of the fridge and freezing on the shelf's
For model number GLP85800
Hi Julie. Check the drain defrost tube to see if it is blocked or damaged. Thank you for your question and good luck with your repair.
Was this helpful?
Thank you for voting!
Gord
December 12, 2019
Door does not lock to self clean
For model number GLP85800
Good Day Gord. Thank you for your question in regards to your unit (Model Number GLP85800). Based on our research, we have found that the door has to be completely closed properly in order for the door to lock. Once that is done you will be able to use the self-cleaning cycle. We would also recommend looking at the door to see if there is anything that has been damaged, warped or bent causing the door to not close properly. Hope this helps. Best Regards.
Was this helpful?
Thank you for voting!
Metis
November 21, 2022
front left burner does not heat anymore, it is a bridge but bridge still working, is there an element that could be replaced?
For model number GLP85800
Hello Metis, thank you for reaching out. We recommend that you check the dual surface element switch. It is also a good idea to test the dual element for continuity. Inspect these parts for any damage and replace the defective part to resolve your problem. If you require assistance to place an order, please contact customer service. We hope that helps!
Our electricity went out overnight. I'm not sure how long the power was out, but our oven is not working correctly. The window that displays the time, now says "LOC 1143" with a little icon of a pad lock. Oven door will open & close with no problems. Stove top works okay. I just can't find a solution to why I can't disposed this screen LOC 1143. The number1143 changes. Never had a problem with this stove/oven. Please advise, thank you so much.
For model number GLP85800
Hello Rm, thank you for your inquiry. We have researched and found that the error code LOC indicates that the control is locked. To unlock the control, you may need to press and hold the start button for 5 seconds, or until a single tone beeps. We hope this information helps!
Was this helpful?
Thank you for voting!
< Prev
1
Next >
✖
Ask a Question
Ask our experts a question on this model and we'll respond as soon as we can.
This heating element is accessed from the right side of the range. The parts drawings are misleading, making you think that it can be accessed from below -- not so!
Remove the right side panel from the range by removing screws on back edge, and bottom center on the inside. Slide the panel forward to release from tabs on the fro
... Read morent edge, then pull out and off.
Separate the insulation that hides the terminals and access cover for the element., then remove one screw at the rear edge of this panel, and slide it toward the rear, then pull out.
Before disassembling the side, you can check to verify that the element is burned out by removing the rear panel and doing a continuity check on the wires leading to this element from the rear of the range. The wires on my range were a salmon or pink color with high temperature insulation.
1. The wiring diagram on the rear of the oven incorrectly shows a bi-metal element in the L2 side of the oven heating element circuit. There is no bi-metal element in the circuit. 2. There is a fast blow 20 Amp fuse with radial leads in the L2 side of the oven heating element circuit which is N
... Read moreOT shown on the oven wiring diagram on the rear of the oven. If you have a malfunctioning heating element this fuse is probably blown and you will need to replace it by removing the rear panel from the oven. The fuse is located toward the bottom, is shrink-wrapped and contained within a wire bundle. 3. The wiring diagram in the manual shows neither the fuse or the bi-metal element.
To replace the lower heating element (aka the hidden element) Disconnect power to the oven. Remove oven from it's location to gain access to the right side panel. Remove three screws holding the right side panel in place and remove panel Disconnect both wires connected to the element terminals. Carefully pull back fiberglass insulation to reveal element holding bracket. Remove one screw holding the element bracket in place and remove both element and bracket.
Installation is the reverse of these steps but make sure you replace the fiberglass insulation correctly or you will experience problems with heat transfer and a possible hot-spot on the side of the oven.
The quality of this KitchenAid oven is very bad. The parts are cheap and not well finished. No thought has been given to serviceability and the product's documentation is defective. The entire device has been designed for low-cost production and not for reliability or longevity. It is easy to see this when you study the documents and take the device apart. The morel of the story is: don't spend extra money on a KitchenAid oven because a less expensive brand will probably be of equal or better quality of design and/or parts quality. Access to the lower heating element could easily have been designed for front or rear removal. A service technician would charge around $250-$300 to perform this repair including parts.
I removed the oven door by lifting it off with the hinges. Disassembled the door parts one at time making sure I remember where I removed the screws until I am able to get to the broken glass. The most difficult part is making sure that the insulation strip & the gasket stayed in place after I replaced the broken glass & doing the reverse
... Read more process of installing the parts together. Relatively easy process as long as you remember where the parts go. When in doubt, I had to refer to the pictorial of the disassembled door shown on your website.