


FCFE308LAFA Frigidaire Range - Overview
Sections of the FCFE308LAFA
[Viewing 1 of 1]
Keep searches simple, eg. "belt" or "pump".
 – Part Number: 318178110")
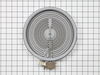
Radiant Element w/Limiter (1200w)
PartSelect #: PS1528719
Manufacturer #: 318178110
This is a six-inch radiant element with limiter. It works in conjunction with your stove top range. The purpose of this part is to heat up the cooking area that is located on top of the range, also kn...
$86.19
In Stock

ELEMENT
PartSelect #: PS16763418
Manufacturer #: 5304533520
Dual Radiant Surface Element
$68.26
In Stock


Leveling Leg
PartSelect #: PS977569
Manufacturer #: 316272900
This part is sold individually. The leveling leg is black in color and measures approximately 2 inches in length. It is made of plastic. The leveling leg is found underneath your range and may crack o...
$21.95
In Stock

SWITCH
PartSelect #: PS12746358
Manufacturer #: 5304522918
Find an authentic solution for your appliance repair needs with the SWITCH,INFINITE,RADIANT DUAL from Frigidaire. This is a genuine OEM part designed for consistent performance and longevity. Enjoy th...
$57.37
In Stock

Rack
PartSelect #: PS16731592
Manufacturer #: 5304531722
Measurements: approximately 22 7/8" x 16 1/4"
$53.30
In Stock


SWITCH
PartSelect #: PS8692370
Manufacturer #: 808136601
This Frigidaire Oven Door Light Switch is a genuine OEM part, compatible with certain models of Frigidaire, Electrolux, White Westinghouse, and Tappan stoves, ovens, and ranges. Designed for functiona...
$43.95
In Stock
Questions And Answers for FCFE308LAFA
We're sorry, but our Q&A experts are temporarily unavailable.
Please check back later if you still haven't found the answer you need.
Common Symptoms of the FCFE308LAFA
[Viewing 2 of 2]


")

Keep searches simple. Use keywords, e.g. "leaking", "pump", "broken" or "fit".
burned out burner
First we removed two screws under the rim of the range top to open the lid. Lifted the lid and removed the screws from the bracket that holds the elements, Be careful with the clips that hold the element in, if you break them or bend them there aren't any more! Also note which holes they were in, they are marked according to the differ
... Read more
ent sizes of elements. Disconnected the wires, needed needlenose pliers to grip them...connected new element, popped it back in place, replaced bracket, closed top ...Easy peasy!!!
Read less
Parts Used:
-
Lori from Winter Haven, FL
-
Difficulty Level:Easy
-
Total Repair Time:Less than 15 mins
-
Tools:Pliers, Screw drivers
68 of 92 people
found this instruction helpful.
Was this instruction helpful to you?
Thank you for voting!
Center of dual burner was broken
Removed screws on the sides and front.
Labeled the wire sets connected to the front control panel.
Gently lifted up the stove top and flipped it over on to a towel.
Removed the piece of metal holding down the burner.
Disconnected the cables to the old burner.
Repeated steps above in reverse.
Labeled the wire sets connected to the front control panel.
Gently lifted up the stove top and flipped it over on to a towel.
Removed the piece of metal holding down the burner.
Disconnected the cables to the old burner.
Repeated steps above in reverse.
Parts Used:
-
German from SELLERSBURG, IN
-
Difficulty Level:Easy
-
Total Repair Time:1- 2 hours
-
Tools:Screw drivers
6 of 8 people
found this instruction helpful.
Was this instruction helpful to you?
Thank you for voting!
2 elements stopped working.
My husband followed the video instructions and it was easy to fix.
Parts Used:
-
Ruth from MORGANTOWN, WV
-
Difficulty Level:Really Easy
-
Total Repair Time:30 - 60 mins
-
Tools:Nutdriver
7 of 12 people
found this instruction helpful.
Was this instruction helpful to you?
Thank you for voting!