Your coupon for will be reflected when you check out!
✖
Your coupon for
✖
Hello!
You're visiting the PartSelect site in U.S.
Would you like to shop on the Canadian site?
Stay on this site
Go to Canadian site
✖
Model Number Locations
1Select Category Type
Select Category Type
2Select Product Type
Select Product Type
3Select {MODEL} Type
Select {MODEL} Type
Sample Model Number Tags
Model numbers can be made up of numbers (1005400, for example) or a combination of letters and numbers (LAT1000AAE). The model number will most likely appear on either a paper sticker or a metal plate. Your appliance's model number tag may look similar to the sample model number tags shown here (model number highlighted in yellow):
Model has been saved to My Models. If you're not signed in, your lists are available on this device and will expire within 30 days.
Model has been saved to My Models.
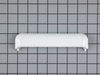
This authentic, white Drum Bearing Slide, also known as the bearing drum slide, glide, or pad, is a plastic, easy-to-install part for your dryer. It replaces the dryer's front drum slide to allow for ...
$15.91
In Stock
Order now and your part arrives in 2-3 business days!
This original equipment manufacturer Drum Bearing Slide is a plastic, green, easy-to-install part for your dryer. It replaces the dryer's front drum slide to allow for easier movement. You'll know if...
$28.87
In Stock
Order now and your part arrives in 2-3 business days!
This Front Drum Bearing (Top Bearing, Dryer Drum Front Support Bearing, Drum Support Bearing, Dryer Drum Glide Bearing) holds the drum bearing and slides for the drum to turn on. The front drum bearin...
$43.83
In Stock
Order now and your part arrives in 2-3 business days!
This Drive Belt is 89.5" long and comes in black, featuring four ribs on the inside for a better grip. This is a long belt that wraps all the way around the dryer drum, around a tension pulley, and th...
$49.81
In Stock
Order now and your part arrives in 2-3 business days!
This is a duct felt seal for a dryer. The duct felt seal allows the front-load dryer drum to glide smoothly on the front panel. Your dryer will not function properly if the drum felt seal is compromis...
$37.84
In Stock
Order now and your part arrives in 2-3 business days!
This set (Knob and Clip Assembly, Control Knob, Dryer Control Knob) allows you to replace the knob on your timer if it is damaged or missing. The plastic knob can break around its shaft, or the retain...
$37.84
In Stock
Order now and your part arrives in 2-3 business days!
This timer knob is used to set the dryer cycle by advancing the timer. The plastic can become brittle with age and crack where it attaches to the timer shaft. You will need to replace this part if it ...
$42.83
In Stock
Order now and your part arrives in 2-3 business days!
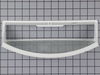
This is a lint filter screen that is used for many dryers. It has a metal screen with a white plastic frame, and is approximately 13 inches wide. This part is sold individually. The lint filter traps ...
$59.56
In Stock
Order now and your part arrives in 2-3 business days!
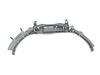
This rear drum bearing kit includes a shaft, ground strap, bearing, seven screws, and installation instructions. The bearing plate comes with a slot in it for the ground strap. This part helps keep yo...
$74.22
In Stock
Order now and your part arrives in 2-3 business days!
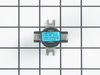
Restore reliable operation to your GE dryer with this genuine OEM push-to-start switch, designed specifically for use with a range of GE dryer models. This switch activates the dryer when you press an...
$30.86
In Stock
Order now and your part arrives in 2-3 business days!
This lint chute assembly is a genuine replacement component designed for GE and Hotpoint dryers. It plays a critical role in directing exhaust airflow from the dryer drum to the blower wheel, ensuring...
$85.04
In Stock
Order now and your part arrives in 2-3 business days!
Ask our experts a question about this model and we'll get back to you as soon as possible!
1 question answered by our experts.
Sort by:
< Prev
1
Next >
Search filter:
Clear Filter
Your search term must have 3 or more characters.
Keep searches simple. Use keywords, e.g. "leaking", "pump", "broken" or "fit".
Sorry, we couldn't find any existing answers that matched.Try using some different or simpler keywords, or submit your new question by using the "Ask a Question" button above!
Becky
October 11, 2021
What is the capacity of this dryer?
For model number DBLR333GG7WW
Hello Becky, Thank you for contacting PartSelect.com. This dryer is 7.8 cu. ft according to the manual. We hope this helps!
2 people found this helpful.
Was this helpful?
Thank you for voting!
< Prev
1
Next >
✖
Ask a Question
Ask our experts a question on this model and we'll respond as soon as we can.
It was pretty easy. After already taking apart the dryer to install a new belt I knew exactly my plan of action. I removed the two screws that hold the top panel of the dryer to the front panel. I then removed the top panel and removed the screws that hold the front to each side panel. I than pulled the front away from the cabinet and
... Read more drum. I put the new slides in place and installed a new felt strip. I put it back together and that was that. Very easy.
Basically, I followed the same steps a prior person posted. 1.Removed the two screws inside the door, on the top part of the opening. 2.Lifted up and removed the top. 3.Removed two screws holding the front panel in place. 4.Held up the drum while removing the front panel. I carefully turned the panel so I could get at
... Read morethe drum bearing without pulling the wires connecting it to the front panel. The wires are not very long, so I had to be careful not to pull on them. 5.Carefully pried off the old drum bearing, using just my hands. It was fairly tight, and popped out just as I started to worry if I was putting too much pressure on it. 6.Checked to see how the old felt was installed, then I pulled out the old felt. 7.Inserted the new felt, being careful to insert one end into a slot the same way the original was installed. 8.Inserted the new slides into the new drum bearing. The gray slides went in at the eleven and one o'clock positions, the white slides went in at ten and two o'clock. 9.Removed a surplus plastic piece from the new drum bearing (where the light comes through). 10.Inserted the new drum bearing, putting the bottom tabs in first, then pivoting it into place. I squeezed it into place to make sure it was tight. 11.Lifted up the drum and put the front panel back on. 12.Screwed the front panel back on, using the two screws. 13.Carefully put the top back on. 14.Screwed in the two screws inside the front door to fasten down the top. That was it! I started up the dryer and it worked fine. No more squeaking. About the only thing odd about the repair is why PartSelect sells each slide separately (i.e., I had to order 2 white slides and 2 gray slides). I can't imagine replacing just one, so why not package them in pairs, or maybe even all four in one package. At any rate, the repair was easy, and a lot cheaper than having someone come out to fix it.