Your coupon for will be reflected when you check out!
✖
Your coupon for
✖
Hello!
You're visiting the PartSelect site in U.S.
Would you like to shop on the Canadian site?
Stay on this site
Go to Canadian site
✖
Model Number Locations
1Select Category Type
Select Category Type
2Select Product Type
Select Product Type
3Select {MODEL} Type
Select {MODEL} Type
Sample Model Number Tags
Model numbers can be made up of numbers (1005400, for example) or a combination of letters and numbers (LAT1000AAE). The model number will most likely appear on either a paper sticker or a metal plate. Your appliance's model number tag may look similar to the sample model number tags shown here (model number highlighted in yellow):
CDWT280V50SS General Electric Dishwasher - Overview
Save your modelModel Saved!
Save your model for later to make things easier.
Model has been saved to My Models. If you're not signed in, your lists are available on this device and will expire within 30 days.
Model has been saved to My Models.
This detergent dispenser assembly is attached to the inner door panel of a dishwasher. This part holds detergent and dishwasher rinse products in a covered container. If your dispenser will not open, ...
$67.57
In Stock
Order within the next 7 hrs and your part ships today!
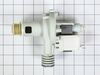
This water inlet valve should be located behind the lower kickplate panel in either the right or left corner. The attaching solenoid on the valve open and close according to the desired amount of water needed.
$46.95
In Stock
Order within the next 7 hrs and your part ships today!
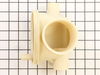
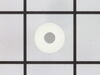
This genuine rinse-aid dispenser cap is an original replacement part from GE, designed for use with GE dishwashers. It covers the rinse agent port and securely seals the dispenser to keep the rinse ai...
$15.95
In Stock
Order within the next 7 hrs and your part ships today!
The hinge link on your dishwasher connects the spring to the dishwasher door hinge. If the hinge link becomes cracked or damaged, you may not be able to shut or lock your dishwasher door properly. In ...
$13.95
In Stock
Order within the next 7 hrs and your part ships today!
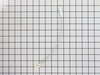
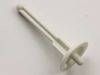
This OEM-compatible screw is designed for use with many GE dishwashers. Measuring 8-16 HXW and 1/2" in length, this stainless steel screw secures the middle spray arm hub to the upper rack assembly, e...
$13.95
In Stock
Order within the next 7 hrs and your part ships today!
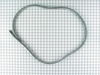
This part is the replacement door hinge cable for your dishwasher. The door hinge cable connects the door spring to the door hinge, and allows the door to open in a controlled fashion. If you open you...
$20.95
In Stock
Order within the next 7 hrs and your part ships today!
Turned off power to unit, 'cuz it has a solenoid lead to open the soap door. Removed the phillips head screws that held the door together. The screw are located on the inside edge of the door, there are 10-12 of them. Spearated the door shells carefully, trying not to disturb the location of the wiring in the middle of the doo
... Read morer.
Found the 4 screws that hold the module assembly to the door from the inside, and removed them. Popped the assembly out, cleaned the gasket-seat area and placed the new one in place. Carefully tightened the 4 screws. It is easy to over-tighten them, so only turn them until you feel they are snug. Let the gasket do the work. Attached the two solenoid control wires in the same positions they were in before they were removed from the old assembly. Re-assembled the door halves, again taking care to not over-tighten the phillips-head screws. One got "spun" and I removed it and re-set it into some epoxy. Returned power to the dishwasher, and stopped washing dishes by hand. Note: the latch is now made with a plastic that is more dense, and likely will not fail as soon as the original one did. I think GE learned something about the durability of their component plastics since this was originally built.
The hardest part for me was pulling the dishwasher out from under the countertop. Once it is out all you have to do is disconnect the power (or power off the fuse going to the dishwasher) then look underneath the dishwasher and you will see where the two ends of the heating element come through. Disconnect the wires connected to the ends
... Read moreby simply sliding off the connector. Then remove the plastic "nuts" that screw onto the ends of the heating element by turning them counterclockwise counterclockwise. Once the nuts are removed you can reach inside the dishwasher and remove the old heating element and replace it with the new one. Then simply replace the plastic nuts and reconnect the wires and you are good to go.
You'll need to remove the front toe kick and (if installed, the GE Profile baffling for additional silencing action).
You will need to disconnect the right wire connection to access the right screw (and may need to use a flat head screwdriver). You can then remove the 2 screws that hold the Valve Water Inlet on.
... Read more>You will then need to loosen and the hose clamp that attaches the water line to the Valve Water Inlet. You may need to force it undone since the rubber connection is pretty secure around the water tube inlet.
Disconnect the plastic wire housing from the Valve Water Inlet and you should now have the Valve Water Inlet disconnected.
Reverse the order and reconnect everything and you should be good to go!
Double-check for any leaks prior to pushing everything back in :)


 – Part Number: WD02X10067")