Your coupon for will be reflected when you check out!
✖
Your coupon for
✖
Hello!
You're visiting the PartSelect site in U.S.
Would you like to shop on the Canadian site?
Stay on this site
Go to Canadian site
✖
Model Number Locations
1Select Category Type
Select Category Type
2Select Product Type
Select Product Type
3Select {MODEL} Type
Select {MODEL} Type
Sample Model Number Tags
Model numbers can be made up of numbers (1005400, for example) or a combination of letters and numbers (LAT1000AAE). The model number will most likely appear on either a paper sticker or a metal plate. Your appliance's model number tag may look similar to the sample model number tags shown here (model number highlighted in yellow):
Model has been saved to My Models. If you're not signed in, your lists are available on this device and will expire within 30 days.
Model has been saved to My Models.
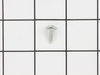
This is a multi-use and multi-appliance screw. It can be used on a microwave, refrigerator, range/oven, air conditioner, dehumidifier, washer, or dryer. The measurements of this screw are 8 x 1/2 inch...
$20.95
In Stock
Order within the next 7 hrs and your part ships today!
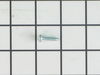
This hose clamp is used in a wide variety of household appliances. Most often it is found in washers, dishwashers, refrigerators, freezers, dehumidifiers, garbage disposals, or air conditioners. This ...
$7.95
In Stock
Order within the next 7 hrs and your part ships today!
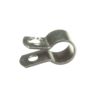
This water hose clamp is used in your refrigerator to support the water tube. If the tubing or hose is working, but is loose inside the unit, the clamp, which is supposed to support it in place, could...
$11.95
In Stock
Order within the next 7 hrs and your part ships today!
The speed nut (also referred to as a condenser motor fan nut), fits onto the condenser fan motor. The motor for this fan turns on simultaneously with the evaporator and the compressor motors, so a mal...
We have a Reverse Osmosis water filter supplying the fridge, so the internal water filter only served to reduce the water pressure inside the unit. I installed the bypass plug by simply twisting and removing the internal water filter and then twisting the plug up into the same hole. Done in 5 min. Longest part of this was cl
... Read moreearing the top shelf to reach back there... Oh, and figuring out that this part exists and that it could help with the problems we were having with the unit. The water filter is relatively new, less than six months, but it still contributed to the problem enough to cause the failure. [Thank you Partselect.com for having this web database set up that gets EXACTLY the right part!].
Now about the hollow cubes: Do a web search and you'll find a lot of discussion about it. This is specific to the Whirlpool (Maytag, and others) newer style front to back icemakers that create "half moon" shaped icecubes. For a Shop Manual to a web search for 4316835.pdf for this series. No doubt my old unit's icemaker solenoid valve on the back isn't passing as much pressure as it did new, but by itself it isn't fatal just yet. You can tell if you are vulnerable to this if the water spigot on the front only delivers a very slow trickle of water; if it takes a l o n g t i m e to fill a glass.
But here is the rest of the story: There is a fundamental design flaw in the way the icemaker unit was created that makes it malfuntion if the water pressure is too low - they chose to put the thermocouple (TC) that senses the temperature of the freezing cube on the opposite end (front) of the water tray from the water fill tube which fills from the rear. This was probably a manufacturing trade off for simplicity of assembly and it saved them half a cent's worth of copper wiring and a couple of screws. And maybe a safty concern about wiring under an open water channel, but that is a lousy excuse; there are other solutions, and the power "harness" goes right by there within a couple of inches anyway...
There are a number of reasons for low pressure: - Bad supply inlet valve, or not open all the way, crimped tubing - Bad Frige icemaker solenoid valve - Clogged internal water filter (even just a little) - Frozen ice plug in the fill tube, in the very back top of the unit against the back (use a hair dryer to defrost) - Etc. Do some more web research for more details. Of course the icemaker timers do fail as well, so this discussion assumes the icemaker is still functioning as "normally" as it can, given its design limitations.
The interaction with water pressure (design flaw!) is this: if the unit doesn't get enough water due to low pressure, then the final cube position to fill doesn't get any water in it (the front one by the motor). This is the one that the TC is next to as well, so it cools of really quickly and the TC thinks the tray is completely frozen, when in fact it isn't. The TC fires the cycling motor which turns on the heater and then spins the ejector shaft which has tabs that push the half moon shaped cubes around and out. However, since the cubes weren't fully frozen, only their outer shell gets pushed out - the water in the middle drains out leaving a hollow cube set. That liquid water hits the cold ejector bars and some of it immediately freezes, making little stalactite fingers that catch on the tabs and side of the tray, thus jamming the ejector shaft and pausing the cycle in place indefinitely. The net is that you get a few hollow cubes and then no more ice until you reach in and crack off the ice fingers so shaft tabs can pass and the motor can finsh the cycle and properly stop in its home position. You can also tell by checking whether the front cube location has water in it just after it fills by reaching around and dipping your finger in it. If it comes up dry, then you have this problem. So, in my case, putting the bypass plug in increased my flow t
From the beginning I have never had good water flow in the door and ice cubes turned out funky. I tried replacing the filter once with hardly noticeable change. The change I did see was $35 less in my pocket. So I bought a filter bypass plug and it now works like a champ. I have well water so I trust its quality and I am very satisfied
... Read more. I would describe how I did the repair but if you don't no how to change out the filter you probably shouldn't be trying it.
I removed the water filter located in the refrigerator and replaced it with the bypass plug. The ice cubes and the water dispenser work properly . I am pleased with the outcome especially the price was only $15 and less than 5 minutes of my time. Maytag recommends replacing the water filter every six months at $40 a filter. One can see
... Read more how this will add up in time. Eventually I am installing an after market water filter in line prior to the refrigerator.


 Diagram and Parts List for Maytag Refrigerator")
 Diagram and Parts List for Maytag Refrigerator")
.gif "SUPPLEMENTAL INFORMATION Diagram and Parts List for Maytag Refrigerator")


 – Part Number: WP4387558")