Your coupon for will be reflected when you check out!
✖
Your coupon for
✖
Hello!
You're visiting the PartSelect site in U.S.
Would you like to shop on the Canadian site?
Stay on this site
Go to Canadian site
✖
Model Number Locations
1Select Category Type
Select Category Type
2Select Product Type
Select Product Type
3Select {MODEL} Type
Select {MODEL} Type
Sample Model Number Tags
Model numbers can be made up of numbers (1005400, for example) or a combination of letters and numbers (LAT1000AAE). The model number will most likely appear on either a paper sticker or a metal plate. Your appliance's model number tag may look similar to the sample model number tags shown here (model number highlighted in yellow):
Model has been saved to My Models. If you're not signed in, your lists are available on this device and will expire within 30 days.
Model has been saved to My Models.
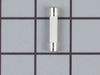
I found an exploded view diagram of of my microwave model which was very helpful. You need only remove outside metal skin by removing 4 screws on either side and 4 more on the back. Remove 4 plastic hole plugs from the top mounting inserts. Gently pull sides out and lift up and back to remove outer skin. The fuse is located on the back ri
... Read moreght corner behind the control panel. You access from the side. The fuse is under the spreader bar. Lift fuse up gently to remove.
P.S. It was the MSP Capaciter and or the interlock switch, snap apart 21A (19) failure that actually caused the ceramic fuse to blow.