


9778-1 Generator - Overview
Models starting with 9778-1
Click on the best match to narrow your results.
Keep searches simple, eg. "belt" or "pump".

Fuel Valve W/Bushing
PartSelect #: PS8911051
Manufacturer #: 192980GS
Made of durable rubber and plastic components, this Fuel Valve and Bushing are designed for use in over 150 models of generators and pressure washers. This item is sold as a kit, including the valve a...
$19.38
In Stock


Generator Carburetor
PartSelect #: PS9873484
Manufacturer #: 0A4600
Enhance the efficiency and performance of your Generac equipment with this high-quality Carburetor. Expertly designed by Generac, this part ensures smooth and stable fuel supply to your machine's engi...
$124.09
On Order


Generator Brush Holder Assembly
PartSelect #: PS10162299
Manufacturer #: 0663860SRV
Keep your Generac equipment running smoothly with this Brush Assembly featuring a Brush Holder Assembly. This essential component is designed to meet the high-quality standards maintained by Generac, ...
$26.85
In Stock


Common Symptoms of models starting with 9778-1
[Viewing 1 of 1]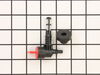
Keep searches simple. Use keywords, e.g. "leaking", "pump", "broken" or "fit".
Dry rotted rubber
Put some dish soap on the rubber, push into the tank hole, slip 1x2 into the handle of the tank and over the new part and pry down pushing it into the hole. Took about 2 minutes.
Parts Used:
-
James from PICAYUNE, MS
-
Difficulty Level:Very Easy
-
Total Repair Time:Less than 15 mins
6 of 10 people
found this instruction helpful.
Was this instruction helpful to you?
Thank you for voting!
Carberator gummed up from sitting in storage. Fuel gone bad in the tank
With a 12-in-one nut screwdriver I removed the two bolts holding the breather cover and air filter. Then I used about a 9/16 deep socket ratchet to remove the nuts holding the breather housing to the carburetor assembly studs. A pair of needle nose pliers was used to disconnect the throttle then I wriggled the breather cover away from t
... Read more
he carburetor so I could get to the fuel line. I managed to pull the fuel line off the carburetor and from the shut-off valve at the tank. The carburetor slid freely and easily off the carburetor studs and I was careful not to damage the carburetor gasket since none came with the new carburetor. I used a single edge razor blade to free the gasket from the old carburetor. A very small amount of silicone lube was used on the gasket and then I sandwiched the old gasket between the carburetor intake and the new carburetor and attached the throttle connection. Before beginning the reassembly I unscrewed the shut-off valve from the tank and used a funnel to drain the very old fuel into a 5-gallon bucket. I made sure the valve was clean by spraying carburetor cleaner through it and did the same with the old fuel line, making sure everything was clear of any obstruction. Then replace the breather assembly back over the carburetor studs, snugged the nuts back on and then replaced the air filter and cover. I re-attached the fuel line to the fuel valve and the carburetor, added a half gallon of clean fresh fuel and was ready for a smoke check. Pulled the starter rope three times with the choke full on, then turned to half-choke and the puppy started right off. I then turned the choke completely off and the engined purred along. I then exercised the generator by plugging in and running a number of power tools for about 15 minutes. Followed standard shut off procedures and the generator is ready for use. Saving the old carburetor to be cleaned and held on reserve for the future. Might want to have another gasket handy or some gasket material should it have to be replaced in the future.
Read less
Parts Used:
-
Robert from BATON ROUGE, LA
-
Difficulty Level:Really Easy
-
Total Repair Time:30 - 60 mins
-
Tools:Nutdriver, Pliers, Socket set
3 of 3 people
found this instruction helpful.
Was this instruction helpful to you?
Thank you for voting!
old valve dripped gas when opened on cold sub zero day
old valve easily pulled out with screwdriver and pliers
install difficult due to 40 degree cold temp and bushing didn't want to squeeze into fuel tank hole
install required lots of liquid soap on bushing, which popped into place by using upward prying pressure from 3"X24" plywood braced into under-shelf of gas tank
... Read more
r />
used same technique to insert valve upward into bushing
works great!
install difficult due to 40 degree cold temp and bushing didn't want to squeeze into fuel tank hole
install required lots of liquid soap on bushing, which popped into place by using upward prying pressure from 3"X24" plywood braced into under-shelf of gas tank
used same technique to insert valve upward into bushing
works great!
Read less
Parts Used:
-
Alan from RADFORD, VA
-
Difficulty Level:A Bit Difficult
-
Total Repair Time:1- 2 hours
-
Tools:Pliers, Screw drivers
3 of 4 people
found this instruction helpful.
Was this instruction helpful to you?
Thank you for voting!