


79651993610 Kenmore Washer - Overview
Sections of the 79651993610
[Viewing 1 of 1]
Keep searches simple, eg. "belt" or "pump".

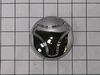
Washer Pulsator Cap
PartSelect #: PS3525704
Manufacturer #: 5006EA3009B
This part is known as a pulsator cap or washplate cap, and is designed for your LG washer. It fits over the washplate mounting bolt and prevents clothes from getting caught on the washplate during a w...
$44.83
In Stock


Support
PartSelect #: PS3535910
Manufacturer #: MJH40343501
Introducing the LG Washer Supporter Leg, designed meticulously to provide robust support to your laundry appliance pedestal. This genuine OEM item from esteemed brand LG has been manufactured for exac...
$28.71
In Stock


Questions And Answers for 79651993610
We're sorry, but our Q&A experts are temporarily unavailable.
Please check back later if you still haven't found the answer you need.
Common Symptoms of the 79651993610
[Viewing 4 of 4]Will not agitate
Fixed by
these parts
these parts
Show All
Leaking
Fixed by
these parts
these parts

Show All
Lid or door won’t close
Fixed by
these parts
these parts

Show All
Marks left on clothes
Fixed by
these parts
these parts
Show All
Keep searches simple. Use keywords, e.g. "leaking", "pump", "broken" or "fit".
Top loading washing machine displayed "tE" error
Disconnect machine from power source. Then, disconnect any tubes from the back side (make sure you close any water valves before doing so). Then, lay the machine on its back to access the bottom of the machine. Then, locate the thermistor and replace it with the new one (the thermistor will have two screws holding it in place, simply remo
... Read more
ve the screws and replace the thermistor, then screw it back in). After the new part is installed, stand the machine back up and make sure to connect any tubing to its proper place. Done.
Read less
Parts Used:
-
Angelica from HOUSTON, TX
-
Difficulty Level:Easy
-
Total Repair Time:30 - 60 mins
-
Tools:Pliers, Wrench (Adjustable)
6 of 7 people
found this instruction helpful.
Was this instruction helpful to you?
Thank you for voting!
Washer was stopping during the spin cycle and making a grinding noise.
Our Samsung HE washer started making a grinding noise and stopping at the end of the rinse/spin cycle. I had replaced the clutch and seal 2 years ago and it sounded like it was going out again, however we were not getting the gunk inside the tub like before (seal) and the machine was throwing the tE error code when it stopped which it di
... Read more
d not do last time. According to the manual this meant a thermistor error and the solution was "Call for Service". The machine is 9 years old and way out of warranty so....uh No! I ordered the new thermistor for $15 plus shipping to correct the tE code before looking to replace the clutch again or get a new machine. The new thermistor arrived, leaned the machine on its back, unplug one connector, remove two screws and pull the old one out of it's hole, push the new one in, replace two screws and the connector and GO! Problem fixed! No tE code, no stopping, no grinding noise. As best I can tell, the old thermistor was faulting during the spin cycle and the machine went into emergency stop mode which made the grinding noise. It was not the clutch or bearing at all. Most of the repair time was moving the machine out and disconnecting lines so I could lean it onto its back. Note: If your machine is stopping before draining, it will have water inside the tub which will drain out of the hole where the thermistor goes when you pull the old one out. It has an o-ring to seal it, so just expect a little water to come out and be ready to catch all the water or put the new one in quickly.
Read less
Parts Used:
-
Mike from MANOR, TX
-
Difficulty Level:Really Easy
-
Total Repair Time:Less than 15 mins
-
Tools:Screw drivers
2 of 2 people
found this instruction helpful.
Was this instruction helpful to you?
Thank you for voting!
Water Intake would not stop
Replaced intake valves. Second time, LG repair couldn't handle it. As a note never buy LG, no reliable service, badly engineered machine.
Parts Used:

-
James from HOUSATONIC, MA
-
Difficulty Level:Really Easy
-
Total Repair Time:15 - 30 mins
-
Tools:Pliers, Screw drivers
1 person
found this instruction helpful.
Was this instruction helpful to you?
Thank you for voting!