


79571313311 Kenmore Refrigerator - Overview
Sections of the 79571313311
[Viewing 1 of 1]
Keep searches simple, eg. "belt" or "pump".

Refrigerator Push Button Switch
PartSelect #: PS3529268
Manufacturer #: 6600JB1010A
The interior light in your refrigerator is controlled by a switch that is activated when the door is opened and closed. If your refrigerator light will not turn on, or stays on when the door is closed...
$23.06
In Stock

Refrigerator Door Holder
PartSelect #: PS3535435
Manufacturer #: MEG61899901
This is a manufacturer-approved refrigerator door closure for your refrigerator. It is made of white plastic and measures approximately 3 inches by 2 inches. If your old closure is damaged, your refri...
$21.82
On Order

Ice Maker Assembly
PartSelect #: PS3617225
Manufacturer #: AEQ72909603
This ice maker assembly is for refrigerators. This Ice maker assembly contains the complete ice maker and housing. The assembly may include multiple parts; refer to your parts diagram for a complete ...
$218.39
In Stock

Refrigerator Decor Assembly Tray
PartSelect #: PS10065045
Manufacturer #: ACW74118101
This cover seals the front of the pantry drawer in your fridge, offering both functionality and a decorative touch. It has a clear color and is sourced directly from the original manufacturer. Please ...
$86.07
In Stock

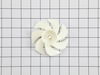
Refrigerator Evaporator Fan Motor
PartSelect #: PS3523323
Manufacturer #: 4681JB1027C
This is a genuine OEM evaporator motor that directly powers the evaporator mechanism within your refrigerator. This mechanism is responsible for pulling air over the evaporator coils, which are cold, ...
$104.59
In Stock

Refrigerator Door Shelf Bin
PartSelect #: PS10065040
Manufacturer #: AAP73051304
This door basket, bin, or tray has both white and clear sections and is used to store items such as condiment bottles and jars. It is attached to the inner side of the refrigerator door. If it becomes...
$77.66
In Stock

Refrigerator Compressor Set Assembly
PartSelect #: PS12739218
Manufacturer #: TCA38151706
This part must be installed by a licensed and trained LG technician that is able to perform a software update, which is required for the installation of this compressor. Part number CJT30000002 is nee...
$425.85
In Stock


Temperature Sensor
PartSelect #: PS3636270
Manufacturer #: 6500JB2002X
This is a temperature sensor for various models of LG refrigerators. Temperature sensors are used to adjust the level of cooling depending on the internal temperature of the refrigerator. If your refr...
$36.77
On Order


Questions And Answers for 79571313311
We're sorry, but our Q&A experts are temporarily unavailable.
Please check back later if you still haven't found the answer you need.
Common Symptoms of the 79571313311
[Viewing 7 of 7]Light not working
Fixed by
these parts
these parts

Show All
Ice maker not making ice
Fixed by
these parts
these parts

Show All
Door won’t open or close
Fixed by
these parts
these parts

Show All
Noisy
Fixed by
these parts
these parts

Show All
Fridge too warm
Fixed by
these parts
these parts
Show All
Ice maker won’t dispense ice
Fixed by
these parts
these parts
Show All
Fridge and Freezer are too warm
Fixed by
these parts
these parts

Show All


Keep searches simple. Use keywords, e.g. "leaking", "pump", "broken" or "fit".
Remove and replace light switch
Video makes it look easy. Kenmore refrigerator does not have "groove" along the right hand side of switch that allows for pushing down on release. Used a thin screwdriver to get under to push while holding switch edge with pliers. Kept slipping. Tape sides to avoid scratching inside of refrigerator.
Parts Used:
-
Debbie from Waltham, MA
-
Difficulty Level:A Bit Difficult
-
Total Repair Time:30 - 60 mins
-
Tools:Pliers, Screw drivers
41 of 74 people
found this instruction helpful.
Was this instruction helpful to you?
Thank you for voting!
Icemaker quit releasing ice from tray and water was pouring and freezing in ice storage bin
This couldn't have been easier. Two tiny screws in the front needed unscrewed, and then two plastic clips in the middle just had to be popped lose. Finally, you unplugged the power cord. Then, you just needed to reverse the process by plugging the new ice maker in, popping the clips in place, and screwing the two holes back in and turning
... Read more
the whole thing on. Voila! Perfect ice cubes again. And for only a little over $100.
Read less
Parts Used:
-
Amber from PEORIA, IL
-
Difficulty Level:Really Easy
-
Total Repair Time:15 - 30 mins
-
Tools:Screw drivers
10 of 17 people
found this instruction helpful.
Was this instruction helpful to you?
Thank you for voting!
Original gasket became deformed creating bad seal.
Soak new gasket in hot water in bathtub to soften while removing old gasket. No tools required, it was a little difficult pulling old gasket out but once you get it started part way out it will come out real easy. By the time you get the old gasket out the new gasket will be warm and easy to get started into the groove it pops into. Start
... Read more
ing on back (hinged) side is of door, begin pushing new gasket into groove. Work up and down pushing gasket into place working towards the corners and around to the front side of door. Your all done. This is a job I went into a little nervous thinking I might be calling a service man out to fix, but it turned out to be really easy.
Read less
Parts Used:
-
Stanley from Armona, CA
-
Difficulty Level:Very Easy
-
Total Repair Time:Less than 15 mins
6 of 6 people
found this instruction helpful.
Was this instruction helpful to you?
Thank you for voting!