Your coupon for will be reflected when you check out!
✖
Your coupon for
✖
Hello!
You're visiting the PartSelect site in U.S.
Would you like to shop on the Canadian site?
Stay on this site
Go to Canadian site
✖
Model Number Locations
1Select Category Type
Select Category Type
2Select Product Type
Select Product Type
3Select {MODEL} Type
Select {MODEL} Type
Sample Model Number Tags
Model numbers can be made up of numbers (1005400, for example) or a combination of letters and numbers (LAT1000AAE). The model number will most likely appear on either a paper sticker or a metal plate. Your appliance's model number tag may look similar to the sample model number tags shown here (model number highlighted in yellow):
Model has been saved to My Models. If you're not signed in, your lists are available on this device and will expire within 30 days.
Model has been saved to My Models.
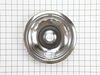
This chrome drip bowl is designed for use with electric cooktops and ranges. This drip bowl is sold individually. At the widest point this part has a diameter of approximately 10 inches. It sits benea...
$18.95
In Stock
Order now and your part arrives in 2-3 business days!
The Frigidaire Range Light Lens Indicator, compatible with selected Frigidaire, Electrolux, White Westinghouse and Tappan models, ensures optimal function of your stove, oven, or range. As a genuine O...
$16.95
In Stock
Order now and your part arrives in 2-3 business days!
This steel washer is also known as the range washer and is used on your oven door. The measurements for the steel washer are a three quarter inch outer diameter, and a one quarter inch inner diameter....
$18.95
In Stock
Order now and your part arrives in 2-3 business days!
This OEM broiler pan and grate insert are cooking accessories used in your oven to broil food. The pan catches drippings and prevents them from falling into the appliance, while the grate insert ensur...
This part is sold individually. The leveling leg is black in color and measures approximately 2 inches in length. It is made of plastic. The leveling leg is found underneath your range and may crack o...
$21.95
In Stock
Order now and your part arrives in 2-3 business days!
My husband removed the screws that held the top of the stove on and then lifted the top up. It is hinged. He then took out the old insulation, wiped down all visible parts of the interior with a bleach solution and replaced the blanket insulation with the new insulation. That took care of the problem!
The light apparatus was loose behind the panel. Remove the remaining part of the lens. Install the new lens from the outside of the panel and hold it in position, protruding into the inside of the panel. Slide the light apparatus onto the lens from the inside, allowing the bracket to hold it in place - it will be spring loaded, which will
... Read more hold it in place.


 – Part Number: 316047707")