


73163 LG Refrigerator - Overview
Sections of the 73163
[Viewing 1 of 1]
Keep searches simple, eg. "belt" or "pump".

Refrigerator Handle Stopper
PartSelect #: PS8752913
Manufacturer #: MJB63190001
This handle screw, also known as a mounting bolt, is a mounting screw to help secure the door handle to your refrigerator door. If your handle is loose, you may just need to tighten the screw. If your...
$14.94
In Stock

Door Basket Assembly
PartSelect #: PS3637059
Manufacturer #: AAP73252302
This door basket assembly is supplied by the original manufacturer to provide storage for various food items in refrigerators. It consists of a white plastic base and a transparent shield, measuring 1...
$62.97
In Stock

Air Filter
PartSelect #: PS3654115
Manufacturer #: ADQ73214404
Refrigerator Air Filters are a key component for neutralizing odors and ensuring a fresh stream of air into your refrigerator. Swapping your old filter out for a fresh one isn’t difficult and should t...
$52.95
Special Order

Door Gasket Assembly
PartSelect #: PS11732674
Manufacturer #: ADX72930461
This is a door seal, also known as a door gasket, for LG refrigerators. This door gasket is used to seal the warmer room temperature from the cooler fridge interior. If the gasket for your refrigerato...
$98.42
In Stock

GASKET ASSEMBLY,DOOR
PartSelect #: PS11732673
Manufacturer #: ADX72930460
This fridge gasket, also known as a door seal, is an authentic OEM part supplied by LG for use with various models of LG refrigerators. It is a flexible strip of rubber that sits along the perimeter o...
$98.42
In Stock

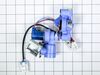
WATER INLET VALVE
PartSelect #: PS3618979
Manufacturer #: AJU72992603
This water inlet valve in your refrigerator, also called a solenoid valve or water control valve, regulates water flow to the icemaker and dispenser. It is found at the rear of the appliance, where it...
$130.83
In Stock

Refrigerator Defrost Sensor Assembly
PartSelect #: PS3529165
Manufacturer #: 6500JB2001B
Enhance the performance of your LG refrigerator with the genuine OEM Defrost Sensor Assembly. This product plays an essential role in maintaining the correct temperature within your refrigerator, as i...
$42.48
In Stock


Ice Water Tube Assembly
PartSelect #: PS3533046
Manufacturer #: AJR56656503
Upgrade your LG fridge functionality with this high-quality Refrigerator Ice Water Line Tube Assembly. The water line is an essential component for your fridge, delivering water to areas that require ...
$42.48
In Stock

Head Cap Assembly
PartSelect #: PS3530706
Manufacturer #: ABN73019101
This is a water filter bypass plug made for use with LG refrigerators. This plug is designed to act as a stand-in and allow water to flow to the dispenser or ice maker, even when the water filter is r...
$23.06
In Stock

Sensor Cover Assembly
PartSelect #: PS3531167
Manufacturer #: ACQ73244001
The LG Temperature Sensor and Cover Assembly is a crucial component of your fridge, ensuring consistent and accurate temperature regulation. This genuine LG item incorporates a high-quality sensor to ...
$42.48
In Stock
Exact Part matches for your search term
[Viewing 3 of 3]
TRIM
This part number matches the current model number 73163
PartSelect #: PS1297077
Manufacturer #: 73163
No Longer Available
Slide spring/clip
This part number matches the current model number 73163
PartSelect #: PS12495913
Manufacturer #: 73163
No Longer Available
Rotor assembly
This part number matches the current model number 73163
PartSelect #: PS16580389
Manufacturer #: 73163
$533.32
Special Order
Questions And Answers for 73163
We're sorry, but our Q&A experts are temporarily unavailable.
Please check back later if you still haven't found the answer you need.
Common Symptoms of the 73163
[Viewing 5 of 5]Door Sweating
Fixed by
these parts
these parts


Show All
Leaking
Fixed by
these parts
these parts

Show All
Not dispensing water
Fixed by
these parts
these parts
Show All
Door won’t open or close
Fixed by
these parts
these parts
Show All
Ice maker not making ice
Fixed by
these parts
these parts
Show All
Keep searches simple. Use keywords, e.g. "leaking", "pump", "broken" or "fit".
The door gaskets had become hard and curled up - would not seal properly
Watch YouTube videos on this topic if you are uncertain before tackling the job. The right door was easy to replace. Just pull the gasket with your fingers and it will come off easily. Place new gasket over door and use fingers to press it inside the groove few inches at a time. Pay attention to gasket orientation.
The left ... Read more door is a bit harder because you need to remove the mullion at the door edge using a screw driver. Remove two screws on the center hinge and then slide the mullion up to disengage. Then unplug the wires to remove the mullion. Replace the gasket as described above and replace the mullion reversing the directions shown above.
Could not believe how easy it was!
Read less
Parts Used:
-
Vispi from SUGAR LAND, TX
-
Difficulty Level:Really Easy
-
Total Repair Time:15 - 30 mins
-
Tools:Screw drivers
4 of 4 people
found this instruction helpful.
Was this instruction helpful to you?
Thank you for voting!
Left side gasket was torn and would seal properly
Took off the French door Mullen by unscrewing middle area. Unconnected the wires for the door sensor. Then detached old gasket and replaced with new gasket. Reattached the wiring and snapped Mullen flap in place and finally rescrewed to the door. Seal is very good now.
Parts Used:
-
Thomas from CHULA VISTA, CA
-
Difficulty Level:Easy
-
Total Repair Time:Less than 15 mins
-
Tools:Screw drivers
3 of 3 people
found this instruction helpful.
Was this instruction helpful to you?
Thank you for voting!
Gasket on one of the side opening doors was torn and no longer a tight seal.
Fortunately, others had left comments about this installation, so proved very helpful. First thing was laying out the gasket flag on the counter to allow it to unbend, get out the kinks from shipping. While the new gasket was laying out on the counter, started removing the old gasket. As it had been there for 11 years, needed pliers to
... Read more
get a corner started. I was slow and careful removing the old gasket in case I needed to put it back in. A very helpful suggestion from others was to lightly rub dishwashing soap on the gasket edge that fits in the groove in the door. Again, slow and careful, got it installed, wiped off any excess dishwashing liquid, and the door closed with a better seal in a long time. Pleasantly surprised how easy this was to do!
Read less
Parts Used:
-
Daniel from MCMURRAY, PA
-
Difficulty Level:Really Easy
-
Total Repair Time:30 - 60 mins
-
Tools:Pliers
3 of 3 people
found this instruction helpful.
Was this instruction helpful to you?
Thank you for voting!