


3LMVWC100YW0 Maytag Washer - Overview
Sections of the 3LMVWC100YW0
[Viewing 5 of 5]


 Diagram and Parts List for Maytag Washer")

Keep searches simple, eg. "belt" or "pump".

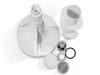
Washer Agitator Repair Kit
PartSelect #: PS334650
Manufacturer #: 285811
This kit (Medium Cam Agitator Repair Kit, Washer Agitator Cam Repair Kit, Cam Agitator) is used to repair the agitator. These parts are located inside the agitator auger near the top. You will need t...
$20.95
In Stock

Washer Thrust Spacer
PartSelect #: PS334562
Manufacturer #: 285587
This is a genuine OEM thrust spacer for your washer, and is also commonly known as a retainer ring. The spacer is about 2.5 inches in diameter, is made of plastic, and is white in color. It is used in...
$6.95
In Stock

Washer Inner Cap Seal
PartSelect #: PS11748108
Manufacturer #: WPW10072840
This is an inner cap seal, but may also be known as an O-ring, and it is a part for your washing machine. Some symptoms replacing this part will fix include: leaking from your appliance, uncontrollabl...
$10.45
In Stock

Washer Drive Pulley
PartSelect #: PS10057144
Manufacturer #: W10721967
This is a replacement clutch assembly or cam kit for your washer. The clutch assembly is mounted on the drive shaft on the bottom of your washer. You may need to replace the clutch assembly if the spl...
$37.76
In Stock

Washer Agitator Cap Barrier w/Seal
PartSelect #: PS11748113
Manufacturer #: WPW10074580
The O-Ring is included with this cap. It can be purchased separately as Part #WPW10072840.
$16.74
In Stock

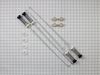
Washing Machine Suspension Rod Kit
PartSelect #: PS11703290
Manufacturer #: W10780048
This suspension rod kit is a genuine OEM kit specially designed for washing machines. Each kit includes a set of 4 rods, 4 suspension balls and 4 bushings. The suspension rods are responsible for supp...
$60.25
In Stock

Agitator Kit
PartSelect #: PS334557
Manufacturer #: 285565
This agitator kit does NOT include the fabric softener dispenser (part 8575076A). That must be ordered separately.
$140.95
In Stock

Dryer Screw
PartSelect #: PS11746840
Manufacturer #: WP90767
This screw is sold individually.
$7.95
In Stock

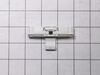
Washer Hose Clamp
PartSelect #: PS11743008
Manufacturer #: WP596669
This hose clamp is used in a wide variety of household appliances. Most often it is found in washers, dishwashers, refrigerators, freezers, dehumidifiers, garbage disposals, or air conditioners. This ...
$7.95
In Stock

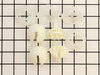
Washer Suspension Rod Support
PartSelect #: PS3502189
Manufacturer #: W10440729
These parts are the replacement suspension rod supports for your washer. They are made of plastic and are approximately 1 ½ inches in diameter. This package will come with an 8-piece set of suspension...
$9.43
In Stock

Washer Washer
PartSelect #: PS11742027
Manufacturer #: WP3949550
This part goes on the agitator retaining bolt.
$12.58
In Stock
 – Part Number: 72017")
Refrigerator Touchup Paint (White)
PartSelect #: PS385132
Manufacturer #: 72017
This touch-up paint can be used on a wide variety of household appliances. It is most often used on washers, dryer, refrigerators, dishwashers, ranges, freezers, trash compactors, or microwaves. It is...
$12.58
In Stock
Questions And Answers for 3LMVWC100YW0
We're sorry, but our Q&A experts are temporarily unavailable.
Please check back later if you still haven't found the answer you need.
Common Symptoms of the 3LMVWC100YW0
[Viewing 15 of 15]Will not agitate
Fixed by
these parts
these parts


Show All
Leaking
Fixed by
these parts
these parts


Show All
Shaking and Moving
Fixed by
these parts
these parts

Show All
Spinning Issues
Fixed by
these parts
these parts
Show All
Does not dispense fabric softener or detergent
Fixed by
these parts
these parts


Show All
Spins slowly
Fixed by
these parts
these parts
Show All
Will Not Start
Fixed by
these parts
these parts
Show All
Noisy and Marks Left on Clothes
Fixed by
these parts
these parts
Show All
Lid or door won’t close
Fixed by
these parts
these parts

Show All
Will not drain
Fixed by
these parts
these parts
Show All
Marks left on clothes
Fixed by
these parts
these parts
Show All
Burning smell
Fixed by
these parts
these parts
Show All
Cycle Not Advancing
Fixed by
these parts
these parts
Show All
Locking Issues
Fixed by
these parts
these parts
Show All
Not cleaning dishes properly
Fixed by
these parts
these parts
Show All


Keep searches simple. Use keywords, e.g. "leaking", "pump", "broken" or "fit".
Upper portion of agitator, no longer pushing clothing down.
The instructions came with the repair kit, it was fairly simple and straight foward.
One bolt held the entire agitator unit in the washer, as well as held the upper and lower halves together. Once that nut was removed the two halves seperated and the plastic clutch pieces could easily be replaced wtih the new onces in the repai ... Read more r kit.
Very easy do-it-yourself repair! Took about 20 minutes because I was being cautious. Next time I could do it in 5 minutes.
Read less
Parts Used:
-
Matt from Pawtucket, RI
-
Difficulty Level:Easy
-
Total Repair Time:15 - 30 mins
-
Tools:Pliers, Socket set
800 of 836 people
found this instruction helpful.
Was this instruction helpful to you?
Thank you for voting!
Would not agita.
It was a blessing that I ordered the kit, because I thought it only needed the rubber seal and the four dogs. But because the seal and dogs cost less than the shipping I decided to order the kit and its good I did because the nochage on the basket sleeve was broke off. The blessing is that the sleeve was in the kit, sp it took 5 sec to sl
... Read more
ip it on along with the rest of the kit, and after about 15 min my wife was back to work. Thanks for saving me time and money without this web site I would have bought another brand new washer, thanks. Lennis from NC.
Read less
Parts Used:
-
Lennis from Jacksonville, NC
-
Difficulty Level:Really Easy
-
Total Repair Time:15 - 30 mins
-
Tools:Socket set
546 of 557 people
found this instruction helpful.
Was this instruction helpful to you?
Thank you for voting!
Clothes mover stopped working. Found, after disassembly, that cam dogs were broken into many pieces.
I first pulled the softener dispenser cap off, then re-moved the inner cap/seal by twisting and pulling (it was a little stubborn, but alternating my grip from side to side while pulling was helpful). Using a 7/16" socket with an extension to reach down inside the mover, I then loosened the agitator mounting bolt. Note the amount of to
... Read more
rque needed to "break " the bolt from the threads holding it as you don't want to overtighten it when you replace it. It doesn't require much effort to tighten it., depend-ing on the size of your wrench. I then lifted the agitator up and off its shaft by slipping my fingers under it on opposite sides of its base. Then, I lifted the mover or auger off the agitator and removed the thrust washer, cam and cam dogs. Don't worry; the illustrated instructions which are included with the new parts are quite clear and understandable. Then, I placed the new thrust washer and cam and dogs (a separate instruction sheet shows you how to assemble the cam, dogs and bearing; not difficult). Here's the only complaint I have about all this: the instructions advise you to apply agitator grease to the top surface of the thrust washer, but the grease isn't included in the kit. I used standard plumber's silicone grease which I had on hand. Hopefully, that won't be a problem. There's a part # for the grease shown on the illustration (#350849).
It would be helpful if this information were given when ordering these replacement parts. You then put the auger and cam on the agitator and place the assembly back on the shaft in the wash tub and replace the mounting bolt and tighten it. Remember to not overtighten it. Then you place the inner cap/seal back inside the mover after lubricating the seal with plumber's grease or liquid soap and replace the dispenser cap. The instructions remind you that the mover is to turn only clockwise and, if that's what you have, you are finished. As a precaution, I checked the "play" (and there is some in it) in the mover/auger after assembly then checked it again after the first couple of loads we washed. It seems to be fine.
Please don't let the length of this story alarm or discourage you. I'm trying to include everything which might be helpful to anyone who wants to do this. It really isn't difficult. Incidentally, it probably wasn't necessary to replace the mover/auger in my machine as it looked to be in very good condition, but I thought it wise (at another's suggestion) to replace it in case it might wear the other parts prematurely. I hope this helps somebody out there and that I didn't forget anything. Again, the parts come with very good instructions. Just don't forget the grease!
Read less
Parts Used:

-
Claude from Beckley, WV
-
Difficulty Level:Easy
-
Total Repair Time:30 - 60 mins
-
Tools:Socket set
392 of 409 people
found this instruction helpful.
Was this instruction helpful to you?
Thank you for voting!