Your coupon for will be reflected when you check out!
✖
Your coupon for
✖
Hello!
You're visiting the PartSelect site in U.S.
Would you like to shop on the Canadian site?
Stay on this site
Go to Canadian site
✖
Model Number Locations
1Select Category Type
Select Category Type
2Select Product Type
Select Product Type
3Select {MODEL} Type
Select {MODEL} Type
Sample Model Number Tags
Model numbers can be made up of numbers (1005400, for example) or a combination of letters and numbers (LAT1000AAE). The model number will most likely appear on either a paper sticker or a metal plate. Your appliance's model number tag may look similar to the sample model number tags shown here (model number highlighted in yellow):
Model has been saved to My Models. If you're not signed in, your lists are available on this device and will expire within 30 days.
Model has been saved to My Models.
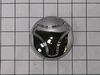
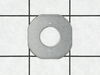
This part is known as a pulsator cap or washplate cap, and is designed for your LG washer. It fits over the washplate mounting bolt and prevents clothes from getting caught on the washplate during a w...
$44.83
In Stock
Order now and your part arrives in 2-3 business days!
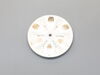
This is a pulsator assembly, also known as an agitator, for your washing machine. This pulsator sits at the bottom of your washer and is what is used as the main driving force to wash your clothes. Th...
$163.86
In Stock
Order now and your part arrives in 2-3 business days!
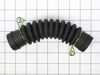
This is a drain hose assembly for top-load models of LG washing machines. This hose specifically is used to allow water to drain from the tub to the drain pump of the washer. This hose is made of plas...
$40.88
In Stock
Order now and your part arrives in 2-3 business days!
Upgrade your LG washing machine with this genuine top lid hinge. Specially designed to support the hinge and help cushion the lid when opening and closing, this high-quality component ensures the long...
$13.75
In Stock
Order now and your part arrives in 2-3 business days!
Introducing the customized screw designed exclusively for LG washers. Manufactured with safety and efficiency in mind, installation is straightforward when you adhere to correct safety regulations. Sh...
$20.67
In Stock
Order now and your part arrives in 2-3 business days!
This drain hose is a genuine OEM replacement part supplied by LG for use in their washing machines. It is a light gray pipe with a diameter of 1.25 inches. The drain hose is connected to the drain pum...
$44.04
In Stock
Order now and your part arrives in 2-3 business days!
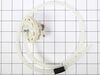
This water-level pressure switch in your wash monitors and regulates the water levels throughout the fill, wash, and rinse cycles. You will usually find it inside the control panel or near the tub. It...
$63.16
In Stock
Order now and your part arrives in 2-3 business days!
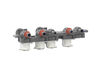
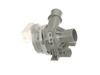
This inlet valve assembly in your washer controls the flow of hot and cold water into the machine, opening and closing as needed during the wash cycle to ensure the drum fills with water at the correc...
$135.68
In Stock
Order now and your part arrives in 2-3 business days!
Popped out the plastic "doors" that cover the metal actuators. Removed the metal actuators on both right and left sides of the door then unscrewed (3 screws each actuator) them from door frame. Slid the actuators out to enable the door to be removed. Unscrewed 2 screws on the top front of the washer which enabled me to angle the top of
... Read more the washer to expose the screws that hold the plastic hinges. Unscrewed the hinges (2 screws each) and replaced both of the hinges (I figured I'd do both of them now so I don't have to do it again for another 15 years). Put everything back together and all works like new.
Removed the center cover cap carefully on top of the agitator with a small screw driver. There are 3 (on mine) little slots around the edge of the bottom of the cap where it meets the agitator. Insert the small flat blade screwdriver and gently twist at each one till the cap pops loose and comes off.
There was a 10MM bolt under
... Read more the cap on mine that you need to remove. I used an cordless impact driver but you could use a socket wrench as well. Remove the bolt and the agitator comes off. May take a little wiggling or it may come right off.
The teeth on the agitator were wore all the way down and gone on mine so it came off easy and this was the issue I had why it was spinning freely. I took the small flat blade screwdriver and used the edge and corner of the blade to clean the teeth on the shaft where the agitator attaches and wiped it down before installing the new part as there was quite a bit of metal shavings from the damaged part.
I just reversed the order of removal to install the new part. Took about 15 min. I ran a rinse and spin cycle to remove any additional metal shavings and to check to see if it all worked properly. THATS IT! TOO EASY!
I found the pulsator just spun freely, I determined the hole on underside should ribbed to align with the ribbed shaft. But it was wore away. I purchased the new part and replacement was simple. It slide right on and I replaced the bolt. Pulsator works great, washing again.