Your coupon for will be reflected when you check out!
✖
Your coupon for
✖
Hello!
You're visiting the PartSelect site in U.S.
Would you like to shop on the Canadian site?
Stay on this site
Go to Canadian site
✖
Model Number Locations
1Select Category Type
Select Category Type
2Select Product Type
Select Product Type
3Select {MODEL} Type
Select {MODEL} Type
Sample Model Number Tags
Model numbers can be made up of numbers (1005400, for example) or a combination of letters and numbers (LAT1000AAE). The model number will most likely appear on either a paper sticker or a metal plate. Your appliance's model number tag may look similar to the sample model number tags shown here (model number highlighted in yellow):
Model has been saved to My Models. If you're not signed in, your lists are available on this device and will expire within 30 days.
Model has been saved to My Models.
This is a leveling leg for your oven, range, or stove. The leveling legs on your oven allow your appliance to sit perfectly flat. The new one may be longer in length than your original, but will work...
$21.89
In Stock
Order now and your part arrives in 2-3 business days!
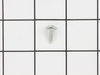
This is a multi-use and multi-appliance screw. It can be used on a microwave, refrigerator, range/oven, air conditioner, dehumidifier, washer, or dryer. The measurements of this screw are 8 x 1/2 inch...
$20.89
In Stock
Order now and your part arrives in 2-3 business days!
This is a replacement oven rack and it is designed for use with ranges and ovens. This is a genuine OEM replacement part. The rack provides a level and stable surface for cookware inside of your appli...
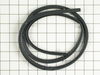
This door seal is used for ranges and ovens. The seal prevents hot air escaping from the oven to maintain a certain temperature when baking. The clips sticking out of the seal help secure it to the ra...
$50.23
In Stock
Order now and your part arrives in 2-3 business days!
This is a thermostat knob, but you may know it as a surface burner knob. It is a part for the stovetop on your range. It gives you the ability to control the heat levels of the surface burner, located...
$22.89
In Stock
Order now and your part arrives in 2-3 business days!
This is a surface burner knob for the stovetop on your range. it is 2 inches in diameter and only accepts a D-shaped shaft. The part snaps into place on the shaft of your unit and rotates to the diffe...
$22.89
In Stock
Order now and your part arrives in 2-3 business days!
The pilot stays lit all the time and, when the oven is turned on, the flame gets bigger and surrounds the thermocouple. When the thermocouple senses the required heat, the safety valve opens to let th...
$49.16
In Stock
Order now and your part arrives in 2-3 business days!
This set of four square chrome drip pans fits many gas ranges and cooktops. Each drip pan has sides measuring just over eight inches and a center hole diameter of three and a half inches.
$66.64
In Stock
Order now and your part arrives in 2-3 business days!
First I removed the oven door by pulling straight up off of the hinges in the open postion. Next remove oven racks,then use 1/4 nutdriver to remove back screws on inside oven bottom plate. Next remove gold nut on silver tube @ pilot connection,then remove 1/4 nuts that hold pilot assembly. Next open top of stove and remove small gold nu
... Read moret "with the thin wire from pilot"attached to the back left of oven control knob. Snake that nut and wire from the top of the stove down to the oven and removethe whole pilot assembly. To install carefully unroll the new pilot assembly starting from the oven "there are two round holes you need to snake the tube into"and up behind the back & into the stove top. Make your connection@ the oven assembly. Next attach the assembly with the 1/4 screws that you removed,then make your connection"gold screw silver tube" now push in your oven control knob to alllow gas to flow to the pilot tube and check for leaks with a water @ soap solution. No bubbles no leaks. Light your pilot . . . . You must hold in the oven knob. Put back in oven plate,,,, 1/4 screws,,,,racks close the stove top ,put door back on hinges and your done. . . . . Hope I helped,. . Pete
First I opened the door to the oven. Then I opened the box that the part came in. (knife) I then slid the oven rack out of the box and unwrapped the plastic, being careful not to bend or scratch the new rack. Now, this is the tricky part... I had to move the existing rack down one space to make room for the new one. Then carefully sl
... Read moreid the new rack in, tipping it slightly and sliding it in. LOL


 – Part Number: W11665456")


")

