


23LC Husqvarna - Overview
Models starting with 23LC
Click on the best match to narrow your results.
- 23LC (1993-05) Husqvarna Trimmer (Husqvarna String Trimmer Model 23LC/1993-05 (23LC/199305, 23LC/1993 05) Parts)
- 23LC (1991-04) Husqvarna Trimmer (Husqvarna String Trimmer Model 23LC/1991-04 (23LC/199104, 23LC/1991 04) Parts)
- 23LC (19931800001-Current) Husqvarna Edger (23 Lc (19931800001-Current))
- 23LC (19911400001-19931800000) Husqvarna Edger (23 Lc (19911400001-19931800000))
- 23LC (19931800001 & Above) Husqvarna Trimmer (String Trimmer)
- 23LCN (1991-04) Husqvarna Trimmer (Trimmer)
- 23LCN Husqvarna Trimmer (Husqvarna String Trimmer Model 23LCN Parts)
Keep searches simple, eg. "belt" or "pump".

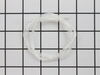
Trimmer Fuel Filter
PartSelect #: PS9285148
Manufacturer #: 530095646
This Genuine OEM fuel filter is designed to maintain the performance and longevity of your equipment by preventing dirt and debris from entering the carburetor. Located inside the fuel tank, this esse...
$5.95
In Stock

Chainsaw Fuel Line
PartSelect #: PS9472280
Manufacturer #: 530069247
This is the replacement fuel line 25 Inch for several OPE products that use small engines. The fuel line carries fuel from the tank to the carburetor. Over time, the fuel line can become badly clogged...
$9.93
Special Order

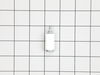
Chainsaw Fuel Cap w/Retainer
PartSelect #: PS9468748
Manufacturer #: 530014347
The Fuel Cap with retainer, often simply known just as the fuel cap, keeps fuel from splashing out of your tank and debris from entering it. Black in color, it is sold individually and made of plastic...
$9.17
Special Order

Chainsaw Gasket and Diaphragm Kit
PartSelect #: PS9472427
Manufacturer #: 530069844
This is a genuine manufacturer-sourced replacement gasket repair kit that is specially made for use with Paramount and Poulan lawn and garden equipment. It is utilized to replace carburetor gaskets an...
$22.40
Special Order

Trimmer Starter Spring
PartSelect #: PS9482319
Manufacturer #: 545008010
The Starter Spring is a metal spring used to restract the rope after you pull it to start the engine. Installation of this OEM part is rated as "Medium" difficulty and requires a screwdriver, nutdrive...
No Longer Available

Chainsaw Rope Retain Screw
PartSelect #: PS9469228
Manufacturer #: 530016080
This genuine replacement screw is a high-quality OEM part designed for use with Paramount and Poulan gas-powered lawn and garden equipment. It is specifically engineered to secure the starter rope wit...
$6.21
In Stock

Trimmer Check Valve
PartSelect #: PS9002985
Manufacturer #: 530026119
This check valve, also known as a one-way valve, is a genuine OEM part that regulates the flow of fuel/oil in the equipment engine to prevent it from flowing backwards. It is made of plastic and desig...
$6.22
In Stock


Engine Carburetor Rebuild Kit
PartSelect #: PS10048119
Manufacturer #: K10-WAT
This repair kit, also known as a carburetor rebuild kit, is sourced from the original manufacturer for use in small and outdoor power equipment. This kit includes a pump cover gasket, to prevent fuel ...
$35.23
In Stock

Trimmer Fuel Pump Diaphragm
PartSelect #: PS11811118
Manufacturer #: 504130807
This fuel pump diaphragm, also called a membrane or a gasket, is what helps pump fuel from the tank to the engine of your gas-powered lawn equipment. It is normally found attached to the carburetor as...
$34.85
In Stock

Common Symptoms of models starting with 23LC
[Viewing 2 of 2]Will Not Start
Fixed by
these parts
these parts
Show All
Engine stops after a few seconds or minutes
Fixed by
these parts
these parts
Show All


Keep searches simple. Use keywords, e.g. "leaking", "pump", "broken" or "fit".
Fuel line deterioration and carb overhaul
The machine was offered for free on FB marketplace. The person tried a rebuild of the carb, but could not figure out how to connect the fuel line, which feeds from the tank above the carb. I couldn’t either, so I went to a local parts dealer, who could not find a diameter the same size (it’s tiny). I assumed there may have been a fitting
... Read more
in the tank, but if so, it was absent. The only parts that were found in the tank: a large filter in a 3/4”piece of larger tubing and this tiny fuel line was inserted into the other end. The resulting arrangement was long enough to reach the hole in the tank.Since the machine looked spectacularly clean, I used these parts to make it run.
1. Using diagonal cutters, I cut a very sharply angled end on the small line.
2. I generously lubricated the new line and the hole in the tank. I then took angled end of the new line and inserted it into the hole. Using a screwing type motion , I slowly worked it into the tank, using generous amounts of lubricant, until the line was far enough into the tank to grab from the fill hole with needle nose pliers. I then pulled and twisted until the line came out of the top of the tank.
3. I cut the angled end square at this point. I then inserted the filter into the larger tubing the cut about an inch longer than the filter Barb.I then lubed the larger line and the smaller line and pulled the line back into the tank from the bottom until the filter laid flat on the bottom of the tank.
4. At this point, I cut the end of the small line so that about an inch protruded from the bottom of the tank. I then re-lubed that line and inserted into a well lubricated length of larger line of sufficient length to reach the inlet on the carb.
About the carb: the donor of the machine had apparently attempted a rebuild. While it was very clean, he assembled it incorrectly. The metering diaphragm was pinched and he left off two of the four screws which held it together. I disassembled it, and using the correct parts assembled in the correct order, (there are parts for multiple applications included in the kit), mounted it back to the machine, and after about six or eight pulls, it roared to life. I did not get into the jets etc, because they seemed to work. This Walbro carb only has one inlet and no purge bulb, and after adjusting the carb it starts on the third pull every time using the choke as it was designed to.
Read less
Parts Used:

-
Edward from FREDERICKSBRG, VA
-
Difficulty Level:A Bit Difficult
-
Total Repair Time:30 - 60 mins
-
Tools:Pliers, Screw drivers
8 of 9 people
found this instruction helpful.
Was this instruction helpful to you?
Thank you for voting!
part not same
Ordered on/off switch. My switch had only one wire terminal. Replacement had two. I ran a wire from one to a screw as a ground. Switch worked fine.
Parts Used:
-
Bruce from ALGOMA, WI
-
Difficulty Level:Easy
-
Total Repair Time:15 - 30 mins
4 of 18 people
found this instruction helpful.
Was this instruction helpful to you?
Thank you for voting!