


2146XLS Husqvarna - Overview
Models starting with 2146XLS
Click on the best match to narrow your results.
Keep searches simple, eg. "belt" or "pump".

Lawn Mower Flange Wheel Bearing
PartSelect #: PS9006914
Manufacturer #: 532009040
The OEM bearing, also known as the flange bearing, is silver, made of metal, and sold individually. It is used on riding mowers to secure the wheel in place and allow it to rotate freely on the shaft....
$9.18
In Stock

Lawn Mower Ring Clip
PartSelect #: PS9143890
Manufacturer #: 812000029
The Ring Klip Number T5304-75, also known simply as a ring clip, is an OEM part designed to secure your mower wheel to its axle.
This part is black, made of metal, and around an inch in length. It i...
$5.95
In Stock

Lawn Mower Hex Head Bolt
PartSelect #: PS9982804
Manufacturer #: 584953901
This part is the replacement washer head screw for your lawn tractor. It is black in color and is approximately an inch and a half in length. This self-threading screw is most commonly used for securi...
$3.99
In Stock

Lawn Mower Washer
PartSelect #: PS9008998
Manufacturer #: 532121749
This OEM washer, also known as a flat washer, has dimensions of 25/32 x 1-1/4. Silver in color and metal, the washer is sold individually. Although this part can have a range of applications depending...
$3.99
On Order

Lawn Mower Axle Hub Cap
PartSelect #: PS9007667
Manufacturer #: 532104757
This genuine black cap axle, also sometimes known as the dust cap, is around 2 inches in diamater and sold individually. Comprised of plastic, it is designed to keep debris out of the hub and axle of ...
$5.95
In Stock

Lawn Mower Blade Bolt and Washer Assembly
PartSelect #: PS9020856
Manufacturer #: 532193003
This manufacturer-approved bolt and washer assembly is for lawn tractors.
Wear work gloves to protect your hands when installing this part.
$9.62
In Stock


Lawn Mower V-Groove Idler Pulley
PartSelect #: PS9016377
Manufacturer #: 532194326
This ground drive fixed idler pulley is for lawn tractors.
910 inch offset
Ground drive fixed idler pulley helps apply tension to the drive belt, allowing the belt to turn.
Wear work gloves to...
$21.22
In Stock


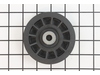
Lawn Mower Flat Idler Pulley
PartSelect #: PS9016399
Manufacturer #: 532194327
This flat idler pulley is a genuine OEM replacement part for use in outdoor power equipment. It is made of plastic and features a metal bore adapter, and a radial-style single row bearing. The pulley ...
$19.09
In Stock


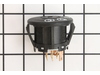
Lawn Mower Ignition Switch
PartSelect #: PS9020864
Manufacturer #: 532193350
This ignition switch is an OEM replacement part found near the steering wheel or dashboard in lawn tractors and riding mowers. The switch has four symbols on the top side which indicate its various fu...
$24.40
In Stock
Common Symptoms of models starting with 2146XLS
[Viewing 2 of 2]Drive system does not work
Fixed by
these parts
these parts

Show All
Will Not Start
Fixed by
these parts
these parts
Show All

Keep searches simple. Use keywords, e.g. "leaking", "pump", "broken" or "fit".
Wheel bushings were bad
Removed old clip removed rim from tractor, removed grease fitting on rim, took hammer and screw driver knocked out old bushing turned rim over knocked out other bushing. Press in new bushings reinstalled grease fitting slide tire back on tractor, put retaining washers on then locking clip put on dust cover grease at grease fitting. Repeat
... Read more
other side.
Read less
Parts Used:
-
Anthony from OLIVEHILL, TN
-
Difficulty Level:Easy
-
Total Repair Time:15 - 30 mins
-
Tools:Pliers, Screw drivers
22 of 36 people
found this instruction helpful.
Was this instruction helpful to you?
Thank you for voting!
Drive belt came off from transaxle pulley, noticed in bad shape, ordered new one form parts select.
The drive belt literally goes from the back of the tractor to the front. The mower must be removed, helps to have the tractor up on blocks to give adequate room for work on underside. Belt goes easiest on the engine first, then thread to the rear, install on the rear, (driven pulley) then on the idlers. Check to assure that it function
... Read more
s properly before re-installing the mower. If you have the owners manual, there is a diagram, (check your orientation, it is not clear if it is a birdseye or under tractor view) which offered some help. When replacing belt, check the transaxle front mount, mine was broken which is why the belt came off in the first place. Repairing the mount was quite a job in itself, but now works fine.
Read less
Parts Used:
-
Lynn from BOILING SPGS, PA
-
Difficulty Level:A Bit Difficult
-
Total Repair Time:30 - 60 mins
-
Tools:Socket set
20 of 32 people
found this instruction helpful.
Was this instruction helpful to you?
Thank you for voting!
Husqvartna LGT-48DXL transmission drive belt was worn out
ALL VIDEOS and the official Husqvarna instructions will tell you that you MUST remove both the mowing deck and the entire clutch pulley assembly to switch the transmission drive belt. This is NOT true. It takes some effort and tight maneuvering, but this job can be done relatively quickly without removing either. You do NOT have to rem
... Read more
ove the mowing deck! You do NOT have to remove the clutch pulley assembly! What I did was to stand the tractor up nearly vertical, resting it against a golf cart I have and tying it in place for safety. Then, you have to loosen two black belt guides right by the clutch pulley assembly. I did NOT remove them, just left them hanging loose. Next, there is a silver bar that comes in from the outside of the mower chassis and attaches directly to the clutch, remove this entirely. Next, there is an electrical cord assembly in the way, trace this back, find where it plugs in, and unplug it. Next, in order to be able to slide the belt fully over the clutch pulley assembly, you have to take the mower deck belt off of JUST THE ONE spindle closest. I tie wrapped it in place after getting it off the spindle so that I could easily put it back onto the spindle as the last step when done. Once the mowing deck belt is off the closest spindle, you can then slide the drive belt completely over the clutch pulley assembly. You can then easily remove the entire drive belt, taking note (I took pictures) of how it is routed. Then, just reverse all of this. I began by fitting the drive belt over the clutch pulley assembly to make sure that end was correct. I then put the previously mentioned two guides, silver bar, and electrical cord back in place. Next, I shoved the belt down where it goes, working it down towards the transmission and routing it correctly. Of course, it is a little difficult with the limited space available, but I would rather do that then needlessly take the entire mowing deck off. You finally have to CAREFULLY slide it over the PLASTIC fan blades on the transmission. Once past those, it slides easily in place. The last step is to put the mowing deck belt that you previously removed and tie wrapped in place back onto the spindle. That's it! Only takes about 30-45 min. done this way.
Read less
Parts Used:

-
Daniel from WYTHEVILLE, VA
-
Difficulty Level:A Bit Difficult
-
Total Repair Time:30 - 60 mins
-
Tools:Pliers, Screw drivers, Socket set, Wrench (Adjustable)
4 of 4 people
found this instruction helpful.
Was this instruction helpful to you?
Thank you for voting!