


1416 Range - Overview
Models starting with 1416
Click on the best match to narrow your results.
Keep searches simple, eg. "belt" or "pump".

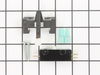
Range Surface Burner Element Switch 8
PartSelect #: PS11740783
Manufacturer #: WP3149400
This surface burner element switch is for an 8-inch surface burner on an oven, stove, or range. The element switch controls the heat of the surface burner. Disconnect power to your range before comple...
$54.00
In Stock

Washer Lid Switch
PartSelect #: PS11723153
Manufacturer #: W10820036
This 3 prong lid switch is used for washing machines that do not have a tub light.
$20.95
In Stock

Range Hex Nut
PartSelect #: PS11738304
Manufacturer #: WP112432
This 10-32-inch hex nut works with multiple appliances in your home as a fastener. This specific model is sold individually. Hex nuts usually have 6 even sides and together they are used with bolts an...
$7.95
In Stock

Blower Belt
PartSelect #: PS11743766
Manufacturer #: WP691371
This part rotates the blower fan wheel
$50.37
In Stock

 – Part Number: 299761")
SERVICE MOTOR-60 CYCLE (PRODUCTION MOTORS 296086, 295976 OR 295977)
PartSelect #: PS334960
Manufacturer #: 299761
No Longer Available
Exact Part matches for your search term
[Viewing 3 of 3]
Lockwasher 1/4
This part number matches the current model number 1416
PartSelect #: PS8863629
Manufacturer #: 1416
No Longer Available
Bushing
This part number matches the current model number 1416
PartSelect #: PS9487862
Manufacturer #: 1416
No Longer Available
Bushing
This part number matches the current model number 1416
PartSelect #: PS12425254
Manufacturer #: 1416
No Longer Available
Common Symptoms of models starting with 1416
[Viewing 8 of 8]Element will not heat
Fixed by
these parts
these parts
Show All
Will Not Start
Fixed by
these parts
these parts
Show All
Will not drain
Fixed by
these parts
these parts
Show All
Oven is too hot
Fixed by
these parts
these parts
Show All
Will not agitate
Fixed by
these parts
these parts
Show All
Won’t Start
Fixed by
these parts
these parts
Show All
Will not program
Fixed by
these parts
these parts
Show All
Oven not heating evenly
Fixed by
these parts
these parts
Show All


Keep searches simple. Use keywords, e.g. "leaking", "pump", "broken" or "fit".
the element did not turn compleatly off, the on light stayed on.
removed the screws holding the back metal panel, this exposed the wires to the switch. tested the wires to find that they were live when the switch was in the off position. ordered a new switch. UNPLUGED THE STOVE. removed the knob on the front of the stove. this exposed 2 screws, removed screws and the switch came away from the stove. re
... Read more
moved each wire from the old switch and replaced them in the same position on the new switch. inserted new switch into the stove and attached the 2 screws. replaced back panel and pluged in stove. all tested well
Read less
Parts Used:

-
chaz from fairplay, CO
-
Difficulty Level:Easy
-
Total Repair Time:15 - 30 mins
-
Tools:Screw drivers
85 of 104 people
found this instruction helpful.
Was this instruction helpful to you?
Thank you for voting!
Burner would go high without warning
We felt the only possible problem could be the switch assembly. I removed the switch panel, removed the wires from the old switch, one at a time, removed the old switch assembly and installed the new switch assembly. The extended stem did have to be snapped off (per your instructions) and that too was a very simple task.
Parts Used:
-
John from Clinton, CT
-
Difficulty Level:Easy
-
Total Repair Time:15 - 30 mins
-
Tools:Pliers, Screw drivers
57 of 60 people
found this instruction helpful.
Was this instruction helpful to you?
Thank you for voting!
Left front burner would not adjust heat downward
Pull unit away from wall.
Unplug power
remove topmost four screws from rear metal cover
Pull knob off switch shaft.
Remove two screws holding switch to panel.
Break off shaft of new switch to correct length.
Remove each wire from old switch and attach to Corresponding lug on new switch.
Reattach the new ... Read more switch to the panel and reverse the first four instructions.
Read less
Parts Used:
-
ALTON from ROUND ROCK, TX
-
Difficulty Level:Easy
-
Total Repair Time:15 - 30 mins
-
Tools:Screw drivers
35 of 40 people
found this instruction helpful.
Was this instruction helpful to you?
Thank you for voting!