


1413 - Overview
Models starting with 1413
Click on the best match to narrow your results.
- 1413 Bissell Canister Vacuum (Bissell Vacuum Cleaner Model 1413 Parts)
- 1413*0A Roper Range (Ranges, Electric*)
- 1413*1A Roper Range (Range (gas)*)
- 1413^0A Whirlpool Range
- 1413^1A Whirlpool Range
- 141300 Briggs and Stratton Engine (Engine)
- 141300SERIES Briggs and Stratton Engine (Engine)
- 1413W0A Roper Range (Electric)
- 1413W1A Roper Range
Keep searches simple, eg. "belt" or "pump".

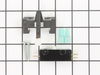
Washer Lid Switch
PartSelect #: PS11723153
Manufacturer #: W10820036
This 3 prong lid switch is used for washing machines that do not have a tub light.
$20.95
In Stock

Dishrack
PartSelect #: PS12348079
Manufacturer #: W11169039
The gray upper dishrack kit is a replacement for select dishwasher models. It securely holds dishes, cups, and utensils during the wash cycle. This kit does not come pre-assembled, so some parts from ...
$141.06
In Stock

Range Hex Nut
PartSelect #: PS11738304
Manufacturer #: WP112432
This 10-32-inch hex nut works with multiple appliances in your home as a fastener. This specific model is sold individually. Hex nuts usually have 6 even sides and together they are used with bolts an...
$7.95
In Stock

Engine Oil Seal
PartSelect #: PS9277860
Manufacturer #: 391086S
The Oil Seal is a manufacturer-approved rubber part which provides a seal between the crankcase and crankshaft by attaching around the axle shaft on the crankhouse housing. Installation is rated as "M...
$6.59
In Stock

Spring-Rewind Str
PartSelect #: PS8978476
Manufacturer #: 490179
This rewind starter spring or as it is also known, recoil spring, rewinds the pull robe back into the starter housing of your engine. The spring is made of metal, silver colored, and sold individually...
No Longer Available

Engine Starter Pulley
PartSelect #: PS8942071
Manufacturer #: 295871
Introducing the Briggs and Stratton Starter Pulley, a vital component for your appliance repair needs. Crafted with quality and precision, this pulley plays a significant role in your engine's start-u...
$15.80
In Stock

Engine Starter Clutch
PartSelect #: PS8968281
Manufacturer #: 399671
Discover the power of optimal engine performance with the Briggs and Stratton Starter Clutch. A vital piece of your garden equipment's engine, this starter clutch engages your machine's flywheel while...
$37.32
In Stock

Broil Element
PartSelect #: PS340509
Manufacturer #: 326795
This is a five-loop broil element for an oven, range, or stove. It is approximately 11-3/4 inches wide and 18-5/8 inches long with approximately 11-3/4 inches between terminal connections. It features...
No Longer Available

Fuel Line
PartSelect #: PS9140673
Manufacturer #: 791745
This fuel line is compatible with several different makes and models of small engine equipment and is sold as an individual part. Equipped with the securing clamp, this rubber fuel line is used to tra...
$11.29
Special Order


Exact Part matches for your search term
[Viewing 6 of 6]
PAELLA PAN
This part number matches the current model number 1413
PartSelect #: PS3434632
Manufacturer #: 1413
No Longer Available
3/8-24 Hex Nylock Nut
This part number matches the current model number 1413
PartSelect #: PS9262443
Manufacturer #: 1413
No Longer Available
Strn Rlf
This part number matches the current model number 1413
PartSelect #: PS9892466
Manufacturer #: 1413
No Longer Available
Suggested Replacement Engine
This part number matches the current model number 1413
PartSelect #: PS11814423
Manufacturer #: 1413
No Longer Available
Hinge
This part number matches the current model number 1413
PartSelect #: PS12185115
Manufacturer #: 1413
No Longer Available
HUMPHREY VALVE
This part number matches the current model number 1413
PartSelect #: PS12400456
Manufacturer #: 1413
$60.60
Special Order
Common Symptoms of models starting with 1413
[Viewing 4 of 4]Will Not Start
Fixed by
these parts
these parts
Show All
Will not drain
Fixed by
these parts
these parts
Show All
Will not agitate
Fixed by
these parts
these parts
Show All
Won’t Start
Fixed by
these parts
these parts
Show All


Keep searches simple. Use keywords, e.g. "leaking", "pump", "broken" or "fit".
Lid closes, switch wouldn't turn on machine.
Used toothpick for a year to push switch acctuator far enough to engage switch. Broke my foot and found time to order part thru PartSelect. Went from cast to boot and received part 2 days after ordered. Had difficulty with foot and getting to switch. Went back into PartSelect and figured out how to dis-assemmble panels thru the diagrams.
... Read more
Time on my job doesn't, just that their service and expertise that is available to everyone is there to use. Broken bones or not, I will always get my parts and advice from PartSelect. Thanks to PartSelect.
Read less
Parts Used:
-
Kenneth from Wilmington, IL
-
Difficulty Level:Easy
-
Total Repair Time:1- 2 hours
-
Tools:Nutdriver, Screw drivers, Socket set
31 of 47 people
found this instruction helpful.
Was this instruction helpful to you?
Thank you for voting!
Washer would fill up, wash, then stop
I deduced the lid switch was the problem.
I removed the two screws holding the control panel on. Pulled the control panel back.
Disconnected the ground wire of the lid switch.
removed the two top clamps that hold the panel to the top of the machine.
Pulled back the casing (outside of the washer) and placed ... Read more it on it's side on the floor. Here I could reach the switch. Removed old, installed new and reversed the process.
The part that gave me the biggest problem was setting the casing back on to the frame. You have to slide the front part in at the bottome, then lean back the rest of it.
Read less
Parts Used:
-
Glen from Plano, TX
-
Difficulty Level:A Bit Difficult
-
Total Repair Time:30 - 60 mins
-
Tools:Screw drivers
22 of 31 people
found this instruction helpful.
Was this instruction helpful to you?
Thank you for voting!
One day, I found my dryer continued running after I opened the door. And next day, it stopped working at all. I thought it was time to buy a new one, since my dryer had been used for more than 15 years. But I was curious to know what went wrong, and recalled my friend told me he repaired the door
My daughter found the video on youtube, which showed step by step repairing procedures. I just followed it and fixed my dryer in 15 min.
Parts Used:
-
Xiaobin from Cordova, TN
-
Difficulty Level:Really Easy
-
Total Repair Time:Less than 15 mins
-
Tools:Screw drivers, Wrench set
17 of 21 people
found this instruction helpful.
Was this instruction helpful to you?
Thank you for voting!